Monday, October 11, 2010

Wow! Post #100! My baby's not a baby anymore!

I'm so excited, y'all! I know, it's a little thing, but this is post #100 for Layniefingers, AND I've finally reached 100 followers through GFC! How awesome is that?

I'm absolutely giddy. I had no idea people would be interested in this. I thought the market was saturated, and I would basically be keeping track of the nail designs I did for myself. I didn't think I'd be showcasing polish collections or actually having readers! So for everyone reading this, know that I think you're fabulous just for stopping by and bringing a bit of sunshine into my life. I couldn't be happier!

So, back to the bloggy goodness. I was wandering through WalMart the other night and decided to take a detour through cosmetics. Of course, the first thing I looked at was the Hard Candy section. I have some serious love for Hard Candy! I think it's the packaging. It's so cute and funky, it just screams out to come home with me! But I digress...

This time, I was surprised by a display of new goodies. An entire endcap of Hard Candy new stuff! I didn't know what to look at first, but I found myself drawn to their new temporary tattoos. Does anyone remember the uber-cute limited edition Chanel tattoos that were out just recently? They were so adorable, but there was NO WAY I could spend $75 on a box of temporary tattoos. Sorry, boys and girls, but mama's just too frugal for that one. Still, I was so, so drawn to them. The idea of temporary tattoo jewelry was too fun!

Well, now you can duplicate that look for about $70 less! Choose from blossoms and branches or hearts and crowns. You can have that Chanel look without emptying your wallet!

There's 3 sheets of tattoos with chain parts in single links, multiple straight links, or gracefully curving links, allowing you to arrange it however you like on your skin. Then there are 3 sheets of tattoo pendants, either crowns and hearts or sparrows and branches with cherry blossoms on them.

Personally, I find I'm drawn to the blossoms. I think there's a graceful flow to them that seems somehow peaceful to me. I really like them!

But if temporary tattoos aren't your thing, you can try their new nail polishes instead! Hard Candy has introduced three new shades to their permanent line up, and they are absolutely lovely!
They've also brought back a  wonderful shade from the old line, so if you missed Sky the first time around, this is a great time to go pick it up. This gorgeous pastel blue is so icy and gorgeous.

I have to admit, though...I am seriously lemming for Beetle. Look at how it seems to shimmer through different colors! I may have to break my no-buy for this one!

And as if that weren't enough, there are also three fantastic new limited edition polishes out just in time for Halloween! Mischief is a wonderful bright orange in a sheer black dark green (Thanks, Scandalous!) base. It's so sparkly that you know the inner magpie in me was crying to get out! Zombie is a luscious pink and purple, and Wicked is silver in a black base. These are so, so perfect for Halloween! They're also great for any other time of year, who am I kidding!

The best part of all is that each of these is only $5 at your local WalMart. I would suggest heading to the web page to order if your local store was out of stock, but after looking at it, it's... slightly strange. The polishes aren't listed by name! Instead, someone has described them by color- white glitter, rose glitter, red-orange. Who can tell what you're getting like that? Weird! Oh well...

I'm telling you, this no-buy gets harder by the day!

Images from the Hard Candy Facebook page.

Sunday, October 10, 2010

I am one exhausted fashionista...

I'm so very very sorry. I was actually planning to post tonight. But after spending the entire day with my 9-year-old nephew and my 6-year-old niece, I am exhausted. My fibromyalgia is fibroing, my brain is fuzzy, and I am pooped. We spent the afternoon playing Pokemon, then went to dinner at Cracker Barrel. After eating, my niece and I went wandering through the shop, looking at dollhouses and glowing glitter batons, at dresses and hats and halloween costumes. As we were flipping through one particularly rack, she said to me...

"Wow, Aunt Laynie, this is SO FUN! It's like we're fashionistas out shopping for the day!"

I couldn't have summed up better myself. We now have a date next weekend to spend the day doing our nails together, doing each other's makeup. I realize now that this is a very special thing, and I'm very much looking forward to it. I'll be konading her nails and taking pictures of them for the blog. I cannot wait. :D

Saturday, October 9, 2010

GOSH Black Passion (and a request!)

I love autumn. I get absolutely giddy every year when the weather cools down and I get to start wearing my long-sleeved tops with my kitty shoes. This year has turned cool earlier than usual, and I'm not complaining at all! I am, however, finding myself turning to deep colors for my nails. It's time to pull out my GOSH Black Passion!

This is a deep charcoal polish with silver shimmer. I love it even more than usual because this gift (along with my other GOSH polishes) was sent to me by a lovely friend in the UK. Every time I see those bottles, I'm reminded of how surprised I was to see the package she'd sent me. A little unexpected kindness will turn me into a silly mess of thankfullness every time!

Black Passion is actually less black and more of a graphite color,  complete with silvery shimmer inside. It's absolutely lovely, and a bit easier to wear than straight-up black. I found it kind of hard to apply- it's a very dense, pigmented polish but it tended to have a lot of drag, so I ended up needing two coats just to even everything out. Still, two coats is nothing to complain about, especially when you end up with such a lovely result!

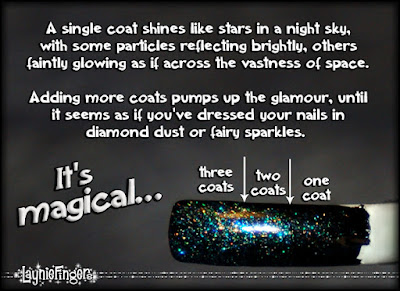
Also, I had a request the other day from Deez Nailz, who was curious to see what Love My Nails Dazzling looks like over black. She was thinking it would look stunning over black, and she was right!


I mean, really... do you see the crazy sparkle on that nail tip? I also tried something simple- I did a gradient with the sparkles, so that it went from pure black at the base to sparkle mania at the top. All I did was paint the glitter on from different parts of the nail for each coat!


I think it's a bit easier to see the lines since I put the arrows on. Also, to cut down on the lumpy look, I did the first coat on just the tip of the nail, the second on half, and the third coat covering three quarters of the nail. Somehow that makes it seem more gradient and less striped. A coat of topcoat and it looks magical!


What can I say, I think everyone should have at least one bottle of this topcoat. It can turn any polish from drab to glam! So tell me, what do you think of this topcoat? What color would you put it over?

Thursday, October 7, 2010

Cleaning Up My Manicure- A Look At My Nail Brushes

A few posts back (or maybe more than a few, I'm not so good with time) someone asked in the comments what sort of brushes I use to clean up my manicure. In a totally separate conversation, a friend of mine mentioned that she thought I was just super-talented at painting my nails and managed not to make a total mess at it. That's so not true... so much so that I had to laugh!

See, I've had a tremor since I was in my teens. I could never be a neurosurgeon, else my patients would end up blinded, paralyzed, or missing chunks of their anatomy! As it is, I've managed to cut off part of my finger using a craft knife. (Don't worry, it was a tiny part and I barely miss it. But if you ever look closely at my left hand index finger, you'll notice it's got a slanted edge on one side. That's because I lost that part in a nasty art school incident. But I digress...)

So how do I end up with nails that look neat and skillfully-painted? Easy. I cheat. I use a technique that I first read about on Lacquerized: I use a paint brush and pure acetone to remove the polish from everywhere that should be polish-free! For the actual how-to, I really suggest you go read her description of the process. I simply cannot explain the process any better than she does, or even add anything new or fun to it. But finish reading my entry before you go, if you don't mind. :D

The question is, what sort of brush do I use? I still haven't completely decided what sort of brush to use. Mostly, I flip-flop between two main brushes. Thankfully, since I'm a painter I have an absolute ton of paintbrushes on hand. Let's look at what I've been using...


I started out using this tiny little brush. It came from a multi-pack of brushes from WalMart's craft department. (I think it was $3 or $4 for a pack of five brushes, maybe?) Although this was a very inexpensive brush, it works really well. It would also be a good brush to use for cream or gel eyeliners. What I love about this brush is that it's got such a sharp, chiseled edge. This means I can get right into the crevices on the sides of my nails where polish tends to pool, or I can turn the brush sideways to sweep off larger blobs of polish from other parts of my finger.

 The synthetic bristles hold their shape well and so far haven't seemed to be degrading from the acetone. The biggest drawback of this brush is that it simply doesn't hold much acetone, so I end up dipping back into the liquid over and over and over and over again. It gets tedious. So for preliminary cleanup (or when I'm feeling particularly lazy) I switch over to my larger cleanup brush.


You can see that this brush is much larger than the first one. I can sweep off much more polish with this one before needing to redip it. Unfortunately, since it holds more acetone it also tends to flood my nail with it if I'm not careful. (It's always something, isn't it? Sheesh, my diamond shoes are too tight and all this money in my purse makes my bag too heavy!) To avoid the acetone flooding into my nail creases, I simply tap the tip of the brush onto my towel before I touch it to my finger. Problem solved!

One thing to be careful with: acetone is a really potent solvent. It removes nail polish, right? Well, it will also remove the paint from your paintbrushes, so be very careful not to dip your brush too far into your acetone. If you aren't careful, you'll end up with paintbrush paint all over your fingers. It's not a pretty look, trust me!

I have one more brush that I use for nail art, and it's one I customized myself. I may have mentioned this before, but I am VERY frugal. (Frugal sounds so much nicer than cheap or poor.) I wanted to have a fine brush that was long enough to make straight lines easier to paint and fine enough to make those lines thin. I had several liner brushes, but they were all entirely too large. So, one day I pulled out my scissors and gave my brush a haircut.


Now the brush does exactly what I wanted it to do, even if it is ugly as can be. One day I may end up with actual nail art brushes, but until then these do the job nicely. I'm even getting faster with cleaning up my polish... when I first started this technique, I'd spend a good hour going over the various parts of my nails and still not have a very good result. Now I get a pretty nice result after around half an hour (unless I'm wearing red- red is EVIL to clean up!), and I know people who manage to do their cleanup in around 10 minutes!

So, do you think you'll try this method? I honestly cannot say enough good things about it. How do you currently clean up your edges?

Wednesday, October 6, 2010

Doesn't Everyone Want A Happy Ending? Sinful Colors Can Help!

As much as I hate to admit it, I love fairy tales. I love the idea of finding your handsome prince and living happily ever after. Life doesn't always cooperate with that, but Sinful Colors has at least finally given me my Happy Ending. It's a bright beautiful green with warm golden shimmer inside. I'm not exactly sure that this color works with my skin tone, but it was fun to work with!

Happy Ending applied beautifully, although it was fairly sheer. Because of the sheerness, it doesn't work all that well for stamping or for nail art. Unfortunately, it looks like a green tint for those purposes. Hmm... this makes me want to try layering it over other colors...

Now, I have to be honest for a few moments. The idea of happily ever after isn't exactly what everyone thinks of when they hear the phrase Happy Ending. In fact, when I told my friend Din about this, it sparked a conversation about what color a happy ending would be, and why they chose this particular shade of green to name Happy Ending. We even decided that if someone's happy ending was this particular shade of green, they might want to see a doctor about it.

What can I say, we're a bit twisted. :D

This polish is one of the bottles I got in my birthday haul, back in August when Sinful Colors polishes were $1 each. That was such a happy shopping spree! That means this bottle of polish (along with several others) has been sitting in my untrieds box since early August. And to think, when I started I only had a handful of polishes! This hobby reminds me very much of Pokémon- I very much feel like I gotta catch 'em all! Ah well...

So overall, I'm not sure this is a polish I'd want to wear again, or one that I think is flattering with my skin tone. It's a beautiful green, though, for people who love greens.

What's your opinion on green polishes? Do you love green, or think it's a color best left to plant life? Tell me about it in the comments!

Bottle image taken from the Sinful Colors website.

Tuesday, October 5, 2010

Tiger Stripes- They're Fun When You Throw In A Gradient!

Let's be honest- animal prints are fun. They're especially fun for nail art, but they can seem a bit flat-looking sometimes. I decided I was going to try to do a tiger print with a bit of depth to it!

I started out with my standard base coat, then two coats of Love My Nails Hot Tamale. This is a gorgeous orange that's absolutely loaded with shimmer. I wanted a bit more, though, so I mixed it with a bit of white polish. Oddly enough, it turned pink! I wish I'd gotten pictures of that stage, but I wasn't thinking. Instead, I added some Sinful Colors Let's Meet (Yellow) to warm that pink up to a pale orange again.

Once I had a pale orange I was happy with, I sponged it lightly over the center high part of my nails. It ended up being a sort-of blended pale stripe down the centers. It still seemed too white/pink for me, so I ended up painting a coat of Let's Meet over my nails to make everything work together. At this point, it was late and I seriously needed sleep, so I added a coat of Seche Vite and let it dry for a bit, then went to sleep.

The next morning, I had to go run some errands, and didn't realize until I was already out of the house that I had odd nails that I hadn't even cleaned up edges on! Thankfully, I don't think anyone noticed. If they did, they probably thought I was insane! My nails looked weird! But that's ok... if they got a giggle, then maybe their day got a little brighter. I'm ok with that!

So, once I got home, I pulled out my Sally Hansen Nail Art pens, choosing the black for the tiger stripes. It was a simple matter to draw on stripes, and my biggest challenge was not drawing too many stripes! I added another coat of Seche Vite, then looked at them. They were pretty, but something was missing...

My basic rule of thumb is this: when in doubt, add glitter! In this case, it worked splendidly! Instead of brushing glitter over the entire nail, though, I wanted to enhance the light parts of the nail. I ended up using a very thin nail art brush to paint the glitter polish onto the appropriate areas.

Sounds fiddly, doesn't it? Oh yea. You could say that. First I painted on a layer of Love My Nails Dazzling (my go-to glitter of choice). It was pretty, but it wasn't enough. So, I pulled out my Sinful Colors Call You Later. This stuff is seriously gorgeous, a mix of gold and copper glitters in multiple sizes that absolutely sings on the nail. It turned out to be the absolute perfect addition, and once I was finished with the glitters I couldn't help but smile.
 
Once I got those applied I added one more coat of Seche Vite. (I hope you aren't counting, but basically, that's a lot.) Believe it or not, it dried fairly quickly and was super smooth even with all the glitter. I did a quick cleanup with my acetone & paintbrush and then I wasn't ashamed to leave the house anymore!

Even my husband seemed amused by this manicure. I showed him my nails and he said, "Awww, you're a kitty!" It made me smile.
Normally he just sort of shrugs and says, "Ew, stinky." To get a positive reaction makes me happy!

So tell me, what do you think about animal prints. Do you like them? Do you love them even more in rainbow colors? Are you a purist who thinks animal prints belong only on the animals who wear them? Tell me all about it in the comments!

Sally Hansen Nail Art Pen was provided by the company for evaluation.

Monday, October 4, 2010

Andrea Fulerton Nail Boutique- Everything You Need For A Fun Manicure At Home!

I'm strongly tempted to call this week, "Why Don't I Live In The UK Week" because of all the fantastic UK products I've been finding out about! Living in the US definitely has its advantages, but I'm just not finding goodies like these over here! If you're wondering what I'm babbling about this time, don't worry. You aren't alone...

I've just been struck with a severe case of blabbosity by the insane cuteness of the Andrea Fulerton Nail Boutique line. I saw a tweet by @AndreaFulerton stating that her new Nail Boutique was live on Superdrug.com, and I was curious. She's a celebrity nail technician with a heck of a resume, if you're wondering, and she has created quite a collection! This collection is clearly made by people who love nail art, for people who love nail art!

Let's take the polishes, for example. The Superdrug description says it best:
A treasure trove of colour. Be spoilt for choice with 24 professional finish Nail Colours that have a unique resin system formula that flexes with your nail and is easy to apply in just one coat. Keep your options open with the Trio Colour Layering System – a double ended varnish bottle of two colours that can be worn alone or layered creating a 3rd colour or effect, or try the re-worked French Manicure Sets with ultra slender brushes for effortless tip application or the experimental Flip Flop French with its especially angled brush and French tip stickers to make the French tip application easy. And finally, Peel Off Varnish is fast and fun with four shades to choose from.
Not only are there lots of choices, she's also got a range of colors that is wonderful for a new line. She didn't stick to safe pinks and reds. She's got a rainbow of colors that combine with her layering polishes to make an overwhelmingly exciting range! I so want to get my hands on these!

Then there are the nail art goodies, and you know that's what has me giddy! Stripe and Sparkles has a nail polish with a thin striper brush on one end and a glitter shaker on the other end. The Glitter Puff Dust and Overcoat comes with two colors of glitter in squeeze bottles plus their own topcoat. Then there are the crystal gemstones and nail tattoos. Finally, there are the finishing topcoats, from a simple quick-drying glossy topcoat to various special effects options. There's also something that I think might work as a "gradient liquid," although I'd have to test it to be sure.

And as if that's not enough, there's more. (I know, I know, I sound like I'm doing a cheesy infomercial. But wait, there's more... you also get this slicer/dicer/shredder/spooler/dishwasher attachment FOR FREE!!! What can I say, I think I need a nap... but back to the goodies!)

Where was I? Yes... there's also a line of tools that looks fabulous.  Files, buffers, cuticle pushers and trimmers, varnish remover, cuticle oil... Honestly, I'm wishing I could hop on a plane and go buy the entire line!

So do me a favor, lovely readers of mine. If you happen to be out and about and nab some of these luscious goodies, take pictures. Tease me with photos of all the wonderful things you can do with these, and maybe I can get some vicarious joy through you! ♥♥