Thursday, October 14, 2010

Dressing Up GOSH Black Passion: Decals

Whew! It's been a while since I wrote about my nails! Sorry about that, I've just been so excited by all the Halloween goodies out there! But I haven't forgotten about my nails...

Last time I wrote about my nails, I'd polished them with GOSH's Black Passion, a simply gorgeous charcoal shimmer. However, if you know me, you know I couldn't leave that alone for long. I wasn't sure what I wanted to do with it, though, so I spent a few minutes digging through my nail art box. Sure enough, I came up with the perfect accent- a set of nail decals that were sent to me by Viva la Nails!

I wanted something simple, something with a bit of color, and something that would show up well against the dark polish. These decals definitely did the rick. They're a set of white hearts and stars that are accented by a rainbow of tiny rhinestones. They also have a variety of sizes so that you're not stuck trying to put a giant sticker on your pinkie nail or a teeny tiny sticker on your thumb. I love that!

Are these adorable or what? Seriously, I absolutely love these! The only problem I ran into is that I'm not terribly good at placing them, so they sort of... well... let's just say I had to work at getting them where I wanted them. I'm pretty sure I'll get better at that with practice, though, so don't let that stop you from getting these.

I also love that these don't all swoop in the same direction, so that you can have both hands look right. I know I'm strange, but that sort of thing can drive me BATTY!

There's one thing I'm unsure of, though. I always feel as if my decals don't look quite right. I don't know if I'm doing something wrong, but when I see decals on other people's nails I love them. Do you guys think there's anything I could do differently to improve this look?

Ah well... I shouldn't complain. I still think this is cute as can be, and you should know by now that I'm a total sucker for cute! This mani is fun and simple, and I wore the heck out of it!

Now, the question becomes this: what else could I do to change up Black Passion? Stay tuned, and tomorrow I'll show you a look that even surprised me!


Decals were provided by Viva la Nails for evaluation.

Tuesday, October 12, 2010

I hab a code. *sneeze*

Ugh, what a day. I seem to have picked up a bug along the way during the week, because I woke up in the middle of the night feeling as if I'd been overwhlmed by a group of small children screeching at the tops of their lungs while bearing sacks of Pokemon cards. Oh wait, that actually happened.

In all seriousness, though, I do seem to have a cold, so bear with me if my posts are sporadic or somewhat disjointed the next few days. I'm trying to post while all hopped up on Nyquil, and as I'm sure you can imagine, that's not the easiest thing in the world to do. (Note the lovely and accurate artist's self-portrait. Yes, I do look like Rudolf the rednosed raindeer, with an unfortunate butt-cut and glasses. It's not pretty. Be glad I didn't take pictures!)

And yet, having a cold  that requires copious amounts of cold medicine means I get to visit the pharmacy. As my poor husband has discovered, this means I can distract myself from the cold by browsing through cosmetics.

What? You mean I don't actually need a reason to wander through cosmetics? Shhh, don't tell him that, then he'll know it's just for fun! Work with me, people!

Wait, where was I? Oh yea. Cosmetics.

Once again, I was wandering through cosmetics with my sketchbook in hand, taking notes on all the cool stuff I found. Yea, the crazy lady taking notes on color and price while she mumbles to herself? That's me. Say hi next time.

And I found fun things, even though I'm still on a no-buy. So many fun new things, and here I am without a job... but I digress. Again. So what did I find?

Oh my goodness, y'all. It's Halloween, and there are so many amazing deals out there. If you love false lashes, this is the time of year to stock up. Basic lashes, fancy lashes, rhinestone-studded, glittered, feather lashes... you name it, they're out there, and often for less than $5 a pair. These are no worse than the lashes you'll pay lots more for, and they keep indefinitely. So stock up now, or wait til the day after Halloween to clean out the clearance racks!

This also a great time to nab specialty products: scar wax, latex, cosmetic glitter, stippling sponges and so on. However, the Halloween makeup kits you get are usually best left on the shelf, IMHO. They're often very cheaply made and you can end up with quite a breakout using some of those products. For a single night it's not so bad, but they aren't things you want to keep on hand for long-term usage.

I also saw several fun Halloween collections with inexpensive products! Sinful Colors has their Punk Rock collection out with a gorgeous selection of glitter polishes. I was very drawn to Daddy's Girl, a very deep, cool purple glitter polish that looks almost black until the light hits it.

Wet and Wild also has a Halloween collection out consisting of a body glitter gel, vials of cosmetic glitter in various colors, glitter eye liners and glitter polishes. Apparently Halloween is all about sparkle for Wet n Wild! Again, I went for deep purple glitter polish. Prowler is a warmer-toned and slightly brighter color than the Sinful Colors choice, and is full-on sparkle. Then there's Blue Jitters, a deep navy polish with a very subtle glitter. I'd LOVE to see that one on the nail!

Next, I found a display of Fantasy Makers, by the same company that produces Wet n Wild. This line has the traditional black and glow in the dark polishes, along with some really cute makeup kits that include a mini polish, a lipstick, and an eyeshadow duo. That's not bad for $5!

It was all I could do not to fill my basket with pretties. Wouldn't it be nice if we could trick or treat at our favorite cosmetics shops, getting goodie bags of cosmetics instead of candy! Dressing up would be so much fun.I'd probably have to go as a drag queen again... I haven't worn my purple lashes in ages!!

What would you wear for Halloween if we could trick or treat together? Leave a comment telling me what your costume would be, and where we'd go! Ahhh, Sephora, you'd be at the top of my list!!

Images from http://www.frightnightcosmetics.com/, http://wnwbeauty.com

Monday, October 11, 2010

Wow! Post #100! My baby's not a baby anymore!

I'm so excited, y'all! I know, it's a little thing, but this is post #100 for Layniefingers, AND I've finally reached 100 followers through GFC! How awesome is that?

I'm absolutely giddy. I had no idea people would be interested in this. I thought the market was saturated, and I would basically be keeping track of the nail designs I did for myself. I didn't think I'd be showcasing polish collections or actually having readers! So for everyone reading this, know that I think you're fabulous just for stopping by and bringing a bit of sunshine into my life. I couldn't be happier!

So, back to the bloggy goodness. I was wandering through WalMart the other night and decided to take a detour through cosmetics. Of course, the first thing I looked at was the Hard Candy section. I have some serious love for Hard Candy! I think it's the packaging. It's so cute and funky, it just screams out to come home with me! But I digress...

This time, I was surprised by a display of new goodies. An entire endcap of Hard Candy new stuff! I didn't know what to look at first, but I found myself drawn to their new temporary tattoos. Does anyone remember the uber-cute limited edition Chanel tattoos that were out just recently? They were so adorable, but there was NO WAY I could spend $75 on a box of temporary tattoos. Sorry, boys and girls, but mama's just too frugal for that one. Still, I was so, so drawn to them. The idea of temporary tattoo jewelry was too fun!

Well, now you can duplicate that look for about $70 less! Choose from blossoms and branches or hearts and crowns. You can have that Chanel look without emptying your wallet!

There's 3 sheets of tattoos with chain parts in single links, multiple straight links, or gracefully curving links, allowing you to arrange it however you like on your skin. Then there are 3 sheets of tattoo pendants, either crowns and hearts or sparrows and branches with cherry blossoms on them.

Personally, I find I'm drawn to the blossoms. I think there's a graceful flow to them that seems somehow peaceful to me. I really like them!

But if temporary tattoos aren't your thing, you can try their new nail polishes instead! Hard Candy has introduced three new shades to their permanent line up, and they are absolutely lovely!
They've also brought back a  wonderful shade from the old line, so if you missed Sky the first time around, this is a great time to go pick it up. This gorgeous pastel blue is so icy and gorgeous.

I have to admit, though...I am seriously lemming for Beetle. Look at how it seems to shimmer through different colors! I may have to break my no-buy for this one!

And as if that weren't enough, there are also three fantastic new limited edition polishes out just in time for Halloween! Mischief is a wonderful bright orange in a sheer black dark green (Thanks, Scandalous!) base. It's so sparkly that you know the inner magpie in me was crying to get out! Zombie is a luscious pink and purple, and Wicked is silver in a black base. These are so, so perfect for Halloween! They're also great for any other time of year, who am I kidding!

The best part of all is that each of these is only $5 at your local WalMart. I would suggest heading to the web page to order if your local store was out of stock, but after looking at it, it's... slightly strange. The polishes aren't listed by name! Instead, someone has described them by color- white glitter, rose glitter, red-orange. Who can tell what you're getting like that? Weird! Oh well...

I'm telling you, this no-buy gets harder by the day!

Images from the Hard Candy Facebook page.

Sunday, October 10, 2010

I am one exhausted fashionista...

I'm so very very sorry. I was actually planning to post tonight. But after spending the entire day with my 9-year-old nephew and my 6-year-old niece, I am exhausted. My fibromyalgia is fibroing, my brain is fuzzy, and I am pooped. We spent the afternoon playing Pokemon, then went to dinner at Cracker Barrel. After eating, my niece and I went wandering through the shop, looking at dollhouses and glowing glitter batons, at dresses and hats and halloween costumes. As we were flipping through one particularly rack, she said to me...

"Wow, Aunt Laynie, this is SO FUN! It's like we're fashionistas out shopping for the day!"

I couldn't have summed up better myself. We now have a date next weekend to spend the day doing our nails together, doing each other's makeup. I realize now that this is a very special thing, and I'm very much looking forward to it. I'll be konading her nails and taking pictures of them for the blog. I cannot wait. :D

Saturday, October 9, 2010

GOSH Black Passion (and a request!)

I love autumn. I get absolutely giddy every year when the weather cools down and I get to start wearing my long-sleeved tops with my kitty shoes. This year has turned cool earlier than usual, and I'm not complaining at all! I am, however, finding myself turning to deep colors for my nails. It's time to pull out my GOSH Black Passion!

This is a deep charcoal polish with silver shimmer. I love it even more than usual because this gift (along with my other GOSH polishes) was sent to me by a lovely friend in the UK. Every time I see those bottles, I'm reminded of how surprised I was to see the package she'd sent me. A little unexpected kindness will turn me into a silly mess of thankfullness every time!

Black Passion is actually less black and more of a graphite color,  complete with silvery shimmer inside. It's absolutely lovely, and a bit easier to wear than straight-up black. I found it kind of hard to apply- it's a very dense, pigmented polish but it tended to have a lot of drag, so I ended up needing two coats just to even everything out. Still, two coats is nothing to complain about, especially when you end up with such a lovely result!

Also, I had a request the other day from Deez Nailz, who was curious to see what Love My Nails Dazzling looks like over black. She was thinking it would look stunning over black, and she was right!


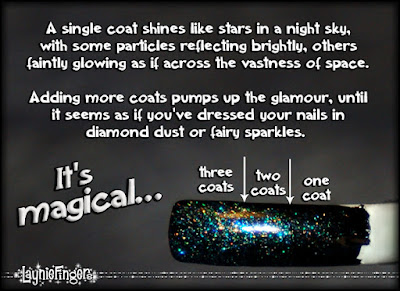
I mean, really... do you see the crazy sparkle on that nail tip? I also tried something simple- I did a gradient with the sparkles, so that it went from pure black at the base to sparkle mania at the top. All I did was paint the glitter on from different parts of the nail for each coat!


I think it's a bit easier to see the lines since I put the arrows on. Also, to cut down on the lumpy look, I did the first coat on just the tip of the nail, the second on half, and the third coat covering three quarters of the nail. Somehow that makes it seem more gradient and less striped. A coat of topcoat and it looks magical!


What can I say, I think everyone should have at least one bottle of this topcoat. It can turn any polish from drab to glam! So tell me, what do you think of this topcoat? What color would you put it over?

Thursday, October 7, 2010

Cleaning Up My Manicure- A Look At My Nail Brushes

A few posts back (or maybe more than a few, I'm not so good with time) someone asked in the comments what sort of brushes I use to clean up my manicure. In a totally separate conversation, a friend of mine mentioned that she thought I was just super-talented at painting my nails and managed not to make a total mess at it. That's so not true... so much so that I had to laugh!

See, I've had a tremor since I was in my teens. I could never be a neurosurgeon, else my patients would end up blinded, paralyzed, or missing chunks of their anatomy! As it is, I've managed to cut off part of my finger using a craft knife. (Don't worry, it was a tiny part and I barely miss it. But if you ever look closely at my left hand index finger, you'll notice it's got a slanted edge on one side. That's because I lost that part in a nasty art school incident. But I digress...)

So how do I end up with nails that look neat and skillfully-painted? Easy. I cheat. I use a technique that I first read about on Lacquerized: I use a paint brush and pure acetone to remove the polish from everywhere that should be polish-free! For the actual how-to, I really suggest you go read her description of the process. I simply cannot explain the process any better than she does, or even add anything new or fun to it. But finish reading my entry before you go, if you don't mind. :D

The question is, what sort of brush do I use? I still haven't completely decided what sort of brush to use. Mostly, I flip-flop between two main brushes. Thankfully, since I'm a painter I have an absolute ton of paintbrushes on hand. Let's look at what I've been using...


I started out using this tiny little brush. It came from a multi-pack of brushes from WalMart's craft department. (I think it was $3 or $4 for a pack of five brushes, maybe?) Although this was a very inexpensive brush, it works really well. It would also be a good brush to use for cream or gel eyeliners. What I love about this brush is that it's got such a sharp, chiseled edge. This means I can get right into the crevices on the sides of my nails where polish tends to pool, or I can turn the brush sideways to sweep off larger blobs of polish from other parts of my finger.

 The synthetic bristles hold their shape well and so far haven't seemed to be degrading from the acetone. The biggest drawback of this brush is that it simply doesn't hold much acetone, so I end up dipping back into the liquid over and over and over and over again. It gets tedious. So for preliminary cleanup (or when I'm feeling particularly lazy) I switch over to my larger cleanup brush.


You can see that this brush is much larger than the first one. I can sweep off much more polish with this one before needing to redip it. Unfortunately, since it holds more acetone it also tends to flood my nail with it if I'm not careful. (It's always something, isn't it? Sheesh, my diamond shoes are too tight and all this money in my purse makes my bag too heavy!) To avoid the acetone flooding into my nail creases, I simply tap the tip of the brush onto my towel before I touch it to my finger. Problem solved!

One thing to be careful with: acetone is a really potent solvent. It removes nail polish, right? Well, it will also remove the paint from your paintbrushes, so be very careful not to dip your brush too far into your acetone. If you aren't careful, you'll end up with paintbrush paint all over your fingers. It's not a pretty look, trust me!

I have one more brush that I use for nail art, and it's one I customized myself. I may have mentioned this before, but I am VERY frugal. (Frugal sounds so much nicer than cheap or poor.) I wanted to have a fine brush that was long enough to make straight lines easier to paint and fine enough to make those lines thin. I had several liner brushes, but they were all entirely too large. So, one day I pulled out my scissors and gave my brush a haircut.


Now the brush does exactly what I wanted it to do, even if it is ugly as can be. One day I may end up with actual nail art brushes, but until then these do the job nicely. I'm even getting faster with cleaning up my polish... when I first started this technique, I'd spend a good hour going over the various parts of my nails and still not have a very good result. Now I get a pretty nice result after around half an hour (unless I'm wearing red- red is EVIL to clean up!), and I know people who manage to do their cleanup in around 10 minutes!

So, do you think you'll try this method? I honestly cannot say enough good things about it. How do you currently clean up your edges?

Wednesday, October 6, 2010

Doesn't Everyone Want A Happy Ending? Sinful Colors Can Help!

As much as I hate to admit it, I love fairy tales. I love the idea of finding your handsome prince and living happily ever after. Life doesn't always cooperate with that, but Sinful Colors has at least finally given me my Happy Ending. It's a bright beautiful green with warm golden shimmer inside. I'm not exactly sure that this color works with my skin tone, but it was fun to work with!

Happy Ending applied beautifully, although it was fairly sheer. Because of the sheerness, it doesn't work all that well for stamping or for nail art. Unfortunately, it looks like a green tint for those purposes. Hmm... this makes me want to try layering it over other colors...

Now, I have to be honest for a few moments. The idea of happily ever after isn't exactly what everyone thinks of when they hear the phrase Happy Ending. In fact, when I told my friend Din about this, it sparked a conversation about what color a happy ending would be, and why they chose this particular shade of green to name Happy Ending. We even decided that if someone's happy ending was this particular shade of green, they might want to see a doctor about it.

What can I say, we're a bit twisted. :D

This polish is one of the bottles I got in my birthday haul, back in August when Sinful Colors polishes were $1 each. That was such a happy shopping spree! That means this bottle of polish (along with several others) has been sitting in my untrieds box since early August. And to think, when I started I only had a handful of polishes! This hobby reminds me very much of Pokémon- I very much feel like I gotta catch 'em all! Ah well...

So overall, I'm not sure this is a polish I'd want to wear again, or one that I think is flattering with my skin tone. It's a beautiful green, though, for people who love greens.

What's your opinion on green polishes? Do you love green, or think it's a color best left to plant life? Tell me about it in the comments!

Bottle image taken from the Sinful Colors website.