Wednesday, October 17, 2012

Another Halloween Nail Art Design

Today's halloween look is super simple and super easy. Again, instead of being an obvious nod to the holiday, this design uses halloween colors to get you in the holiday mood.

I started with a bright orange polish. You can use whatever orange you have, which means you can go with a pumpkin tone or a neon orange, a pastel orange or anything else that makes you smile. I went with a very saturated orange, but not quite neon.

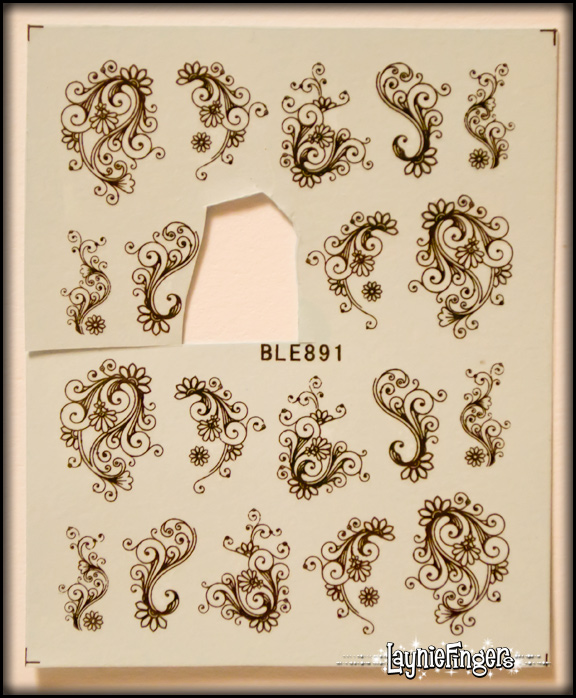
Once that was totally dry I added a beautiful water transfer from the WDBLE981 set that's available at KKCenterHK. I absolutely love these decals! I love that there are many choices in one style, so that your nails don't look so obviously done with decals.

I'm also very glad to share that these decals acted much more like the decals I'm familiar with than the last set I used. Thankfully, these slid right off the backing once it was wet. Then I was able to slide them onto my nail and position it the way I wanted.

Keep in mind that these water decals will continue to slide around whenever they get wet, so you definitely need to top them with topcoat. The clear topcoat helps meld them with your nail polish so that they aren't going anywhere.

Once again, after I got the decal in place I wanted to add a rhinestone to give it a bit of flair. What can I say, I love shiny things! This stone came from the Fing'rs Nail & Body Jewels kit. I really like this kit because the stones are tiny and you get such a great selection of shapes and colors.

Once everything's on and mostly dry I added a coat of ProFX to protect everything. I really like the end result. This could be a beautiful accent nail or you could do all your nails with these decals. Whatever you do, they'll be pretty.

So go ahead, play with your nail art stuff. You may end up with a design you love!


Some polishes were provided by the brands for consideration.
See my disclosure statement for more information.

Jordana Halloween Nail Art Contest

Hey! Do you love nail art? (Of course you do, that's probably why you read this blog!) If you do, then do I have a contest for you!

The lovely people at Jordana are hosting a halloween nail art contest, and it's open to YOU (as long as you live in the United States or Canada)! All you need to do is show them your best halloween nails, and you could win one of several prizes!


Eleven people will win prizes, which I think is pretty fantastic! So what are you waiting for? Go enter your favorite halloween nail art!


Image was provided by the brand.
See my disclosure statement for more information.

Saturday, October 13, 2012

Zoya Suri topped with Zoya Daul

Have you ever had one of those days where you just felt the need for some glam? That was me a couple of days ago. I was feeling blah and I wanted a bit of sparkle to cheer me up. I wanted something purple and glitzy, and boy did I get it!

I started out with a base of Zoya Suri from the Diva collection. I didn't get a photo of this, unfortunately, but I know the photos are out there. Suri is a gorgeous shimmery purple that is absolutely fascinating. The depth of Suri is absolutely delicious on its own, but it wasn't quite enough for me. I wanted more!

Since my Diva collection was still out, I saw Daul and decided to do an accent nail with it. The accent nail quickly turned into a full manicure, and I couldn't have been happier. Zoya calls Daul "a medium red-toned purple base with heavy purple and gold iridescent metallic sparkle," and they're not kidding at all.

From some angles Daul is a bright sparkling gold that completely overwhelms the purple base of Suri. From others, Suri's deep purple is visible with bits of sparkle from Daul. It's a shimmering, sparkling smorgasbord of color that seems almost ever-changing.

Application of both of these polishes was easy, as I've come to expect with Zoya polishes. Cleanup was easy enough, and these polishes are wearing nicely.

If you look at my middle finger in the photo to the left, you can see a bit of bare nail at the tip of the nail. This isn't tip wear. Instead, this is shrinkage from my quick-dry topcoat.


For whatever reasons, some quick-dry topcoats shrink as they dry. This can pull your nail polish back from the edges a bit, and in extreme cases it can even lift your polishes off your nail, causing it to peel off in a solid chunk. I've found using thinner coats of topcoat can help with this, as can wrapping the tips of your nails. Apparently I didn't wrap the tips of my nails as thoroughly as I thought.

I'm including this out-of-focus shot to show the amount of sparkle this polish has. It's a real show-stopper!


Overall, I think this combination is an absolute winner. What do you think? Leave me a comment and let me know!

Zoya polishes were provided by the brand for consideration.
See my disclosure statement for more information.

Thursday, October 11, 2012

Halloween Nail Art

Halloween is coming, and I wanted to share some nail art designs with everyone! I've been experimenting with some nail tips, and I've come up with a variety of designs. I'll be sharing these designs over the next couple of weeks. Hopefully these will give people some more ideas for Halloween.

This more traditional design uses black, orange, and gold in a nod toward the holiday. It's simple to do: paint the nail with a shimmery orange, then add stripes in black and gold. I finished with some black hexagon glitter pieces as an accent.

I've got a doctor's appointment today, so I'm going to cut this short and try and sleep a bit. Wheee!

Halloween is my favorite holiday!
See my disclosure statement for more information.

Tuesday, October 9, 2012

Halloween Goodies from Sally Hansen and NYC

Halloween is coming up fast, and I'm noticing some fun things for nails showing up on the shelves. For example, NYC has the creepy Demon Glow, a black-light reactive top coat you can wear alone of on top of any polish you like.

I can't wait to get my fingers on this one, and then to get it on my fingers! Hopefully I'll be able to take some photos for you guys with a black light. This should be fun! This retails for $2.49, and seems like it's totally worth it!

Then there's the Sally Hansen offerings this season. Once again, Sally Hansen has come out with some adorable Salon Effects nail polish strips. Have I mentioned that I absolutely adore these? These are $9.99 for the box, and if you have short nails like I do you may be able to get two manicures out of the box. The prints are cute as can be, too!

Again, I'm hoping to show these to you soon, because my nails can't wait! Go check out your local beauty departments, because these might just sell out before you get yours!

Information and images were provided by the brands.
See my disclosure statement for more information.

Sunday, October 7, 2012

Layering With Pomegranate Polishes

Today's look features another spin on Curator, the black polish with gold and silver glitter from Pomegranate Nail Lacquer's latest collection. I was able to choose two polishes from Pomegranate to try out, and I chose Cardigan for my second color. I had a plan, and I couldn't wait to try it out.

I chose Cardigan for a couple of reasons: I love the color, and it's a jelly polish. While I'm the type of person who hates visible nail line, I'm also the type of person who absolutely loves layering polishes. I had a sneaking suspicion that I could layer Cardigan over Curator to create something spectacular.

Because Curator is a neutral polish, I imagined that the sheer teal of Cardigan would tint everything so that the black would become a deep velvety greenish with sparkling spots of brighter green and teal where the glitter showed through. For some reason, this brought to mind images of lost jungle tribes, lush greenery and golden treasures covered in moss. (What can I say? I really loved Indiana Jones as a kid!)

In reality, I had a bit of trouble keeping the teal layer even, and there's enough pigment in Cardigan to build up brighter streaks over the black. This didn't bother me, though, because it somehow didn't detract from the overall look. The gold glitter shined through with an almost lime green sheen, and the silver showed more of Cardigan's blue tones. All in all, I called it a win.

Surprisingly enough, I wore this polish for 3 or 4 days. That's odd for me, since I get bored so easily and I have enough polish to change my nail lacquer every day without repeating for... oh, let's just say a long time. I don't want to count how many bottles of nail polish I have now. It's starting to frighten me!

Here, have some more photos of this delicious sandwich.


Pomegranate Nail Lacquer is available for sale on the Pomegranate web site for $9 a bottle. However, if you like Curator, now is the time to buy it, because Pomegranate is selling the cutest Halloween treat bag! In it you'll find one bottle of Persimmon, one bottle of Curator, sweet treats and seasonal decorations, and it only costs you $15! This is the perfect treat for your friends who love nail polish. It's worth picking up two- one for you and one for a friend!

What do you think of this combination? Would you wear it, or are you just shaking your head at me, wondering why I do this weird stuff? Leave me a comment and let me know!


Polishes were provided by Pomegranate Nail Lacquer for consideration.
See my disclosure statement for more information.

Friday, October 5, 2012

It's finally here- a tutorial on how to do laser print nail transfers!

Some of you may remember that a while back I posted a pretty photo of colorful nail art, saying I was working on a technique to share with everyone. I finally figured it out, and then the world blew up, so to speak. However, a few people gently reminded me they were still anxiously awaiting this technique, so I finally got off my butt and finished editing the video that's been waiting all this time. I'm so happy to finally share this technique with all of you!

As you may have noticed from the title of today's blog, these nails were done using color laser prints. That's right- no special tools needed, no store-bought decals or fancy papers or anything. The supplies to create these nails are very basic, aside from the laser prints themselves.

You'll need:
  • Color laser prints - inkjet prints will not work for this project.
  • Acetone or nail polish remover
  • A soft paintbrush
  • White or very-light nail polish
  • Base coat and top coat as usual
The process to apply these transfers is simple, but it can be fiddly at times. It took me over two weeks of playing with this daily to achieve what you see in the top image of this post. But if you take your time and make sure your image is actually transferring to your nail before you lift the paper you can come out with a fantastic finished image.

Once your transfers are done, you can finish your nails off any way you like. You can add glitters, stones, stickers or even additional nail polish. The only real limit here is your imagination!

So what are you waiting for? Watch the video!


That's it! You can use your own scanned-in images, things you've drawn or photographed, images from the internet... anything you can print can go on your nails!

Remember, if you do your nails with something inspired by my blog, leave me a comment and a photo. I love seeing what you come up with, and I love knowing I've inspired someone!

Hope you have a fantastic weekend!
Haven't you always wanted a monkey?
See my disclosure statement for more information.