Showing posts with label OMFGPonies. Show all posts

Monday, July 11, 2011

OMFGPonies and Pengins, does it get any better than this?


I have to be honest here. I intended to post this earlier- maybe Saturday morning? I've lost track of time, thanks to the chest cold of doom that's descended upon our home. I've spent too much time hacking and coughing, wondering if I have the energy to cough again. And all this while, the penguin photos have been waiting for me.

It all started with me deciding I had to wear OMFGPonies and see what it looked like on my nails. It was a bit thick to start out with, so I thinned it with a few (maybe 10?) drops of polish thinner, and then it was absolutely dreamy!

Also, I apologize because I'm going to be sharing a few more photos than usual with this one. I'm sort of in love with it!! Also, I gave up on getting video of it, mainly because it would involve spending half an hour outside in weather that feels like it's 115 degrees so that my camera can adjust to the ambient temperature. Otherwise, the lens just fogs up and makes it impossible to take pictures.

One thing I didn't expect with OMFGPonies is the ending finish: it turned out to have a matte texture that really surprised me! It was easily remedied with a coat of Seche Vite, but I would have preferred a glossier finish. Ah well, not a huge deal.

One thing I didn't think about but was obvious in retrospect was the difficulty that occurred during cleanup. Big glitter = messy cleanup. Overall it wasn't too hard to clean up, but I definitely ended up with some glitter spots that made my cuticles look a bit messy.

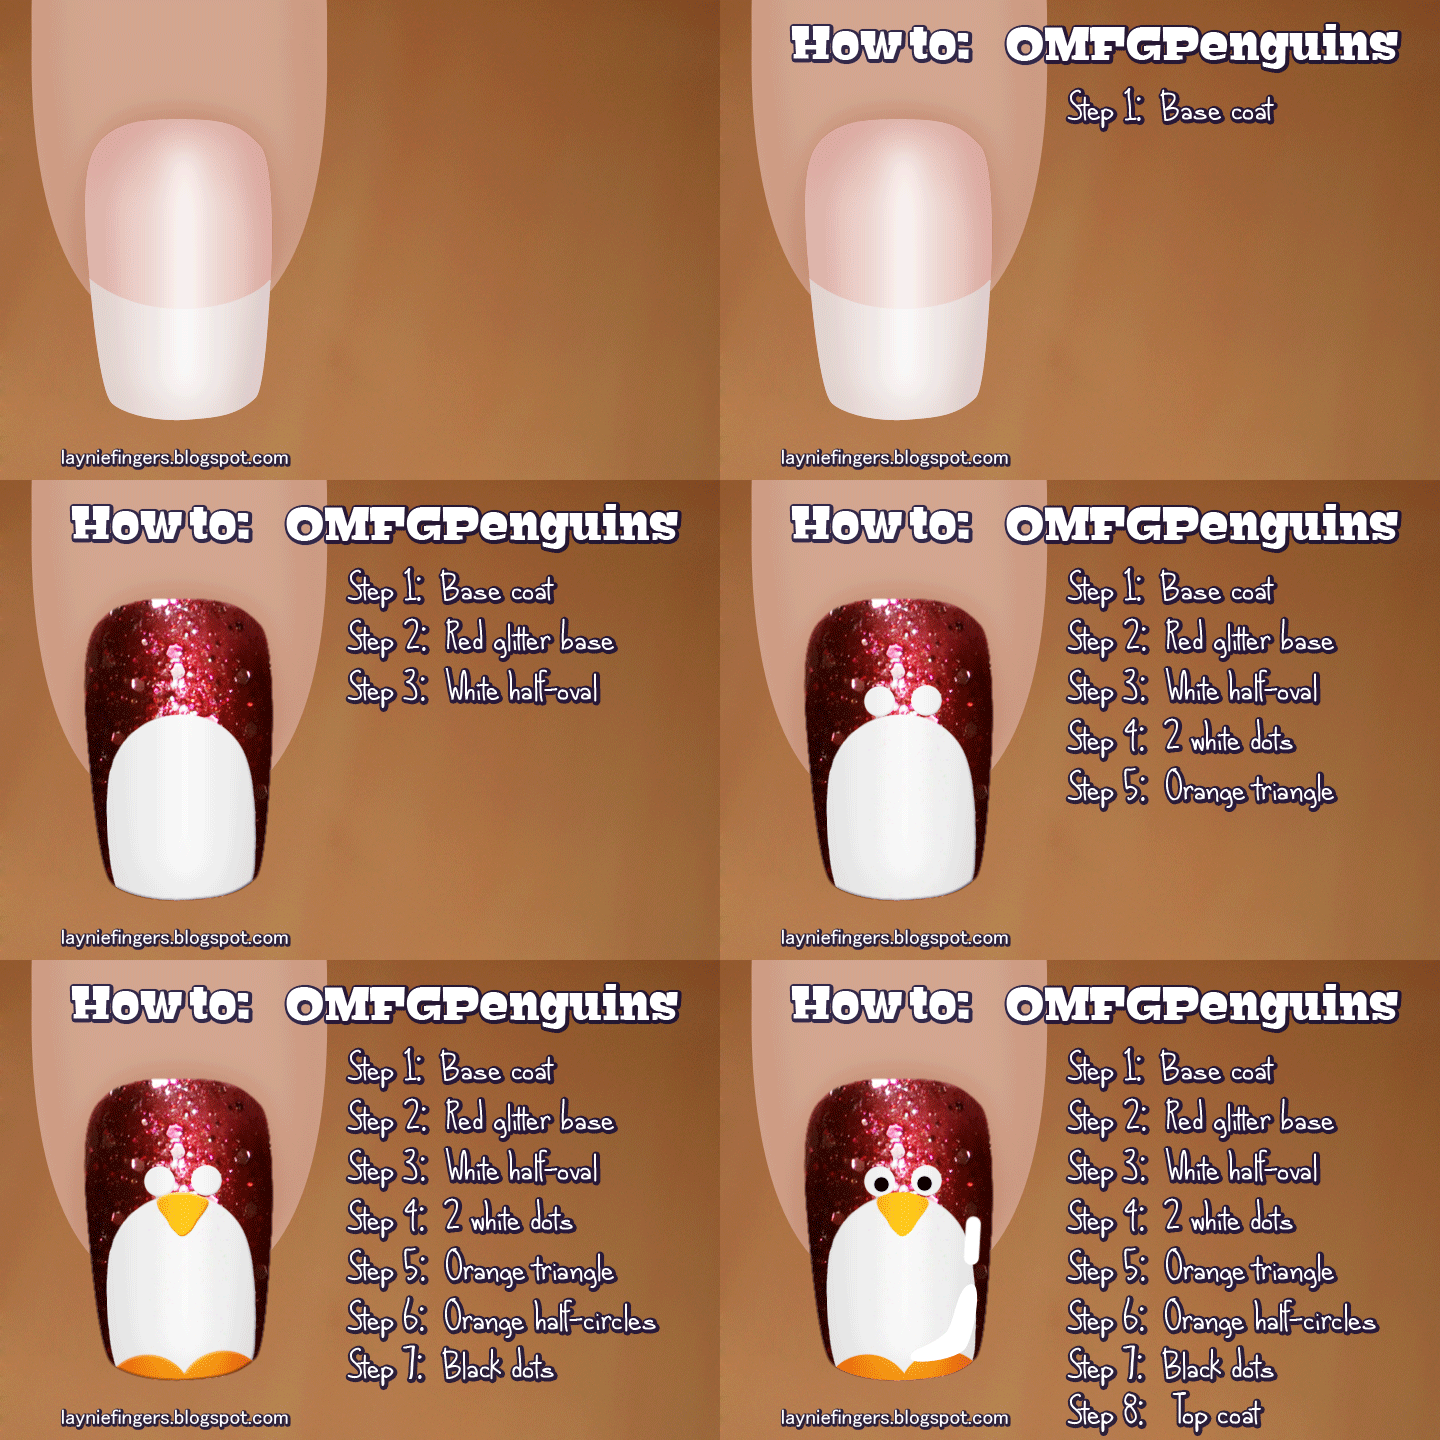
After wearing OMFGPonies for a day, I realized I wanted some nail art. I don't know what prompted me to make red glitter penguins, but I really like them! Turns out they were simple to do, although they were a bit on the fussy side. Still, even my husband loves these!

While it never occurred to me to wear red glitter penguins, I'm glad I did because they make me giggle every time I see them! I'm also really happy with the positions of their eyes, and everyone who has seen them has commented on that as well!

So- how do you make them? I thought you'd never ask!

Items needed to make OMFGPenguins:
  • White nail polish or acrylic paint
    This can be a regular nail polish, a nail art striper polish or even plain white acrylic paint.
    Use whatever you have.
  • Nail art brushes
    These are optional, but a smaller brush can be easier to control when trying to make dots and shapes. Again, use what you have.
  • Dotting tool, bobby pin, toothpick, etc
    I found using a dotting tool was easier for making the eye dots. It's optional. Use whatever you're comfortable with.
  • Black rhinestones, black nail polishI used black rhinestones to create the pupils of the eyes, but you can use whatever you have. Are you sensing a trend here?
 and if you can't follow the how-to because it's upside down, I did a special one just for you!


Keep in mind that you can do lots of expressive things with the eyes. Keep the white parts small and the eyes will be tiny and cute, or make them HUGE and they'll still be adorable! Just look at the different expressions I've given this little guy, just by changing the position and size of the whites and blacks of his eyes!


As always, feel free to show me what you've done if I've inspired you at all. I love sharing with people, and feedback makes me smile for HOURS! :D
Til next time!

EDIT: I cannot believe I forgot to include this image. It's only the first image I edited, and the one I sent to my friends to make them giggle. Yea, I'm forgetful... it's what happens when you get old! Anyway, enjoy!


The penguins have eaten  my brain, it's true!
See my disclosure statement for more information.

Tuesday, July 5, 2011

OMFGPonies- My Little Franken

Holy ponies on a BBQ, I am so, so giddy right now. Last night I was doing my nails with my frankened version of My Private Jet¹ when an idea hit me: I could franken the red-glitter-in-black-jelly polish I've been fantasizing about!

I know, I know. I've mixed my own colors more than once, so why was this such a breakthrough? I have no idea. All I know is the idea hit me like a bolt of lightning, and I immediately tweeted about it!


As you can see, Lisa from Shades of Magic absolutely LOVED my outburst, so I clearly had the name for this franken-to-be, if it turned out at all worth saving.

I knew what I wanted. I've seen several polishes lately that were red glitters in a black jelly base, but each of them had something wrong with them. So rather than keep waiting for the perfect one, I decided to try my hand at mixing what I considered the perfect polish.

See, you may have noticed by now, but I kinda have a thing for glitter. In fact, if you were to look through my box(es) of nail art goodies, you'd find more glitter than you know what to do with. Seriously, I've got over 20 different containers of loose glitter in different sizes and shapes, not counting glitter polishes, and I'm ALWAYS on the lookout for more! It's become an obsession almost, and I simply cannot get enough!

So, thanks to my stockpile of glitter, I was able to pull out three different red glitters, a russet red pigment, and a red glitter polish that I thought would all work together. I also grabbed my TKB glitter suspension base because I knew I wanted a sheer base, and a simple black no-name polish. I used very little black, because black is a very strong color that can easily overpower a polish quickly.

Instead of just jumping in and dumping a lot of stuff into a bottle, I started with one of my mixing cups. I used a dot of black, a dollop of clear suspension base, and a bit of all my glitters. After stirring it up, I was in love, and even though I didn't have the mix right, I knew I wanted a whole bottle of this one.

Onward to the polish. I went in very small quantities at a time, so I could change things if I wasn't happy. It took an hour of tweaking and shaking, testing and tweaking some more to come out with something I was happy with. But once I tested that last mix... omg, I knew this one would live up to its name.

Meet OMFGPonies, the first franken I've made that I am absolutely completely in love with. It's like a deep black cherry base with amazing glitterbits. And keep in mind that these photos really don't capture the depth of it. I need to shoot video in full daylight, but I was sick in bed all day and didn't get to it. Maybe tomorrow...

I absolutely love that as you turn the nail, you capture glints of microglitter peeking up through the sheer black base, russet shimmer catching the light and larger flakes of glitter reflecting a silvery red. My largest red glitter turned silver in the polish, but I knew that was a possibility, and I was ok with the concept if it did.

I love this polish, more than I can say. And the best part? I can make more... :D

You know, if I ever get the bits again.

Til next time...

¹ My version is called My Magic Bus, because it's magically delicious and much cheaper than taking a plane. :D

Some polishes may have been provided by the manufacturer for consideration.
See my disclosure statement for more information.