Sunday, December 5, 2010

Happy Holidaze the fourth- it's all about the glitter, baby!

Wheee! My contest ended this afternoon- I hope you got your entries in before it closed! I'll have the winner announced very soon. I can't wait to see who wins!

Until then, it's time for more holidaze fun! Today's look is a very simple one that's just tons of fun to do, and super easy! I painted my nails with 2 coats of a base color (red in one case, gold in the other) and then took glitter in shades of red, green, and silver and basically blinged them to heck and back! Look how sparkly they are!


One thing that's kind of hard to tell in these pics is that the glitter isn't just spread on in a mix. Instead, I would paint a small section of the nail then press on a single color of glitter. Then I would paint another small section and press on a different color. This gave me sections with mostly red, mostly green, and mostly silver. It really does look gorgeous when the lights are sort of low and the glitter sparkles.

This isn't one of my favorite looks, but I think it could be fun to play with some more. I would like to find a more efficient way of applying the glitter so that it can be both neat, smooth, and yet filling in most of the spaces.

Ah well, one day, yes? Now I'm off to verify more entries in the giveaway. But I'll post more about that when I announce the winner! Have a great day/night/afternoon/whatever it is where you are! :D

Blah blah was provided by the manufacturer for consideration.
See my disclosure statement for more information.

Happy Holidaze the third! A simple snowflake design...

EEEP! The night got away from me, and I totally missed posting the blog tonight. I feel so guilty, but I had a lot of fun going out with my husband and my son, so I guess it was worth it.

It's a simple design today, one inspired by the weather up north. Living in Louisiana, we don't often get snow. Instead, we have weather that bounces back and forth, often seeing 85° one day followed by 35° the next. That actually happened last week, and let me tell you it's NO FUN! How can you get in the holiday spirit when you're in shorts and a tee shirt, sweating your tushie off?

I decided I wanted something pretty to remind me of the first snow we saw while living a bit north of here. We'd gone out in the night to watch it fall- enormous fat, fluffy flakes lazily drifting down to dust the grass. It was a slow fall at first, with huge flakes scattered in the night, standing out starkly against the dark sky. Later that night, the snow fell hard and covered the world with a soft blanket of white, the night absolutely silent as the snow muffled the sound. It was magical, and waking up that morning was so memorable. We walked outside and just looked around, feeling as if we'd been transported to a magical winter wonderland in the night.


This gives you a hint of where my mind was when I did this design, yes? I started with two coats of Sally Hansen Ultra HD Laser, then let that dry. I then pulled out my stencils that came with the limited edition Kiss Nail Art Nail Paint three pack. It's got such adorable stencils for the holidays- a candy cane, a christmas tree, snowflakes and gingerbread men... lots of holiday-themed cuteness! I chose this snowflake, and as you can see they're reusable! I then added a small rhinestone in the center of each snowflake from a pack of adhesive stones by Kiss, then topped with a coat of Seche Vite to smooth everything out and protect the art.

The stencils are super-easy to use. Make sure your polish is dry, then pull the stencil of your choice off the plastic sheet it comes on. Place it carefully on your nail, making sure to press it down thoroughly. If you don't, there's a chance the polish could seep under the edges, ruining your stencil. Apply your polish, then while it's wet lift off the stencil. (I haven't tried letting the polish dry before lifting the stencil off- I'll try that tonight!) Let the stenciled area dry completely, then add a layer of topcoat to protect it.

Once I pulled the stencil off, I'd place it back onto the plastic it came on, then clean off the wet polish with a cotton ball soaked in polish remover. Then I'd place it onto the next area again and start again! The stencils really are lots of fun to use!

Now... let's see if I can get some sleep before tomorrow. I hope your Saturday night was as much fun as mine... what did you do for the evening?


The Kiss Nail Art Nail Paint set with stencils was provided by the manufacturer for consideration.
See my disclosure statement for more information.

Friday, December 3, 2010

Happy Holidaze the twoth!

Wow, I am absolutely blown away by the response to yesterday's post! You guys really like this nail art thing, don't you? Since you don't seem to mind me doing a single nail along with a demonstration of how it's done, I may try and see if I can do more nail art, even when I'm showcasing new polishes or whatever. I think that could be doable... what do you think? Worth the effort? :D

Today's holiday nail art is something for Hannukah. I have so many Jewish friends, and I absolutely love how blue and silver look together. That made today's nail art almost do itself!


As always, you can click the picture to make it bigger, if you'd like to see more detail. One thing I've found myself worrying about while doing nail art is the need to make things perfect. But if you look closely, you'll see that this is far from perfect- the dots aren't all perfectly round (I still don't have a dotting tool- shhh!), my stripes are irregular and sometimes overlap. But it's still pretty, and the whole look works well together as a whole.

So don't be afraid to try something like this. It really is a lot easier than you would think. Be patient, don't try to go too fast, and remember to brace your hand with your little finger while you paint. That step alone can make painting so much easier!

Also, like yesterday, I have an animated gif to help you visualize the steps of putting a look like this together. I'm trying something a bit new with it- I've labeled the steps to help you see what's going on, because there really is no good way to paint glitter. :D

To recreate today's nail, you'll need a few supplies:
  • base coat
  • a blue polish of your choice
  • white and silver stripers OR
  • white and silver polish & a skinny brush
  • clear polish to adhere glitter pieces & rhinestone
  • dotting tool
  • a manicure stick (for placing glitter & rhinestone)
  • silver glitter
  • a rhinestone
  • top coat
  1. Base coat. Always do a base coat.
  2. 2 coats of your background color- blue, in this case. For this nail, I used Sally Hansen Ultra HD Laser, but feel free to use any deep blue you like.
  3. Once your background is dry, paint white four slashes across the nail starting from the bottom corner. They fan out like a flower, almost. I used my Art Deco Illustration Nails paint in white.
  4. Use your dotting tool to paint white dots between the slashes. Do as many as you like. At the outer edges, I only had room for 2-3, but I did 5 on the inner sections.
  5. I decided the design needed a bit more punch, so I added silver stripes along the bottoms of the white stripes. Just use your striper (or your striper brush and your silver polish) to paint slashes along the bottoms of the white ones. I used my Art Deco Illustration Nails paint in silver.
  6. Once the white and silver are dry, sprinkle a tiny bit of glitter onto some paper. Paint a small amount of clear polish onto the first silver stripe, then place single glitter pieces in a line along the edge. Use the manicure stick to pick up and place the glitter pieces one by one. Repeat along all the silver stripes.
  7. Use a bit more clear polish at the base where all the stripes begin. Place a single rhinestone on top, covering the junction and dressing up the look.
  8. Let everything dry a bit, then coat with your favorite top coat. I used 2 coats of Seche Vite.
Repeat this for as many or as few nails as you like. It's a bit tedious, but it really isn't difficult. The main thing to remember is that you can do it if you practice! And even if it doesn't work out (believe me, not all of mine are keepers!), it's just nail polish!

You could customize this in several ways. First, you could change any of the colors and still have it look gorgeous. I can see this being downright amazing with black, silver, and red! You could also skip the careful application of glitter pieces and instead use a glitter striper. Instead of the rhinestone, you could put a big dot of glitter, or a nail decal. Nail art is endlessly customizable, and you should never be afraid to change things up.

I hope everyone has had a great week, and that you're heading into an even better weekend. Give someone something to smile about today! ♥

Thursday, December 2, 2010

Happy Holidaze the first!

 Hello, my name is Laynie and I'm a nailartaholic.

Knowing the holidays were swiftly approaching, I sat down over the weekend to make a few nail art designs on nail tips. I figured I would do 3 or 4, maybe 5 max, so that I would be a bit ahead for the blog. Then I got carried away.

I was having fun. I was absolutely bursting with ideas, more than I could keep up with, truthfully. I jotted down some ideas on paper, so I could get to them before I forgot them. Then, I started to work.

By the time I had finished, I had 30 different looks. Like I said... I got a bit carried away. There's everything from subtle to in-your-face bling. So keep an eye out, we'll be doing lots of holiday nail art!

First up is a look I think is appropriate for everyone, no matter what winter holiday you celebrate. This nail art takes the lights from your tree, your house, or your decorations and puts them on your nails!


It's silly, it's fun, and I can't look at this one without smiling. I showed it to a friend of mine who immediately thought it was complex, so I decided to do an animated image to show you the process. It's time-consuming, but not complex at all.

You'll need to gather your supplies together before you start, so you don't wind up digging for bits halfway through with wet nails. You'll need:
  • base coat
  • the background polish color
  • a black nail art pen (or whatever color you want the cord to be)
  • striper polishes, nail art pens, or an art brush and various polish colors for the lights
  • top coat to protect your art
First, put your base coat on. This is standard no matter what you do.

Next, use a nail art pen (I used my Sally Hansen Nail Art Pen in black) to draw a meandering line across my nail. I then drew shorter wiggly lines to fill in the blank spaces. These black lines will be the cord of the lights. I made sure to leave room for the various lights.

Then, use various striper polishes to paint lights around the nail, making sure the fat end of the light was against the "cord." I used red, blue, green, pink, yellow and silver. You can use whatever colors you want, as many or as few as you want.

Finally, add a coat of top coat to protect the art you just made. It really is that simple!

If you want to jazz it up, you could use individual nail art gems for the lights, or you could use various colors of glitter polish to add some sparkle to the lights. You could also do this on a different colored background- sponged greens to resemble a Christmas tree, black to resemble lights at night, or white to look like lights against snow! You could use a single meandering line that makes its way across all of your nails, or do a single nail for accent. You could even do the black line across the tip of your nail and make a french tip of lights! You're the artist, you can do whatever you like!

Happy Hannukah for those of you who celebrate, and happy Thursday for the rest of you!


EDIT: I worked up a few examples of variations in Photoshop. Hope you enjoy!
 
Some polishes were provided by the manufacturers for consideration.
See my disclosure statement for more information.

Wednesday, December 1, 2010

New Goodies From Essence!

Why, why, why don't I live in Europe?!  If I did, I would surely be snapping up Essence polish collections right and left. I know, this is nothing I haven't said a hundred times before... I think it's an extension of my plans as a child. For years I planned to emigrate to the UK when I was old enough and live my life in Jolly Old England. I didn't have much of a plan beyond that, but in my fantasies my life would be glamorous and exciting once I lived across the pond.

So of course receiving the press release about Essence's new collections coming out for January and February has me reviving those fantasies, only in today's version I'm wearing fabulous holographic Essence polish! Yes... you heard me right. The Black & White collection has a white holographic topcoat!!

The color choices for the Black & White collection are pretty predictable- black and white. I do like the way they designed the bottles, though, with the opposite-color caps and labeling. This makes the bottles pop with a visual energy that just makes me want to own them!

Also in the Black & White collection are the limited-edition nail stickers. Do I even have to tell you how excited I am by these? Holy wow, look at that top pattern... I'm in LOVE, I tell you! These apparently work similarly to the Incoco nail appliques. You peel them off their backing, then apply them to your fingernails. You then use a nail file to file off the edges at the edge of the nail so that they don't catch on anything.

These look SO AMAZINGI I wish I could get my hairs on a set of these. They seem just my style...

Then there's the I Love Berlin collection- also super cute. This one contains five vivid shades of nail polish, as well as two striper polishes! I'm really drawn to these colors. I think they're vibrant and fun and playful, and I think they'd be great to use for nail art.

The best part about these polishes, to me at least, is that they're such good quality and so affordable. Holos for Essence prices? Heck yes, sign me up!

The striper polishes are small and cute, and Essence calls them "tip painters." The fun thing about these particular stripers is that they're matte polish! I find this very interesting, although I almost always use a topcoat over my nail art, so I don't think the matte part of these would necessarily show up. Still, they could be fun to play with.

So what do you think of the new Essence collections that are coming out in January? Let me know if you find them and pick any of them up. I'm really interested in seeing swatches of them!

Tuesday, November 30, 2010

Deborah Lippmann- Some Enchanted Evening

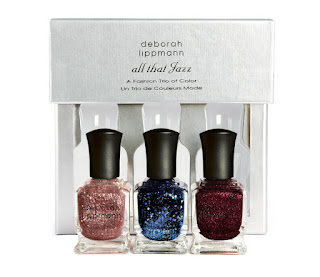
Finally, we come to the end of the All That Jazz collection. Today I'm showing you Some Enchanted Evening, an understated pink glitter topcoat. Well, it's as understated as salmon pink hexagons can be!

While you can wear this polish on its own, I think the beauty of it really shines when it's used to layer over other colors. I chose to layer it over three separate polishes to give you an idea of the versatility of it.

First, I've put it over the Milani polish Bare in Mind, from their limited edition Bare It All collection. On its own, this is a lovely pale pink with a striking duochrome shimmer. However, topped with Some Enchanted Evening it becomes truly elegant. I see this being worn with a beautiful gown for the holidays, or even for a bride at her wedding. (What can I say, I would be a flashy bride! :D)

As you can see, the two pinks play nicely together, creating something soft, feminine and girly, if with a touch of edge. It's fun, funky, and I absolutely love it.

I felt like showing something totally opposite to this girlie girl look, so I decided to pair Some Enchanted Evening with a black creme polish. I don't even know the name of this one, because I picked it up for 50 cents last year. It's a Fantasy Makers polish, so I assume it was leftover from Halloween. Beyond that, I have no idea.

What I do know is that this combination kicks ass! It's funky, with a lot more bite to it than the first combination. However, it softens up the black, so that someone who's a bit self-conscious wearing plain black polish could ease into darker colors. It's also glittery, which this just doesn't capture well enough, IMHO. The sparkle is spectacular!

Finally, I paired Some Enchanted Evening with a color some might not have thought of. My whole life I've been told red and pink don't go well together, but I have to disagree after seeing this. Instead of competing, the pink enhances the red, giving it a shimmer and sparkle that really draws the eye.

Again, I think just about anyone could wear this. It's fun, it's playful, and most of all it doesn't take itself too seriously. I love looks that have a bit of whimsy to them.

So, what do you think- what would you pair Some Enchanted Evening with? Is it too over-the-top for you?

Some polishes were provided by the manufacturers for consideration
See my disclosure statement for more information.
All That Jazz collection photo courtesy of DeborahLippmann.com.

Monday, November 29, 2010

Deborah Lippmann- Lady Sings the Blues

I decided that since these Deborah Lippmann polishes come in a set, I'd review them back-to-back. Today's polish is Lady Sings the Blues, an absolutely stunning jelly-ish navy blue polish with glitter in multiple sizes. Once again, this polish is a total keeper, and one I can see being worn for all sorts of occasions!

Deborah Lippmann seems to be known for her use of glitter in interesting ways. From Happy Birthday to Funky Chunky, her polishes consistently push the envelope, giving us new ways tow ear glitter- stylish, edgy, and always interesting. You may love it, you may hate it, but you'll definitely notice it!

Lady Sings the Blues is no different. It's reminiscent of some of her other polishes (Ruby Red Slippers, Bad Romance, Across the Universe) with the mix of large hex glitter and tiny square glitter suspended in a gorgeous jelly-ish base. What can I say, I am absolutely drawn to this sort of look, and once again this polish is a total winner. The hex glitter is very eye-catching, and the navy is such a beautiful tone. I think almost anyone could wear this polish and look wonderful in it!

This polish is sort of tricky to apply, but it's not too bad. The key is to let each coat dry for a few minutes before applying the next coat. This lets the glitter sort of set up, so that it won't all end up at the tips of your nails. Try and keep a light touch on the brush as well, and you'll end up with a really beautiful arrangement of glitter on your nails!

Removal of this polish isn't too horrible, considering it's a glitter polish. I'm going to assume that's because it isn't a glitter-heavy polish, but instead has so much open space.

I also decided to try stamping with this polish, just to see how it would work. Silly? Probably, but look- it actually works! My little stample shows how nicely it transferred, although the hex glitter did cause a problem or two. You can see a few blobs there- that would be because of the hex glitter.

Gee, I wonder what tomorrow's post will be... :D


Deborah Lippmann's Lady Sings the Blues was provided by the manufacturer for consideration.
See my disclosure statement for more information.