Saturday, September 13, 2014

Halloween costume fun!

(I apologize- if you follow me on Facebook, you may have seen these photos already. If you have, then read along- maybe the story will make up for having seen the photos?)

I love Halloween. You may know this by now, but if you don't, it's my favorite holiday. So even though I haven't dressed up for the holiday in at least a decade, I still wander through Halloween stores and departments many times throughout the season. This brings me to today's post.

As we wandered the Halloween department of a local big box store, my husband and I were enjoying pointing out silly costumes, coming up with ideas for the various bits you can find. I'm halfway planning to make some hair padding from some of the costume wigs once they go on sale after Halloween, but that's a different post entirely! Suddenly, my husband stopped, picked up a costume, and held it out to me with a curious look on his face.

"Honey, do you see anything... odd... about this costume?"

I looked closely, and was overwhelmed by the cuteness of the baby in the photo. I couldn't see past how adorable the whole thing was. "Umm, cute baby?"

He shook his head. "Nope... look more closely."

I looked and looked... and nothing stood out to me. There were sweet googly eyes under a puff of sweet pink curly hair. Soft felt teeth framed the baby's face. A pink bow tie matched the giant yellow feet of the monster and the yellow horns on the monster's head. The effect was almost unbearably cute, and I couldn't get past that.

Finally, he gave up and pointed out what had made him stop and stare in confusion. When I saw it, I had to take a close-up picture, because I knew this was going on the blog.

 That's right: this costume is apparently part of the Noah's Ark collection. Did you miss the part of the story where pink fuzzy monsters were hanging out on the ark with the rest of the animals? I know I did, but hey, I was never the most diligent of students. Maybe I missed out on some of it... and judging by the other costumes we've found in the days following? I missed a LOT.

I don't even know what else to say, other than I've taken to carrying my tablet with me because I keep finding more and more amusing costumes in this line!

That's right- the ark held dragons, too!
Oh look- it's a BOY's monster costume, since boys can't wear PINK, and girls obviously can't wear blue!
Don't look now, it's the terrifying PUMPKIN monster. Because you know, pumpkins...
... so the ark had SHARKS on it? Why couldn't they just swim? Oh, whatever... my brain hurts now.
Yea. So that happened. I don't know who's coming up with the ideas for these costumes, but I think they need a new theme. But now you know the rest of the story, so that's good... right?


Halloween is my favorite holiday!
See my disclosure statement for more information.

Tuesday, July 22, 2014

Rubber Stamping Adventures!

Hidey ho, campers! How are you enjoying the summer so far? Thankfully, it's been a very mild summer this year, so I've been able to spend less time lying in a puddle in front of the air conditioner! The question, then, is what have I been doing with all that extra time?

As some of you know, I've got this driven need to learn things. Asked what my goal in life is, I'll often reply that my goal is to learn everything. EVERYTHING. Yes, I know I'll fail, but just think how much fun I'll have learning in the meantime!

The latest thing I've been learning recently is how to carve my own rubber stamps. See, it all started with business cards...

I've designed my own business cards in the past, and I've been very happy with them. The problem is that they go so quickly. I made a ton of cards a couple of years ago to tide me over until I could get some proper cards printed up, but I kept running into the same issues- business cards can be expensive, and I don't know that I always want the same, single image on my cards. Then there's the question of what can I do when I run out of cards and need some in a hurry?

Some of my first stamps. Robot! :D
So, my kind of strange creative mind hit on rubber stamping. I thought about having a stamp created with all my information on it, but then I found how much a single business-card-sized stamp could cost. (Think $25-40!) Because of this, I started thinking about carving my own stamps. It's something I've been interested in for years, but have never really had the time or opportunity to do.

A quick google search found a Speedball carving set for significantly less than $40. While waiting for that to reach me, I hit my local Dollar Tree and grabbed a bunch of erasers and a couple of things I thought I might be able to make a stamp pad with. Because I'm so fond of bright color, I knew I didn't want a single-color stamped image. So, I grabbed a children's watercolor paint set and some felt to see what I could come up with.

The result? Well, my first stamps were a smashing success, but they were pretty small. My husband brought home some larger erasers a few days later, and I carved the middle stamp in the above image. I've carved over 20 stamps now, and have only cut myself twice, so I figure that's a good thing, right?

Then came the stamp pad. Let's see if I can simplify what I did- I got a medicine organizer with 7 separate compartments, put the watercolors (green, blue, purple, red, and orange) into different compartments with some water to liquify them, then poured them onto the felt and let them dry. To use the stamp pad, I spray it with a light mist of water 5-10 minutes before I plan to use it, then again right before, and oddly enough it works!

I also decided I wanted something beautiful for the back of my cards, so I set out to make something... colorful and me-like. It's amazing what you can create with a set of Crayola watercolors...

Once it was dry, I doodled over it in white, adding paisleys and hearts, fun phrases and spirals. I wanted something that looked like pieces of a whole once it was cut up. I wanted something that felt special, as if I were giving a piece of art to everyone who gets one of my cards.

The result? Crazy fun business cards in gradient colors that make me SO happy... I've had to hand-write the blog address, mainly because I don't carve that well yet. Still, I'm happy with the result so far.

Stamped business cards version 1.

Stamped business cards version 2.
I've also carved some flowers, some leaves, as well as a few other things. Then I wondered what I could do with them, so I started experimenting. And yes, I'm frugal, so I've been painting on old envelopes. I'm weird that way. :D


Not bad for children's watercolors and some eraser stamps, eh? So what do you think of all these? And what do you think I should carve next?

Leave me a comment telling me what you think. I need the feedback, what can I say?

Til next time...

I'm still alive, isn't that fun?
See my disclosure statement for more information.

Sunday, June 8, 2014

Pink Ivy- Stamping with Milani


I got the chance to do a really fun manicure recently, and I loved it so much I kept it for a full week! It was hard to photograph, but I think I got a pretty decent representation of it. You'll have to let me know what you think, and if you'd wear this!

Since summer is here, I was feeling the urge for some bright colors. I also wanted to dig into some of my older polishes, so without much hesitation I pulled out Wicked Style from the China Glaze Electropop collection. I know, I wish I had multiple backups of these polishes, they're definite staples in my collection!

Then, to add a bit of whimsy and to use one of my semi-new stamping plates, I stamped a pretty floral pattern from the Pueen plate #33 using White Milani polish. This worked beautifully, as you can tell! And of course, since I'm me, I had to add a bit of sparkle to things. A single coat of Essence Colour and Go in Space Queen finished things off beautifully!


All in all, this was a fun, bright manicure that made me smile lots. There's something about having my nails done that just makes my day seem a bit brighter!

What colors are you finding yourself drawn to this summer? Are you feeling hot in pastels, or are neons singing your name? Leave me a comment and let me know what you're loving this summer!

Some polishes were provided by the brands for consideration.
See my disclosure statement for more information.

Monday, June 2, 2014

SpringFling VoxBox!

It's that time again- the great folks at Influenster have put together another great box jam packed with goodies for me to evaluate! While some of the past boxes have been somewhat less exciting for me, this one was almost perfect!

When I saw the box, I got excited. See, I have this weakness for cute packaging, and this box did not fail. The Influenster box this time was a pale spring green, and it got me excited before I even opened it! I know, it's sad, but I can't help it. Cute stuff makes me happy!

Once I got it open, I was even more excited! Except for the tampons, this could have been picked for me specifically. Kiss nails? Yes please! Lip balm? Sure! Mascara? Definitely! Lotion? Don't mind if I do!!

I don't do menstrual products because I had a hysterectomy years ago, so I really can't do that good a review of the tampons. I can say they're scented, and they smell... well, strong? Unpleasant? I don't think I'd want to use these even if I did need them, but I'm picky about that sort of thing. As always, your mileage may vary, and you might absolutely love these.

Moving right along, let me tell you about the Softlips Cube! Now, I don't know why they call it 5 in 1 lip care, but I DO know that this is fabulous! It's lightly scented and flavored, which is nice because I don't like things that are heavily scented or flavored. I got the blueberry pomegranate kind, which worried me a bit. I don't usually like blueberry things, but this is actually really nice.

It's also WONDERFUL on my lips. It isn't overly greasy, and it's made my lips super soft. It does seem to either wear off or be absorbed a bit faster than my usual lip balm, but that's not a problem for me. I'm kind of iffy on the way it's packaged- it's very similar to the EOS balms, except it's in a clear cube. The ball shape is odd, but it's also nice- I can apply it to both lips with a single swipe. And getting back to the "I'm a sucker for cute packaging" bit, I love the actual package. This little clear cube is just so pretty! Add in the pretty card it's packaged on and I'm totally sold. This balm is an all-around winner in my books.

How gorgeous is this?? I know, I'm a sucker for a pretty package.

In keeping with the moisturizing theme, let's look at the Nivea Skin Firming Hydration body lotion. Again, I'm really picky about smell, and many harsh-smelling body lotions can trigger a migraine headache in me, or aggravate my asthma. If a product makes me sick, I clearly won't be using it, and unfortunately many skin products have really strong scents.

This lotion does not, thankfully. It does smell wonderful, but it's a light clean scent that I find really pleasant. It's also very soothing, and absorbs into the skin very nicely. I'm not so sure about the "skin firming" claim, but I tend to think that most of the claims of this sort are purely marketing with no real effect.

That doesn't stop me from loving this lotion, and it has now earned a place in my purse. My skin has become very dry in recent years, so I'm absolutely loving this! Another plus- my husband likes this scent, which makes me willing to use it more often!
I have yet to test the remaining products. I can share my initial impressions, though. First, let me address the Labor Day air freshener. I don't know how you are, but I don't tend to get excited over air fresheners, and I honestly have zero interest in this peach pie air freshener. It comes back to the artificial scents issue for me. I don't get the logic behind this sort of marketing, really. But that's me...


I'm really looking forward to using the Rimmel Scandaleyes. I like mascara, since my eyes are deep-set and tend to sort of disappear into my round face. Anything that makes them more visible is a plus!

Finally, I'm really looking forward to wearing the Kiss Everlasting French nails. For whatever reason, I don't seem to be able to really give myself a decent french manicure. I can do all sorts of things, but not that! I'll be trying these using temporary adhesives, and I'll gladly share my results soon.

So keep an eye on this space, and hopefully I'll have some more experiences with these products soon!


SpringFlingVoxBox  was provided by Influenster for consideration.
See my disclosure statement for more information.

Saturday, May 31, 2014

Art/Craft Therapy for Pain Management, AKA What I've Been Doing for the Last Month

I had the best of intentions. I was going to post fun photos of the things I'd been making. Funny how life stepped in and slapped me around a bit! Ok, I'm exaggerating quite a bit, but the last six weeks or so have been really, REALLY unpleasant thanks to changes in the medication I take for fibromyalgia.

Let's start out with the flowers. See, I have this bizarre need to make things, especially pretty things. For whatever reason, I had an epiphany in the middle of the WalMart scrapbooking section. I found the cutest little flower punch in their $2 bins, and realized I could make cute cute mini flowers, then emboss them with my dotting tools.


This is a closeup shot of my flowers.
They're all about dime-sized. Cute, eh?


Of course, once I had them punched, I realized I could use my gel pens and hand sanitizer trick to add some shading and dimension to them. I did, and would up with quite a few really pretty flowers.


What will I do with these? I have no idea... I figured maybe I'll throw them on eBay or Etsy or something. I'm sure someone could come up with cute uses for these!

This isn't all of them... one of the little guys ran away when I was
photoing the group. Oh, and one found a home before I could
get any photos of him. Weenie.


I've also been having a lot of fun making stuffed animals. Would you believe all of these are hand-sewn? They are... and I think that's one reason they help distract me from my pain. I get so focused on each stitch that the pain signals just don't seem to be as noticeable.

I'm not sure which of them is my favorite. I like the big purple guy in the back. He's made of flannel baby blanket with felt details, and he's super snuggly. I also love the stripey guy on his left... I spent almost as much time on that heart detail as I did stitching his body, arms, and legs!


This girlie isn't finished, obviously. I was experimenting with making hair for stuffies that would be a bit more flexible, and less tedious than hand-tying each strand of hair. I've done that before, and it gets old QUICK.

I also had fun shading her lips. I started out with a basic hot pink felt, then used Sharpie markers to add shadows, and a Liquid Paper correction pen to add some highlights. It's kind of awkward looking, but I like it.

Oh, and her head is sitting on a coffee container. I'm going to make a body for her eventually, I just haven't gotten to it yet. What can I say, I get distracted easily!

Moving on to what might be my favorite stuffie dude?


This guy was a total experiment, but I like how he came out. Adding the pink details at his horns was an attempt to cover up a sloppy join, but instead it looks like a design element instead. I like that!


The heart detail on his chest is made from 3 layers of felt, decoratively stitched and lightly stuffed so that it's three dimensional. He's definitely a huggable stuffie!


Then there are the adipose babies. These guys are based on a Doctor Who monster, and they happen to have been on one of my favorite episodes! These two are made of white flannel, so they're super soft and snuggleable. What can I say, I like things I can hug!

I'm not so sure about the one on the right... I used safety eyes on him, and while they're cute, their placement is just a bit off to me. Still, they're handmade, so they don't have to all be perfect... right? :D


Let's not forget my socktopuses. I can't even begin to explain how happy these little guys make me. Then again, the octopus is one of my favorite animals! They're so bizarre, and so fascinating! In my mind, the guy on the left is a boy socktopus, and the one on the right is a girl. They're not dating, though... they're just good friends.

What, you don't give your stuffies background stories?

Finally, a couple of shots of me! My husband and I went to the updated Red Stick festival last week, and I had to share these with you. We started out getting lunch at McDonald's, and after we ate, we had to play with what was left of our food. I would love to introduce you to our french fry guy- isn't he cute?

And yes, I carry a bunch of sizes of googly eyes with me everywhere I go. I also carry a glue stick, and up until recently I carried a pair of scissors with me. I never know when I'm going to get the urge to make something, you know?


While we were there, I was feeling very frustrated with my fibro. It sucks when there are things I want to do but can't because my pain level makes it almost impossible.

So, I pulled out my gel pens and did some lettering. I don't know why it helps, but it does...

Most of the time when I'm drawing on napkins I'm leaving a happy note for the people who work wherever we happen to be. That day, though, I was seriously overwhelmed by pain. Still, it made me laugh, as did this photo!


Once at the festival, we found a dalek! How many of you could have found a dalek and not taken a photo with it??

I have to admit, no one even batted an eye when I did this. It was loads of fun... I'm hoping the festival gets bigger and bigger. I really miss it.


Finally, I'll leave you with this close-up shot of my cutie-patootie. I don't know why this photo makes me smile, but it really does. Hopefully it makes you smile too!


Sometimes the simplest things can be healing.
See my disclosure statement for more information.

Sunday, May 25, 2014

A Sailor Moon/Frozen Mashup!

I see a lot of cute stuff. What can I say, I look for things that will make me happy. But when I saw this video I giggled lots, and realize I had to share it with you guys. This little girl is amazing... I can't wait to see what she's gonna sound like when she grows up!


EDIT: Yea, I'm derpy, I copied the wrong video information. It's fixed now.

Some things are too good not to share!!
See my disclosure statement for more information.

Sunday, April 27, 2014

EEEEK, it's a MONSTER!

I swear, I am SO TIRED of fibromyalgia. Since I'm in one of those weird head spaces where I'm not sure if anything I write is going to make sense, or be rude or weird or boring or... whatever, I'm just going to show you one of the projects I'm working on to distract myself from the fun that is my life at the moment. (Gee, does that come across as sarcasm? I hope it does. I should start adding in tags or something that say, "Hey, read this in a sarcastic voice and realize I'm saying the exact opposite of what's going on here.")

So... monsters. I've been wanting to try my hand at making stuffed animals for ages, and so a couple of weeks back I went to the dollar store and got some adorable socks. $4 got me 8 pairs of socks- two sets of knee socks and 6 sets of anklets in coordinating colors. I like having potions, and making what looks like patchwork fabrics.  (Oooh, another good idea... might have to get out the sewing machine for that one, though...)


I've been handsewing all of this, so it's a V-E-R-Y   S-L-O-W   P-R-O-C-E-S-S. That's a good thing, because it becomes a sort of zen-like process in which I lose track of my body and just become this stitching process. It's very enjoyable, unless I sit for too long and end up hurting MORE because I haven't moved in 3 hours. Yea, no one ever said I was brilliant. :D

Now I'm at a point where I'll need to get some eyes for my critter, and start deciding where I want the various bits and bobs attached. It'll work though... this is what I've sewn so far.

NOTE: I have not yet attached eyes, nose, or horns to the face. These are Photoshop mockups of what could be. I love exploring like this, because it doesn't cost money and it doesn't make me swear like a sailor because I have to go back and rip out stitches when I change my mind about something.

The photo to the right is ... clearly only halfway cleaned up. I thought I'd removed all the loose threads in Photoshop, but clearly they're hanging right over the legs. Ah well... be aware that they were all across the head too, so... whatever.

This is one mockup I did, looking at where I could place things. The ears/horns can be flipped over to show a light blue back, and the curve can go either way(out or in). I stuck them on top to see what sort of long tall critter I could come up with. This guy would remind me of Piglet from Winnie the Pooh if he were all pink.

The green stripe at the bottom of the head is the upper lip, and the big pink thing is a tongue. I may go back and make it smaller, or I might just sew a seam down the middle to thin it out some. It's... large.

I've also got the legs there, but I haven't stuffed them. They are long and super-skinny, so that should be lots of fun! Thank goodness I have chopsticks on hand!

After I made this one, I decided to fiddle around and try and come up with another facial layout. I like this one lots more...

I may end up doing a seam along the center of the head so that it's not so long and skinny. The point here is that I've got all sorts of options, and nothing but time to explore them in. It's a very fun process, if I do say so myself.

I've got several other projects going right now, and I photographed them tonight. I figure I can share them with you guys bit by bit, and not feel so overwhelmed by looking at over 100 photos and thinking "OMG WHAT DID I DO HERE???"

So what do you guys think? Would you want to try making a monster of your own? It seems lots more intimidating than it really is. I waited for weeks, then finally said to heck with it and jumped in, and I'm loving it!!

Monstah feets, I like those monstah feets!
See my disclosure statement for more information.

Saturday, March 29, 2014

A Trip to the Dollar Store... Nail Art on the Cheap!

Instead of doing some pretty nail art, for this post I decided to come at things from a different direction. I've often been asked where to get nail art supplies. Thankfully, I'm lucky enough to have a creative mind, so that I can find nail art supplies almost anywhere! So walk with me through my local dollar store and see what items made me think, "I could do nail art with that!"

Note: you can click any of the pics for larger versions. When possible, I've linked to examples of ways I've used the items either in my own blog or on someone else's. Draw inspiration where you can, and if you visit the blogs I link to, feel free to say I sent ya. :D


First off, I found this creamy petroleum jelly, as well as the lip balms. Any of these would be great for using around your cuticles with a brush to make cleanup that much easier. You could use these for water marbling, stamping, flicking... any of those messy techniques that make cleanup a pain in the tushie. You don't need anything expensive- just a dollar will take care of you!

How about something for masking off sections of your nail? You can get masking tape, of course, which is wonderful for this. However, sometimes I find that to be difficult to deal with, so I'll use sticky notes instead. They aren't as adhesive, they don't run the risk of pulling up your nail polish, and they don't need to be torn or cut with each use. They also work really well as temporary palettes for nail art- put out a dot of polish onto the paper, and dip your brush or tool into it!

How about texture tools? I'm a sucker for texture, and you're in total luck. I've used all of the items pictures in this section and have photos up of most of them. You can use the shelf liner on the left here as a stencil for messy, degraded spots, or you can ball it up and use it with a dabbing motion. The textured sponges on the right can have the polish applied directly to them and then used to apply it onto the nail, or you can put together a blend of polish on your palette to transfer using the sponge. You can ball up a piece of plastic wrap to dab polish on or you can remove polish that's been applied using the plastic wrap to achieve a somewhat watercolor effect.  I'm sure there are more things you can do with these... this is just off the top of my head!


What if you want a more chaotic look? Look no further- you can use straws to achieve that blown spatter look that's so much fun, or you can use the toothbrushes to flick polish onto your nails for a finer, smaller dot pattern. This is a technique I learned years ago at art school, and I've kept a toothbrush in my art box ever since!


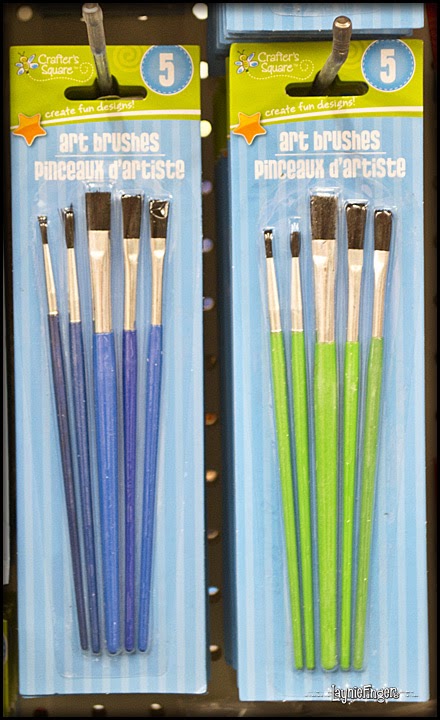
If you'd prefer a more controlled dot pattern, you can spend lots of money on a dotting tool set, or you can look at things around you with a different eye. If you notice, that set of paintbrushes on the left has a variety of brush handle sizes. These would be the perfect dotting tools to add to your collection of nail art tools! Add in some toothpicks for the tiniest of dots and you're all set!


If you like shiny things, your local dollar store probably has lots of goodies for you. Above, I chose three lovely examples of holographic things you can find for a dollar. One is a sticker set, and I've found that these tend to be extremely thing- meaning they do wonderfully on your nails. I'd probably avoid the actual stickers, but the background sticker paper is GORGEOUS!!! You could use your punches, decorative scissors, or regular scissors to cut out stripes, dots, and other lovely shapes!
Then there are the bags and boxes. I know, boxes don't work on your nails, but in the past I've been able to peel off the super-thin holo layer on these packages, which gives me a sheet of holo paper that's again perfect for nail art! When you compare this to the tiny sheets you get from nail art shops, you can see this turns out to be well worth your time!

Finally, there's glitter. I found these packages, and I've also found 6 packs in varying tone combinations (cool, warm, etc). If you don't want to deal with loose glitter, I've found that you can use glitter glue for nail art. Just be sure to let it dry before you put a top coat on it to avoid any weirdness.


You can also sometimes find sets of acrylic paints if you look. I found sets in basic colors as well as the brights you see to the left. These can be used with tiny paintbrushes to add designs to your nail art. Pigments can also be used to either tint your polish or applied with brushes or sponges for really interesting effects. Those LA Colors loose eyeshadows would work beautifully as a pigment for nail art!


When I saw these rubber bands, I got excited. I think they could be very fun to mask off parts of the nail for interesting stripes and sections. With 500 for a dollar, you could afford to cut them off and not worry about reusing them!

If you happen to need nail glue, you can save money by picking up some of the super glue here. You can even choose between liquid or gel!


Finally, there are all the various goodies that you can pick up for nail art- cotton buds, cotton balls, cotton rounds, hand sanitizer, storage containers, and actual nail polishes!! I find the small containers to the right do well for one-time-use custom colors, as I can mix my color, apply one coat, then put the top on while my nails dry and not have the polish dry out in between. They're also great
for storing glitter mixes and other tiny nail art goodies.

So take a trip to your local dollar store and keep an eye open. You may find yourself with access to tools you never even thought about! Do you have any money-saving tips for nail art you'd like to share? Leave examples in the comments... I love saving money!

Where have I been? Oh, pretending to be a glamorous someone else.
See my disclosure statement for more information.