

Note: you can click any of the pics for larger versions. When possible, I've linked to examples of ways I've used the items either in my own blog or on someone else's. Draw inspiration where you can, and if you visit the blogs I link to, feel free to say I sent ya. :D

 First off, I found this creamy petroleum jelly, as well as the lip
balms. Any of these would be great for using around your cuticles with a brush to make cleanup that much easier. You could use these for water
marbling, stamping, flicking... any of those messy techniques that make
cleanup a pain in the tushie. You don't need anything expensive- just a
dollar will take care of you!
First off, I found this creamy petroleum jelly, as well as the lip
balms. Any of these would be great for using around your cuticles with a brush to make cleanup that much easier. You could use these for water
marbling, stamping, flicking... any of those messy techniques that make
cleanup a pain in the tushie. You don't need anything expensive- just a
dollar will take care of you!
 How about something for masking off sections of your nail? You can get masking tape, of course, which is wonderful for this. However, sometimes I find that to be difficult to deal with, so I'll use sticky notes instead. They aren't as adhesive, they don't run the risk of pulling up your nail polish, and they don't need to be torn or cut with each use. They also work really well as temporary palettes for nail art- put out a dot of polish onto the paper, and dip your brush or tool into it!

 How about texture tools? I'm a sucker for texture, and you're in total luck. I've used all of the items pictures in this section and have photos up of most of them. You can use the shelf liner on the left here as a stencil for messy, degraded spots, or you can ball it up and use it with a dabbing motion. The textured sponges on the right can have the polish applied directly to them and then used to apply it onto the nail, or you can put together a blend of polish on your palette to transfer using the sponge. You can ball up a piece of plastic wrap to dab polish on or you can remove polish that's been applied using the plastic wrap to achieve a somewhat watercolor effect. I'm sure there are more things you can do with these... this is just off the top of my head!
 What if you want a more chaotic look? Look no further- you can use straws to achieve that blown spatter look that's so much fun, or you can use the toothbrushes to flick polish onto your nails for a finer, smaller dot pattern. This is a technique I learned years ago at art school, and I've kept a toothbrush in my art box ever since!
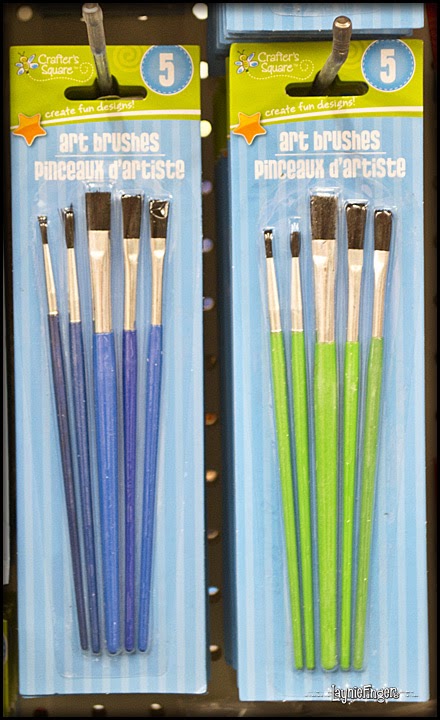
If you'd prefer a more controlled dot pattern, you can spend lots of money on a dotting tool set, or you can look at things around you with a different eye. If you notice, that set of paintbrushes on the left has a variety of brush handle sizes. These would be the perfect dotting tools to add to your collection of nail art tools! Add in some toothpicks for the tiniest of dots and you're all set!


 If you like shiny things, your local dollar store probably has lots of goodies for you. Above, I chose three lovely examples of holographic things you can find for a dollar. One is a sticker set, and I've found that these tend to be extremely thing- meaning they do wonderfully on your nails. I'd probably avoid the actual stickers, but the background sticker paper is GORGEOUS!!! You could use your punches, decorative scissors, or regular scissors to cut out stripes, dots, and other lovely shapes!
Then there are the bags and boxes. I know, boxes don't work on your nails, but in the past I've been able to peel off the super-thin holo layer on these packages, which gives me a sheet of holo paper that's again perfect for nail art! When you compare this to the tiny sheets you get from nail art shops, you can see this turns out to be well worth your time!
Finally, there's glitter. I found these packages, and I've also found 6 packs in varying tone combinations (cool, warm, etc). If you don't want to deal with loose glitter, I've found that you can use glitter glue for nail art. Just be sure to let it dry before you put a top coat on it to avoid any weirdness.

 You can also sometimes find sets of acrylic paints if you look. I found sets in basic colors as well as the brights you see to the left. These can be used with tiny paintbrushes to add designs to your nail art. Pigments can also be used to either tint your polish or applied with brushes or sponges for really interesting effects. Those LA Colors loose eyeshadows would work beautifully as a pigment for nail art!
 When I saw these rubber bands, I got excited. I think they could be very fun to mask off parts of the nail for interesting stripes and sections. With 500 for a dollar, you could afford to cut them off and not worry about reusing them!
If you happen to need nail glue, you can save money by picking up some of the super glue here. You can even choose between liquid or gel!


 Finally, there are all the various goodies that you can pick up for nail art- cotton buds, cotton balls, cotton rounds, hand sanitizer, storage containers, and actual nail polishes!! I find the small containers to the right do well for one-time-use custom colors, as I can mix my color, apply one coat, then put the top on while my nails dry and not have the polish dry out in between. They're also great
 for storing glitter mixes and other tiny nail art goodies.
So take a trip to your local dollar store and keep an eye open. You may find yourself with access to tools you never even thought about! Do you have any money-saving tips for nail art you'd like to share? Leave examples in the comments... I love saving money!

Where have I been? Oh, pretending to be a glamorous someone else.
See my disclosure statement for more information.


