Tuesday, July 12, 2011

Dr's Remedy Nails- Summer 2011

I'm having a horrible time with my email lately. I don't know why, but suddenly lots of emails are ending up in my spam folder that shouldn't be. I'm so glad I started looking through it every few days, although I really don't want to think how many mails I missed that I would have wanted to see...

Thankfully, I found the email from Dr's Remedy Nail Polishes telling me about their new summer collection! These colors are LUSH! The orange is calling my name, and I cannot WAIT to see the blue on my nails. I also have a feeling that I might actually be able to wear the nude pink... we shall see!

The descriptions for the polishes really make me want to try these. Just look for yourself!

* Lovely Lavender: a pale purple with matte depth and charm
* Glee Gold: a shimmer-infused coin of perfection
* Tranquil Tangerine: a bold, but wonderfully wearable, slice of juicy delight
* Bold Baby Blue: an aqua-meets-turquoise take on every boy's favorite color
* Nurture Nude Pink: a delicate, damsel-in-distress barely-there beautiful

Aren't these fab? That lavender looks like it might be one of those almost grey, almost lavender, neutral and lovely colors that's so popular at the moment, and really, do I need to say anything about those shimmers? I'm absolutely bouncing at the idea of getting to try these!!

Dr.’s REMEDY Enriched Nail Polish is DBP, Toluene & Formaldehyde free and is exclusively available for $17 online at www.remedynails.com, or call 877-323-6756.
Images and information were provided by the company for consideration.
See my disclosure statement for more information.

Coming Soon From China Glaze- the Metro Collection!


I'm sure you've heard about the upcoming China Glaze Metro collection. Still, I have to say that I am really looking forward to it!I love the way the colors look all together in the above image! The colors are so rich and yummy! Let's see what's in there!

First off, there's the Downtown collection, a 6 piece box set which includes Skyscraper, Concrete Catwalk, Westside Warrior, Trendsetter, Loft-y Ambitions and Midtown Magic. The polish descriptions sound so interesting!
* Skyscraper: A sparkling, glitter blue reminiscent of the sky over the city.
* Concrete Catwalk: Steel grey crème is amazing for a chic mani.
* Westside Warrior: For the trendsetting woman this camo green crème is to die for.
* Trendsetter: Mustard yellow shimmer translates beautifully from hot dogs to nails.
* Loft-y Ambitions: Burgundy shimmer and cocktail hour – nothing better.
* Midtown Magic: Burgundy base with flecks of gold shimmer captures the latest fashion trend.
Click image for a larger view of the polishes.

Then there's the Uptown collection, a 6 piece box set which includes CG in the City, Urban-Night, Traffic Jam, City Siren, Street Chic and Brownstone. The descriptions make me want to wear these!
* CG in the City: Glittering dusty purple, bronze and silver multi-tonal glitter, perfect for a pop of edge from West side to East side.
* Urban-Night: Exactly what you need for a night on the town – rich purple crème.
* Traffic Jam: Stop traffic with a breathtaking, raspberry pink crème.
* City Siren: The perfect deep, red crème to match any outfit.

* Street Chic: This gorgeous beige crème is the perfect go to shade letting your clothes do the talking.
* Brownstone: Burnt terracotta crème mirrors the quaint townhouses of the city.
Click image for a larger view of the polishes.
This collection looks yummy to me. I'm obviously drawn to the two glitter polishes (Hello, my name is Laynie and I am a glitter addict!), but that olive green is calling my name! The yellow looks interesting for nail art, and I'm just itching to get my hands on  the four middle Uptown polishes! Yea, I think I need to start saving my pennies!

The Metro polishes will be available as box sets of 6 and as individual polishes. China Glaze nail lacquers are free of DBP, toluene, and added formaldehyde, and are available through salons and professional beauty supply stores nationwide. For more information, visit: www.chinaglaze.com or follow China Glaze on Twitter: http://twitter.com/ChinaGlaze.

Til next time!
Images and information were provided by the manufacturer.
See my disclosure statement for more information.

Monday, July 11, 2011

OMFGPonies and Pengins, does it get any better than this?


I have to be honest here. I intended to post this earlier- maybe Saturday morning? I've lost track of time, thanks to the chest cold of doom that's descended upon our home. I've spent too much time hacking and coughing, wondering if I have the energy to cough again. And all this while, the penguin photos have been waiting for me.

It all started with me deciding I had to wear OMFGPonies and see what it looked like on my nails. It was a bit thick to start out with, so I thinned it with a few (maybe 10?) drops of polish thinner, and then it was absolutely dreamy!

Also, I apologize because I'm going to be sharing a few more photos than usual with this one. I'm sort of in love with it!! Also, I gave up on getting video of it, mainly because it would involve spending half an hour outside in weather that feels like it's 115 degrees so that my camera can adjust to the ambient temperature. Otherwise, the lens just fogs up and makes it impossible to take pictures.

One thing I didn't expect with OMFGPonies is the ending finish: it turned out to have a matte texture that really surprised me! It was easily remedied with a coat of Seche Vite, but I would have preferred a glossier finish. Ah well, not a huge deal.

One thing I didn't think about but was obvious in retrospect was the difficulty that occurred during cleanup. Big glitter = messy cleanup. Overall it wasn't too hard to clean up, but I definitely ended up with some glitter spots that made my cuticles look a bit messy.

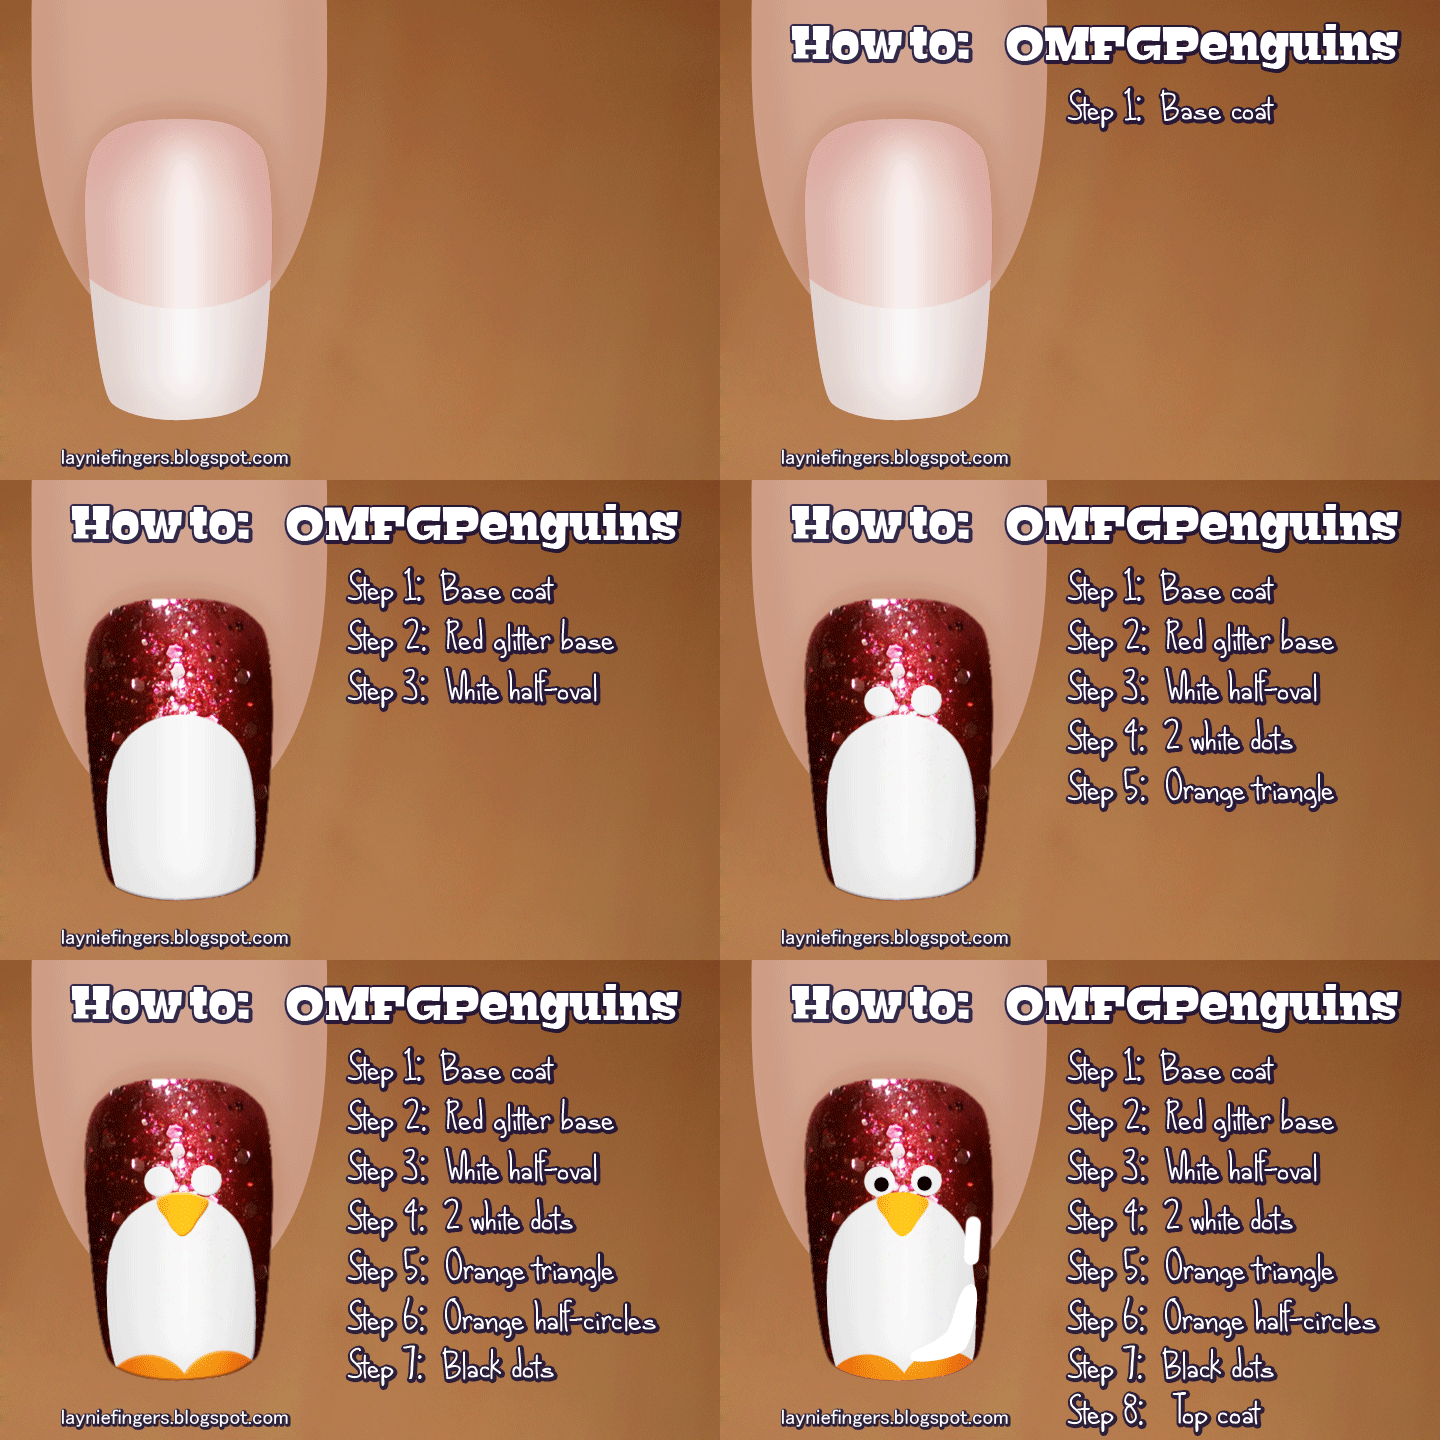
After wearing OMFGPonies for a day, I realized I wanted some nail art. I don't know what prompted me to make red glitter penguins, but I really like them! Turns out they were simple to do, although they were a bit on the fussy side. Still, even my husband loves these!

While it never occurred to me to wear red glitter penguins, I'm glad I did because they make me giggle every time I see them! I'm also really happy with the positions of their eyes, and everyone who has seen them has commented on that as well!

So- how do you make them? I thought you'd never ask!

Items needed to make OMFGPenguins:
  • White nail polish or acrylic paint
    This can be a regular nail polish, a nail art striper polish or even plain white acrylic paint.
    Use whatever you have.
  • Nail art brushes
    These are optional, but a smaller brush can be easier to control when trying to make dots and shapes. Again, use what you have.
  • Dotting tool, bobby pin, toothpick, etc
    I found using a dotting tool was easier for making the eye dots. It's optional. Use whatever you're comfortable with.
  • Black rhinestones, black nail polishI used black rhinestones to create the pupils of the eyes, but you can use whatever you have. Are you sensing a trend here?
 and if you can't follow the how-to because it's upside down, I did a special one just for you!


Keep in mind that you can do lots of expressive things with the eyes. Keep the white parts small and the eyes will be tiny and cute, or make them HUGE and they'll still be adorable! Just look at the different expressions I've given this little guy, just by changing the position and size of the whites and blacks of his eyes!


As always, feel free to show me what you've done if I've inspired you at all. I love sharing with people, and feedback makes me smile for HOURS! :D
Til next time!

EDIT: I cannot believe I forgot to include this image. It's only the first image I edited, and the one I sent to my friends to make them giggle. Yea, I'm forgetful... it's what happens when you get old! Anyway, enjoy!


The penguins have eaten  my brain, it's true!
See my disclosure statement for more information.

Friday, July 8, 2011

Green and Gold Animal Print- is it Tiger? is it Zebra? Who knows?

Hi hi!! I have to share this, even though I should be asleep. I had a weird night and should have been spending the day with my mom taking her to the doctor, but I seem to have a tummy bug. So I figured I'd give you something fun to look at while I'm feeling icky!

This is the last installment for this version of Animal Print week (which actually lasted two weeks, or... is it three? I can't count!) Still, it's cute as a button and can be done in the colors of your choice!

It's super simple too. Apply your base coat and then 2-3 layers of your background color. (This one is Manbug by BB Couture.) Once that's dry, add stripes of the metallic polish of your choice (I've forgotten which one I used here! EEP!) and follow up with thin black stripes under each metallic stripe as an accent. If your background color is darker, you can use silver and white as accent colors and it would really pop!


So, try it, and if you do, show me! I love seeing people trying what I've shown! Til next time!

The tiger zebra is actually a very rare animal. Green is considered the ultimate beauty for their coat.
See my disclosure statement for more information.

Tuesday, July 5, 2011

OMFGPonies- My Little Franken

Holy ponies on a BBQ, I am so, so giddy right now. Last night I was doing my nails with my frankened version of My Private Jet¹ when an idea hit me: I could franken the red-glitter-in-black-jelly polish I've been fantasizing about!

I know, I know. I've mixed my own colors more than once, so why was this such a breakthrough? I have no idea. All I know is the idea hit me like a bolt of lightning, and I immediately tweeted about it!


As you can see, Lisa from Shades of Magic absolutely LOVED my outburst, so I clearly had the name for this franken-to-be, if it turned out at all worth saving.

I knew what I wanted. I've seen several polishes lately that were red glitters in a black jelly base, but each of them had something wrong with them. So rather than keep waiting for the perfect one, I decided to try my hand at mixing what I considered the perfect polish.

See, you may have noticed by now, but I kinda have a thing for glitter. In fact, if you were to look through my box(es) of nail art goodies, you'd find more glitter than you know what to do with. Seriously, I've got over 20 different containers of loose glitter in different sizes and shapes, not counting glitter polishes, and I'm ALWAYS on the lookout for more! It's become an obsession almost, and I simply cannot get enough!

So, thanks to my stockpile of glitter, I was able to pull out three different red glitters, a russet red pigment, and a red glitter polish that I thought would all work together. I also grabbed my TKB glitter suspension base because I knew I wanted a sheer base, and a simple black no-name polish. I used very little black, because black is a very strong color that can easily overpower a polish quickly.

Instead of just jumping in and dumping a lot of stuff into a bottle, I started with one of my mixing cups. I used a dot of black, a dollop of clear suspension base, and a bit of all my glitters. After stirring it up, I was in love, and even though I didn't have the mix right, I knew I wanted a whole bottle of this one.

Onward to the polish. I went in very small quantities at a time, so I could change things if I wasn't happy. It took an hour of tweaking and shaking, testing and tweaking some more to come out with something I was happy with. But once I tested that last mix... omg, I knew this one would live up to its name.

Meet OMFGPonies, the first franken I've made that I am absolutely completely in love with. It's like a deep black cherry base with amazing glitterbits. And keep in mind that these photos really don't capture the depth of it. I need to shoot video in full daylight, but I was sick in bed all day and didn't get to it. Maybe tomorrow...

I absolutely love that as you turn the nail, you capture glints of microglitter peeking up through the sheer black base, russet shimmer catching the light and larger flakes of glitter reflecting a silvery red. My largest red glitter turned silver in the polish, but I knew that was a possibility, and I was ok with the concept if it did.

I love this polish, more than I can say. And the best part? I can make more... :D

You know, if I ever get the bits again.

Til next time...

¹ My version is called My Magic Bus, because it's magically delicious and much cheaper than taking a plane. :D

Some polishes may have been provided by the manufacturer for consideration.
See my disclosure statement for more information.

Monday, July 4, 2011

Happy Independence Day! Let's Have Some Nail Art!

I have to laugh... I was talking twitter last night (I know, I said that already, but I've been up all night. Give me a break!) and someone asked me how long I've been blogging. I went to check my history, thinking my one year blogaversary was coming up this month. Instead, I had a surprise...

My one year blogaversary was actually on June 23! I've been blogging over a year, and didn't even know it! So, let me just say from the bottom of my heart, thank you for being here! There's no way I'd have managed to keep this going without all of you reading and commenting. You make it worthwhile, and that's why you're getting two bits of bloggy goodness today!

So, let's look at some fourth of July nail art, shall we? I didn't do anything overly spectacular, but I did do designs I'd be happy to wear. I started out with something fun, something glittery...

Glitter Glory is a simple design using only three polishes. I chose a white base so that my colors would pop, and I wouldn't have to worry about painting a stripe later. Once my base color was dry, I put in diagonal sections of red glitter and blue glitter. A top coat of Seche Vite and we were done!

 Spangles and Stripes is a simple, almost nautical theme. Again, I started with a white base. This time, I painted a thick red horizontal stripe at the top of the nail and a thick blue stripe toward the base of the nail. In between I added a stripe of silver glitter, just because I really love glitter. Add top coat and it's done! This could be cute alternating the top color, as well!


Finally, I did a design inspired by all the fireworks that will be seen tonight. Normally I would have used a black base for this, but instead I chose to use a very deep blue shimmer polish for the background. It still feels like night without being utterly black. I then chose a central point on the nail and began pulling thin stripes of polish out in a star pattern. I alternated blue, reg, and silver glitter for this, hoping to mimic fireworks. I think I overworked it a bit too much, though. Ah well, they can't all be winners, right? 

To re-find my center point, I added a single white rhinestone in the center of the burst to signify the explosion at the center of a firework. It's not what I was hoping for, but it's still wearable, I think. What do you think?

And now that I've posted both my crackle experiences and my July 4th manicures, I think I'm going to curl up in my bed, try to get some sleep, and hope I can avoid the hottest part of the day. Currently it's 11:50am with a temperature of 90 and a heat index of 111. NO BUENO, people!!! NO BUENO!

Til next time, my lovelies!


Some polishes may have been provided by the manufacturer for consideration.
See my disclosure statement for more information.

The Fun of Frankening- Frankencrackle!

This entire entry shows what happens when I get to talking on Twitter. It started out simply enough- I was goofing off, working on photos while I talked to some friends online. Then someone mentioned wondering if she could mix regular shimmery nail polish into crackle polish, and I realized I'd been wondering about that myself. Could you actually franken your own crackle polish colors?

As I talked with my husband, he made a quick joke and I realized that not only would I do some research, I would have to make a mascot. Ladies and gentlemen, allow me to introduce my new frankening mascot- the Mysterious Mr. Frankencrackle!


Cute, isn't he? And yes, in the interest of full disclosure, the above image is a photo illustration based on nail art I did last night. You can see the original nail on my yfrog account. Since he's a mascot I may use again, I wanted  to make him a little cleaner, a little cuter.

So, the experiments. I wondered several things: 
  • Can you thin crackle polish with regular nail polish thinner? 
  • Can you mix colors of crackle polish together? 
  • Can you mix regular nail polish into crackle polish?
  • Can you mix pigments or glitter into crackle polish?
The results were interesting, but to spare you the long, very wordy description, I'll simply let the photos speak for themselves. :D


 So, to sum up:
  • Can you thin crackle polish with regular nail polish thinner? 
    • Yes! Regular nail polish thinner does thin crackle polish, but thinning it too much makes it look a bit odd. It still crackles nicely, though.
  • Can you mix colors of crackle polish together? 
    • Absolutely! It helps to add a drop or two of thinner to give it a bit more open time, before it dries out too much to apply.
  • Can you mix regular nail polish into crackle polish?
    • Absolutely NOT. It turns everything into a goopy, sludgy mess. NOT attractive at all!
  • Can you mix pigments or glitter into crackle polish?
    • Yes, you can! Pigments and glitter do mix nicely into crackle polish. However, you may need some thinner so you don't end up with a total gloppy mess that's too thick to apply!
Check back later today, I'm hoping to finally get my Fourth of July polishes up! I know they don't help much today, but hey, you still have time before tonight, right? :D


Crackle polishes were provided by the manufacturer for consideration.
See my disclosure statement for more information.