Showing posts with label stripes. Show all posts

Sunday, July 28, 2013

Valentine's Day Candy Cane Water Marble- a Layniefingers tutorial

A while back I mentioned that I was finally figuring out how to water marble nails! I still haven't managed to do both hands with water marble, but I'm finally getting the concept down at least. Once I'd finished with today's design, I was struck by a couple of things: the colors were very traditionally Valentine's day to me, and the pattern reminded me of a candy cane for some reason. That's why this is a Valentine's Day Candy Cane Water Marble in July... because that's what it felt like!

If you like the look of this one, why not check out the video? It shows step by step how I achieved this look. Thanks for watching!


Some polishes may have been provided by the brand for consideration.
See my disclosure statement for more information.

Wednesday, October 31, 2012

One Last Halloween Nail Design

I know this is last minute, but I love this design so much I had to share it. I wanted to do sort of a take on candy corn but with a twist. This bright beauty is what I came up with, and I am absolutely in love with it!

This one isn't difficult to do, but it is fiddly. First I painted the nail with pink, orange, and yellow. I went with vibrant, almost neon colors because I wanted a strong, graphic look to them. I also didn't worry about a neat line, since I wanted that sort of candy corn feel to it.

Once that layer was dry, I very precisely laid out stripes using three pieces of striping tape next to each other, then skipping around that much space and adding another three pieces side-by-side. This gave me much thicker lines than I would have had just using the single pieces of striping tape. However, you could use whatever size tape you like.

I then painted the entire nail with a black creme polish. I pulled the tape pieces off while the polish was still wet, being careful not to smear the still-wet black. I let this dry for several minutes before adding a coat of quick-dry topcoat. That sealed the colors together and let them look glassy and seamless.

Can I just say how much this design makes me smile?? Seriously, I want to do all my nails like this! The bright colors look all the more bright next to the black, and I think thinner lines of color contrasted with thicker lines of black could be a fun spin on this idea. Clearly, I have some experimenting to do!

Speaking of, I may have some nail sets up for sale soon, so if you're looking for some sparkly nails for the holidays I just might be able to help you out! Keep an eye on this space... :D


Some polishes were provided by the brand for consideration.
See my disclosure statement for more information.

Sunday, March 11, 2012

Magnetix Polish

Magnetix polish with two magnets.
I am so excited! Last night, my family and I were out running some errands and I decided to stop off at Rite Aid to see if they had any fun new nail goodies. Talk about a score, I found a display of magnetic nail polishes!

They weren't too horribly expensive, either. The Magnetix polishes are $7.99 each, and come with two magnets! I was excited about that, since it seems most magnetic polishes either come with one magnet or make you buy the magnet separately!

The polishes come in a plastic box, and the display was on the bottom shelf. I could easily have missed it if I wasn't specifically keeping an eye out for interesting polishes! Unfortunately, I didn't notice how many colors there were, but I saw quite a few, including gold, silver, green, blue, deep pink, and a sort of putty brown color. They all had the same two magnets, so you can't get more patterns by buying more than one bottle.

Still, the patterns are nice enough. The magnets are somewhat flexible too, which let me sort of bend the magnet around my finger, so tht the magnetic field reached more of my nail instead of sitting right on top.


One strange thing, at least to me: the bottle shape is downright bizarre! While the bottom of the bottle is round, the top is triangular, and slants off to the left! It's sort of like a Nicole by OPI bottle, if you turned it to the side and the top was triangular. I don't know, it's weird!

It doesn't affect the polish inside, though, and it wasn't hard to hold or anything. I just find the shape weird. Maybe it's interesting instead. Whatever.

The big question for me was would it work. I've been dying to get some magnetic polish, but I didn't want to spend $20 on a bottle, I'm just too poor for that. I can deal with $8, even if it is a bit more than I'd like to spend, but I would be heartbroken if it didn't work. Thankfully I wasn't disappointed...


So, the final verdict? This stuff is kind of tricky to use, but it's absolutely gorgeous. It can be worn as a normal polish, worn with the magnetic stripes, stamped over a different polish... (yes, it stamps like a dream!)

Take a few minutes to get used to using the magnets, though. If you use too little polish and you won't see stripes, and if you use too much you won't see the stripes. Expect to have to redo a few nails, or do like I did and just live with it, since it's pretty no matter what you do to it! I'll let the rest of the pics speak for themselves...


What are your thoughts about magnetic nail polish? Are you itching to rock the trend, or is it leaving you bored and waiting for the next big thing? Leave me a comment and let me know what you think!


Yay for finding inexpensive magnetic polish!
See my disclosure statement for more information.

Tuesday, February 28, 2012

The Dotted Line- an experiment in black and white nail art...

Man oh man, was last night rough. I think I should be sleeping right now, but I'm too tired to think about it. I was up all night with nausea and praying to the porcelain god, and I didn't even have the fun of getting drunk first! Oh body, why do you have to be so eager to host such disgusting viruses?

As a result, the fun nail designs I've been working on are stuck in a holding pattern while I get over this ick. Good thing I've got some stuff in the archives I hadn't posted yet! Today I'm showing a look I did with black, white, and silver holographic glitter. I mean hey, glitter is good for everything, right?

Don't answer that... :D


This is a super-easy design and you don't need that much to do it with! I used my Wet n Wild white polish, a silver from a Sally Hansen gift set I grabbed a couple of years ago on sale, a black striping polish, silver holographic rhombus glitter from Born Pretty, and a black stone from Viva la Nails.

It's super simple to do, too. I'll list the steps in order...

  1. Base coat. Always always always use a base coat to protect your nails and make your manicure last longer!
  2. Paint entire nail white. Use 2-3 coats to ensure opaque coverage.
  3. Paint one side of nail silver. I painted around 1/3 of the nail silver.
  4. Paint black stripe dividing white and silver. This can be as wide or as narrow as you want.
  5. Add white dots down the black stripe. I used a dotting tool, but you can use a bobby pin, a toothpick, a ball point pen... use what you've got!
  6. Add silver glitter pieces in the shape of a flower. If you don't have the glitter, you can paint flower petals on.
  7. Place a black stone in the center of the flower shape.  Again, if you don't have the stone, you can paint a dot, or use a drop of glitter polish, or a piece of glitter from a glitter polish. Do what you like, make it your own!
Of course, this could be done in any colors you like- pink and blue, red and black, green and yellow... That's one thing I love about nail art... you're free to pull inspiration from anywhere, and tweak it til you like it. Have fun with it, it's only nail polish!

Til next time!
The glitter and stone were provided by the shops listed in exchange for an honest review.
See my disclosure statement for more information.

Thursday, February 9, 2012

Scrapbook Punch Nail Decals

This Studio G punch cost
$0.97 at WalMart!
I've done a post about this before, but I'm doing it again because I found the most adorable punch while walking! I love being able to customize my nail art, so the idea of punching decals from whatever polish combinations I choose makes me super happy. As you can see, it make four tiny little hearts with each punch!

I had to test it out as soon as I got home. Sure enough, it made absolutely adorable decals that are the perfect size for nails. Seriously, these things are adorable!

So- how would you go about making these? It's seriously simple. You need a few items to start with...
  • The punch(es) of your choice
  • Nail polish- can be nail art polish, colored, or clear
  • Any other items for decorating the nail polish sheets:
    • glitter
    • nail art pens
    • brushes or dotting tools
  • Plastic zipper sandwich bags
I painted strips a bit wider than the punch.
It's a very simple process. First, you paint strips of your choice of nail polishes across the zipper bag. I'm using a small bag used for packaging jewelry, but lots of smooth plastics will work. Do a test spot first, though, to make sure the polish will come off once it's dried.

I find it helps to do two or three coats of polish, to make sure the resulting sheet is strong enough to hold together. This is a perfect opportunity to use cheap clear polish just to build up the thickness.

Also, this is a great time to play with wet marbling. On the bottom row, you can see where I experimented with marbling different colors together. You can also do stripes, dots, wavy lines... whatever you like!

The next step is the hardest for me- waiting. The polish needs to be completely dry before you remove it from the plastic, otherwise it can bunch and tear, wasting your polish and your time. You can give it a day to dry, or even a week or more. The longer you wait, the easier it is to remove from the plastic as well.

Eek! I'd been wiping the tip of my
skewer on my thumbnail while
marbling the bottom row. Sorry!
Once it's thoroughly dry, removal is a snap. I fold back the corner of the bag under the polish and sort of roll it away from the polish. The polish lifts away easily, leaving you with a sheet that's entirely polish.

The benefit of using these instead of nail stickers is that they're so easy to remove! Because they're nail polish, they meld into your background polish, and easily dissolve in nail polish remover.

Unfortunately, that's the same reason they can't be used as glitter in nail polish- they'll melt back into the liquid polish. Such a shame... =/

An interesting thing about the polish strips: I noticed that the various polishes have much different textures and qualities. I applied basically the same thickness of polish for all of the strips. However, they had very different textures once they were dry. The neon polish (middle of the top row) was very thin, had dried very quickly, and was very brittle. The glass fleck polish on the top right was flexible and sturdy, and the black on the bottom right seemed almost like latex- very pliable and sticking to itself easily.

It would seem that the brittle polishes wouldn't wear as well as the pliable ones. I'm not sure if that's the case... it would be interesting to experiment with!

Ah well, I digress. Back to the tutorial... the next thing is pretty much the last thing- punching the hearts. I find it much easier to use the punch upside down, because I can see exactly where I'm lining up the punch on the polish surface. This is especially useful when punching patterned polish strips.

Unfortunately, when you punch upside down, you often get little hearts everywhere. I found hearts in interesting places after doing this. It's amazing how those little things can fly!

Now I'll share some pic spam showing the finished results. It's really cute!! I'm thinking you could also use the leftover polish bits as well... trip them to fit your nail and apply them in a band. It's an idea!

Four marbled harts in a row. Black on red is striking!

Hearts, hearts everywhere!
Stored in a plastic bag, you can see the variety of hearts I made. What, me obsessive? Noooooo..... :D
So, the next thing to do is to use some of these in a manicure! Sounds like a plan, eh? But first, I've got another tutorial I shot last night to use for sponge painting your nails! I'm all about frugal...

Til next time!

Some polishes were provided for consideration.
See my disclosure statement for more information.

Tuesday, February 7, 2012

Nontraditional Valentine Nails

I'm not all that into Valentine's day. I've never been a fan of pink, and I think people should tell their loved ones how they feel more often than once a year. I'd much rather get a bouquet of flowers to celebrate Thursday, or slow dance in the rain just because we can.

However, I know I'm probably in the minority there, so I figured I'd try some nail designs to celebrate all things hearts and flowers. Then there were these designs, which have the right colors but seem to be missing the hearts. (They're also missing skill, but hopefully you guys can forgive me for that...)


I fully intended to write down all the polishes I used for these, but ended up using WAY too many polishes while I was working. Seriously, my husband came in while I was painting, shook his head at seeing the bed covered in polish bottles and nails on skewers stuck in styrofoam to dry, and walked back out. He might have said something about me making a giant mess, or how stinky the polish was, or maybe how crazy I am.

It's ok, he knows how artists are. He's one too!

I have to admit, I'm really liking the dotted nail. Those colors really make me happy! Maybe pink isn't so bad...

Polishes may have been provided by manufacturers for consideration.
See my disclosure statement for more information.

Friday, July 8, 2011

Green and Gold Animal Print- is it Tiger? is it Zebra? Who knows?

Hi hi!! I have to share this, even though I should be asleep. I had a weird night and should have been spending the day with my mom taking her to the doctor, but I seem to have a tummy bug. So I figured I'd give you something fun to look at while I'm feeling icky!

This is the last installment for this version of Animal Print week (which actually lasted two weeks, or... is it three? I can't count!) Still, it's cute as a button and can be done in the colors of your choice!

It's super simple too. Apply your base coat and then 2-3 layers of your background color. (This one is Manbug by BB Couture.) Once that's dry, add stripes of the metallic polish of your choice (I've forgotten which one I used here! EEP!) and follow up with thin black stripes under each metallic stripe as an accent. If your background color is darker, you can use silver and white as accent colors and it would really pop!


So, try it, and if you do, show me! I love seeing people trying what I've shown! Til next time!

The tiger zebra is actually a very rare animal. Green is considered the ultimate beauty for their coat.
See my disclosure statement for more information.

Thursday, January 20, 2011

Secret Message Nail Art- an understated approach to nail art?

I am a bad, bad blogger. I took this shot several weeks ago and meant to share it, but then I got totally sidetracked. It's a good thing I'm not a doctor or an air traffic controller or something, else people would be dying while I wondered what it was I'd needed to do...

So, today's nail art is sort of backwards, in that you do the nail art first and then cover it up with your base coat. I know, it sounds totally bizarre, but look at the end result!


This was a super easy look, and it will absolutely make people look at your nails. I started with a base coat of solid white, just a cheapie 99 cent white polish from Love My Nails. It works well enough, although it tends to streak a bit on the first coat. Still, for 99 cents I'll deal.

Once that had dried a bit, I used my Art Deco black striper to draw vertical stripes down my nails fairly evenly spaced. This is a cute look on its own, but I had something else in mind. I'd noticed that the Sally Hansen Purple Diamond Nail Prisms dries very translucent, and I wanted to experiment with it.

Once the black and white had dried, I brushed a layer of Purple Diamond over the stripes and sat back to watch it dry. I wish I had video capabilities, because this is an absolutely gorgeous look. It's subtle enough to not look like you're wearing circus tent stripes on your nails, but it's still striped enough to make people wonder how you managed it. I can't wait to wear this one as a full manicure.

So what do you think- do you want to try some hidden nail art? Does it look interesting to you?

Can holographic polishes really be called understated? Who knows?
See my disclosure statement for more information.

Monday, December 20, 2010

Happy Holidaze the fifteenth- it's all stripey!


Today's look is simple again. I find that some of the most fun looks are simple.This green look could be worn just about anywhere, and is still simple enough to do at home.

I started with a base coat as always, then did two coats of my green polish. I added a layer of multi-sized glitter, then painted on stripes of silver polish. I let everything dry for 5-10 minutes, then applied a coat of topcoat.

Easy as can be. You could also jazz this look up with some rhinestones or striping tape if you liked. It's a fun look that takes almost no time to put together!

Sunday, December 19, 2010

Happy Holidaze the Fourteenth- It's a Kwanza day!

*koff*sniffle* Oh boy, it's still one of those days. Let's make things short and sweet today. When I asked people what holidays I should include art for, several of my friends suggested Kwanzaa. And since I'm not terribly familiar with it, I turned to the web to learn more about it.

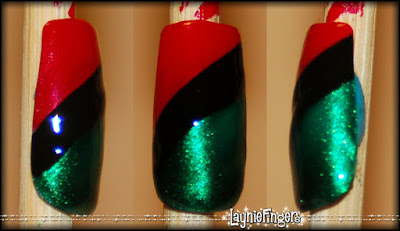
The Official Kwanzaa Web Site has a lot of information about the holiday, and has a lot of interesting reading about it. For my art today, though, I stayed with a very simple look using the colors of Kwanzaa- black, red, and green.


This simple design is elegant and festive, and the sparkle in the polishes fit the festive nature of the season. I would have no problem wearing this design any day of the year!


Tuesday, December 14, 2010

Happy Holidaze the tenth- Checks, Please!

Whew, today has been one of those days that seems like it's 48 hours long, and I only got a few hours of sleep. I even ended up falling asleep in the waiting room at my son's doctor appointment! Talk about embarrassing...

So, this will be a short-n-sweet blog for short-n-sweet nails! (Or long nails, whatever, I'm not picky!) Today's nails are checked, using blue, green, and silver. It's very simple to do... paint your base color, then do diagonal stripes one way in one color, then the other in another color.


The process is really simple.

  1. Apply base coat. Always, base coat.
  2. Apply background polish color. This generally means 2 coats, minimum.
  3. Paint evenly-spaced silver stripes diagonally across the nail.
  4. Paint evenly-spaced green stripes diagonally in the opposite direction across the nail.
  5. Apply top coat after stripes have had a few minutes to dry.


See? I like it, I think it's cute, but I'm not sure it looks finished, exactly. Maybe it needs something else on top- a few flowers, or something. Maybe a fleur de lis, since I'm in New Orleans Saints country? What do you think- would you leave it like this or add something to it? What would you add?

Thursday, December 9, 2010

Happy Holidaze the seventh- Sweet nothings!

Ahhh, the holiday season, when people hang all sorts of candies from a tree, so that you can casually nab a snack as you wander by! Oddly enough, I've never been a fan of mint but I think the patterns on mint candies can be adorable. Candy canes, starlight mints... the crisp white really sets off the red & green stripes. That's the inspiration behind today's nail art.

I just want to lick these!!
This is the simplest nail art ever. Two coats of white polish, then use a striping polish in red and/or green. I used the lush red glitter striper from Kiss's limited edition holiday set, along with a green Art Deco striper from the Dollar Tree. While a deeper green would seem more Christmassy, I think the lighter green really does give this a candy feel.

As always, a coat of Seche Vite tops everything off to make this smooth and glossy. Other top coats aren't bad, really, but Seche Vite is thick, dries exceptionally quickly, and self-levels so that any lumps and bumps get covered up. It's SWEET!

Kiss Nail Art Nail Paint was provided by the manufacturer for consideration.
See my disclosure statement for more information.

Wednesday, November 17, 2010

Ready for a Spring Manicure?

Whew!! What a day! I've been off wandering with my husband and our son, enjoying the wonderful weather and trying to work out some of this fibro stiffness I've been fighting with. We've been having a lot of fun looking at various home items and dreaming about our ideal house. We do this periodically, looking at furniture or appliances. Lately, though, I've been really drooling over electronics.

I wish I knew why I was so into shiny new gadgets. HD video cameras, Nikon dSLRs, home theater systems, CD changers, flat panel TVs... I could look and look and look for hours, it seems. My husband is no better. Anytime I lose him in a shop, all I have to do is wander over to the electronics department and there he is!


It's been fun. Exhausting, but fun. Still, I think I've been overdoing. It felt good to sit down and spend an hour doing nothing but painting my nails! This time I went for something springlike because I got the most gorgeous yellow polish I think I've ever seen! I've always shied away from yellow because it's seemed to hard to wear, but Hard Candy's Splendid is actually good with my skin tone! Then, when I held it next to my Essence Lime Up! I realized they were absolutely perfect together, and I was going to need to do a fun manicure using them both.


First off, before I get to that fun green & yellow mani, let me talk about Splendid first. You know how yellow is always a pain in the butt to apply? Well, this one isn't. It's creamy and opaque and almost a one coater! I was stunned at it, seriously. What you see in the main picture to the right is two coats. Gorgeous... absolutely GORGEOUS!


I also checked to see how well it stamps over both black and white. I wasn't expecting much, because yellow is traditionally a sheer color whether it's in nail polish or artist pigments. It's just really tough to get an opaque yellow! But Hard Candy have done it, as you can see. It shows up beautifully over both black and white, and is such a cheerful color! What can I say, I'm sold!


So... back to the mani. I started with a base of Splendid, then used Essence's Lime Up! to paint 1/2 of each nail on a diagonal. My ring fingers got the base green, the rest got green tips. I was going to apply some pink flower decals over this, then realized I wanted something with a bit more punch to try and pull it all together, although this is cute enough to wear as-is.

For the record, this would also be a great base for a full-nail Konad stamp. Can't you see it- stamping with Lime Up! over the yellow background, so that there's a green print over the yellow? I think it'd be adorable...


Ah well... I decided to use my silver Art Deco striper to paint a line along the join (and disguise some of my wobbly edges), then to put silver pinstripes along the green sections. I added pink flower decals from Viva la Nail for a bit more punch and decided I was happy with things. All in all it was a simple manicure that ended up looking a bit more complex than it really was!


And for once, I decided to do something I rarely do... I'm showing BOTH HANDS! See, I really do paint both hands the same, even if my right hand rarely comes out quite as well as the left. This one was pretty easy to do, though.


So even though it's actually fall and cooler weather is coming in, I needed to try something a bit brighter and sunnier. I think this fit the bill! What do you think?


Items have been provided by the manufacturers for consideration.
See my disclosure statement for more information.