Showing posts with label Franken. Show all posts

Thursday, March 29, 2012

This glitterbomb needs a name!

Expand this for full-on
glitter madness!
Ok, it's official. I'm over my dislike of bar glitter, at least for this particular application. I've said more than once that I don't really like bar glitter, mainly because it looks like your nails are hairy.

Seriously. Who wants hairy nails??

Then a polish came along to change my mind a bit- OPI's Save Me from the Nicki Minaj collection. I don't know why, but the little strings of holographic glitter worked for me in this one.

I kept seeing it every time I went to the local big box store, because the salon inside it sells OPI. But I'm cheap, and I'm broke. I didn't want to buy it if I didn't have to...

I kept wishing and wanting, and thinking I could do this myself. I won a contest from Viva la Nails and got some holographic bar glitter, thinking it would come in handy to franken my own... and then last night the final piece fell into place.

My husband wanted to stop by the Dollar Tree to grab a couple of things, and as usual my first stop was cosmetics. Sure enough, there was a nice selection of Sally Hansen polishes in the two-for-one blister packs! I picked up a couple, including Twinkle Twinkle in Xtreme Wear. It had the large hex holo glitter as well as the base silver I wanted.

I used a bottle of clear Wet n Wild polish for the base. I added a healthy blob of Twinkle Twinkle as well as some Chin Glaze Techno, then added a lot of the string glitter. Finally, I added some small holo glitter I bought literally 16 years ago for a crazy Mardi Gras. I threw in a couple of balls from TKB trading and shook like I was trying to dance in the 80s...

This is the result.


The only problem is that something this spectacular needs a name. I'm at a loss for words, so why not leave me a comment suggesting something?

Magpie, me? Whatever makes you say that...
See my disclosure statement for more information.

Thursday, February 9, 2012

Scrapbook Punch Nail Decals

This Studio G punch cost
$0.97 at WalMart!
I've done a post about this before, but I'm doing it again because I found the most adorable punch while walking! I love being able to customize my nail art, so the idea of punching decals from whatever polish combinations I choose makes me super happy. As you can see, it make four tiny little hearts with each punch!

I had to test it out as soon as I got home. Sure enough, it made absolutely adorable decals that are the perfect size for nails. Seriously, these things are adorable!

So- how would you go about making these? It's seriously simple. You need a few items to start with...
  • The punch(es) of your choice
  • Nail polish- can be nail art polish, colored, or clear
  • Any other items for decorating the nail polish sheets:
    • glitter
    • nail art pens
    • brushes or dotting tools
  • Plastic zipper sandwich bags
I painted strips a bit wider than the punch.
It's a very simple process. First, you paint strips of your choice of nail polishes across the zipper bag. I'm using a small bag used for packaging jewelry, but lots of smooth plastics will work. Do a test spot first, though, to make sure the polish will come off once it's dried.

I find it helps to do two or three coats of polish, to make sure the resulting sheet is strong enough to hold together. This is a perfect opportunity to use cheap clear polish just to build up the thickness.

Also, this is a great time to play with wet marbling. On the bottom row, you can see where I experimented with marbling different colors together. You can also do stripes, dots, wavy lines... whatever you like!

The next step is the hardest for me- waiting. The polish needs to be completely dry before you remove it from the plastic, otherwise it can bunch and tear, wasting your polish and your time. You can give it a day to dry, or even a week or more. The longer you wait, the easier it is to remove from the plastic as well.

Eek! I'd been wiping the tip of my
skewer on my thumbnail while
marbling the bottom row. Sorry!
Once it's thoroughly dry, removal is a snap. I fold back the corner of the bag under the polish and sort of roll it away from the polish. The polish lifts away easily, leaving you with a sheet that's entirely polish.

The benefit of using these instead of nail stickers is that they're so easy to remove! Because they're nail polish, they meld into your background polish, and easily dissolve in nail polish remover.

Unfortunately, that's the same reason they can't be used as glitter in nail polish- they'll melt back into the liquid polish. Such a shame... =/

An interesting thing about the polish strips: I noticed that the various polishes have much different textures and qualities. I applied basically the same thickness of polish for all of the strips. However, they had very different textures once they were dry. The neon polish (middle of the top row) was very thin, had dried very quickly, and was very brittle. The glass fleck polish on the top right was flexible and sturdy, and the black on the bottom right seemed almost like latex- very pliable and sticking to itself easily.

It would seem that the brittle polishes wouldn't wear as well as the pliable ones. I'm not sure if that's the case... it would be interesting to experiment with!

Ah well, I digress. Back to the tutorial... the next thing is pretty much the last thing- punching the hearts. I find it much easier to use the punch upside down, because I can see exactly where I'm lining up the punch on the polish surface. This is especially useful when punching patterned polish strips.

Unfortunately, when you punch upside down, you often get little hearts everywhere. I found hearts in interesting places after doing this. It's amazing how those little things can fly!

Now I'll share some pic spam showing the finished results. It's really cute!! I'm thinking you could also use the leftover polish bits as well... trip them to fit your nail and apply them in a band. It's an idea!

Four marbled harts in a row. Black on red is striking!

Hearts, hearts everywhere!
Stored in a plastic bag, you can see the variety of hearts I made. What, me obsessive? Noooooo..... :D
So, the next thing to do is to use some of these in a manicure! Sounds like a plan, eh? But first, I've got another tutorial I shot last night to use for sponge painting your nails! I'm all about frugal...

Til next time!

Some polishes were provided for consideration.
See my disclosure statement for more information.

Monday, July 25, 2011

Franken Fun- My Magic Bus

I had the strangest night. I finally seem to be getting over the cold I've had for the past three weeks, so my family and I went out to the bookstore to get out of the house for a bit. We got home around 9pm and I immediately hopped onto my computer to update the blog.

But as I was opening images to crop, I saw the art doll I've been working on lately. I realized she needed more trimming and shaping, so I pulled out my supplies and got going on that. Once she was a little more to my liking, I took photos of her so I could keep track of things. But then I realized I had more things to photo for the blog, and figured I might as well shoot them at the same time since I had the camera out.

Fast forward to 7am, when I realize I've revamped the art doll twice, started not only a head for her but a new doll as well, started two paper mache candlesticks, redone a necklace to better suit my tastes, cleaned out my purse, photo'd lots of nail art, shot two or three videos for the blog, reorganized my nail art brush box and my paper mache supplies box, torn new paper strips for the new paper mache goodies, transferred my new bottle of acetone into the bottle I prefer, cut down that bottle into more storage for tall thin things...

... and I looked at the clock and shouted, "Holy CRAP, when did it become 7am??"

My husband, ever the smartass, replied, "About 2 minutes ago." He's so helpful. :D

And so here it is, almost 11am and I'm just now getting to the blog update I started 14 hours ago. I haven't slept, I've barely eaten, but oh how satisfied I feel right now!

However, since I didn't do anything new I'll show you a franken I made several weeks back. I've been admiring OPI's My Private Jet for quite some time, but I am much too frugal to consider buying it. Even if I had the spare cash to spend on it, I'd much prefer to throw that toward something else. So, enter a splash of black, a lot of clear, and some Gosh Holographic.

I love the photo of the bottle. The color is a touch off, for some odd reason, but the sparkles are GORGEOUS! Then again, I do have quite a thing for rainbows. Just in case you don't want to zoom in on it, let me show you a bit of that gorgeous holo sparkle...

Is that delicious or what? The best part? These photos were taken after midnight in my poor bedroom... I can't wait to put this on and take it for a ride outside. This baby is going to sing in the sunlight, I think!

If you're interested in mixing up your own version of this stunner, it's fairly simple as long as you have the right base. You'll need a very holographic polish- something like China Glaze OMG or Gosh Holographic works beautifully. I wish I could tell you a ratio, but it really depends what polishes you're using. My suggestion would be to put about half a bottle of clear, a healthy dollop of holo polish, and then add your black one drop at a time. It really doesn't take much black to completely mask the holographic glitter/shimmer, so it's easier to add it bit by bit than to end up wasting your holo polish in plain old black!

So, if you're anything like me, you're wondering what this looks like on. In a word? YUMMY! It's hard to see the pretty rainbow in this unless you click the picture to enlarge it. Good thing I'm nice enough to do a zoomed-in shot of it! Just look...

Keep in mind, that pic on the right there? Yep... shot after midnight with ambient room lighting. Can you imagine what this would do in the sun? I'm almost hyperventilating thinking about it!! Don't worry, eventually I'll get a shot or three of this in bright daylight, full sunlight so we can all appreciate just how gorgeous a charcoal holo can be. :D

But for now? I'm looking at the clock and it's almost 11:30 and I am finally starting to get a bit sleepy. YAY SLEEPS!!

... who am I kidding, I'll be up before 2. Still, even naps are better than nothing! Keep your chins up, kids, and I'll catch ya on the flip side!

Til next time!
It may not be a private jet, but I'm not complaining...
See my disclosure statement for more information.

Monday, July 11, 2011

OMFGPonies and Pengins, does it get any better than this?


I have to be honest here. I intended to post this earlier- maybe Saturday morning? I've lost track of time, thanks to the chest cold of doom that's descended upon our home. I've spent too much time hacking and coughing, wondering if I have the energy to cough again. And all this while, the penguin photos have been waiting for me.

It all started with me deciding I had to wear OMFGPonies and see what it looked like on my nails. It was a bit thick to start out with, so I thinned it with a few (maybe 10?) drops of polish thinner, and then it was absolutely dreamy!

Also, I apologize because I'm going to be sharing a few more photos than usual with this one. I'm sort of in love with it!! Also, I gave up on getting video of it, mainly because it would involve spending half an hour outside in weather that feels like it's 115 degrees so that my camera can adjust to the ambient temperature. Otherwise, the lens just fogs up and makes it impossible to take pictures.

One thing I didn't expect with OMFGPonies is the ending finish: it turned out to have a matte texture that really surprised me! It was easily remedied with a coat of Seche Vite, but I would have preferred a glossier finish. Ah well, not a huge deal.

One thing I didn't think about but was obvious in retrospect was the difficulty that occurred during cleanup. Big glitter = messy cleanup. Overall it wasn't too hard to clean up, but I definitely ended up with some glitter spots that made my cuticles look a bit messy.

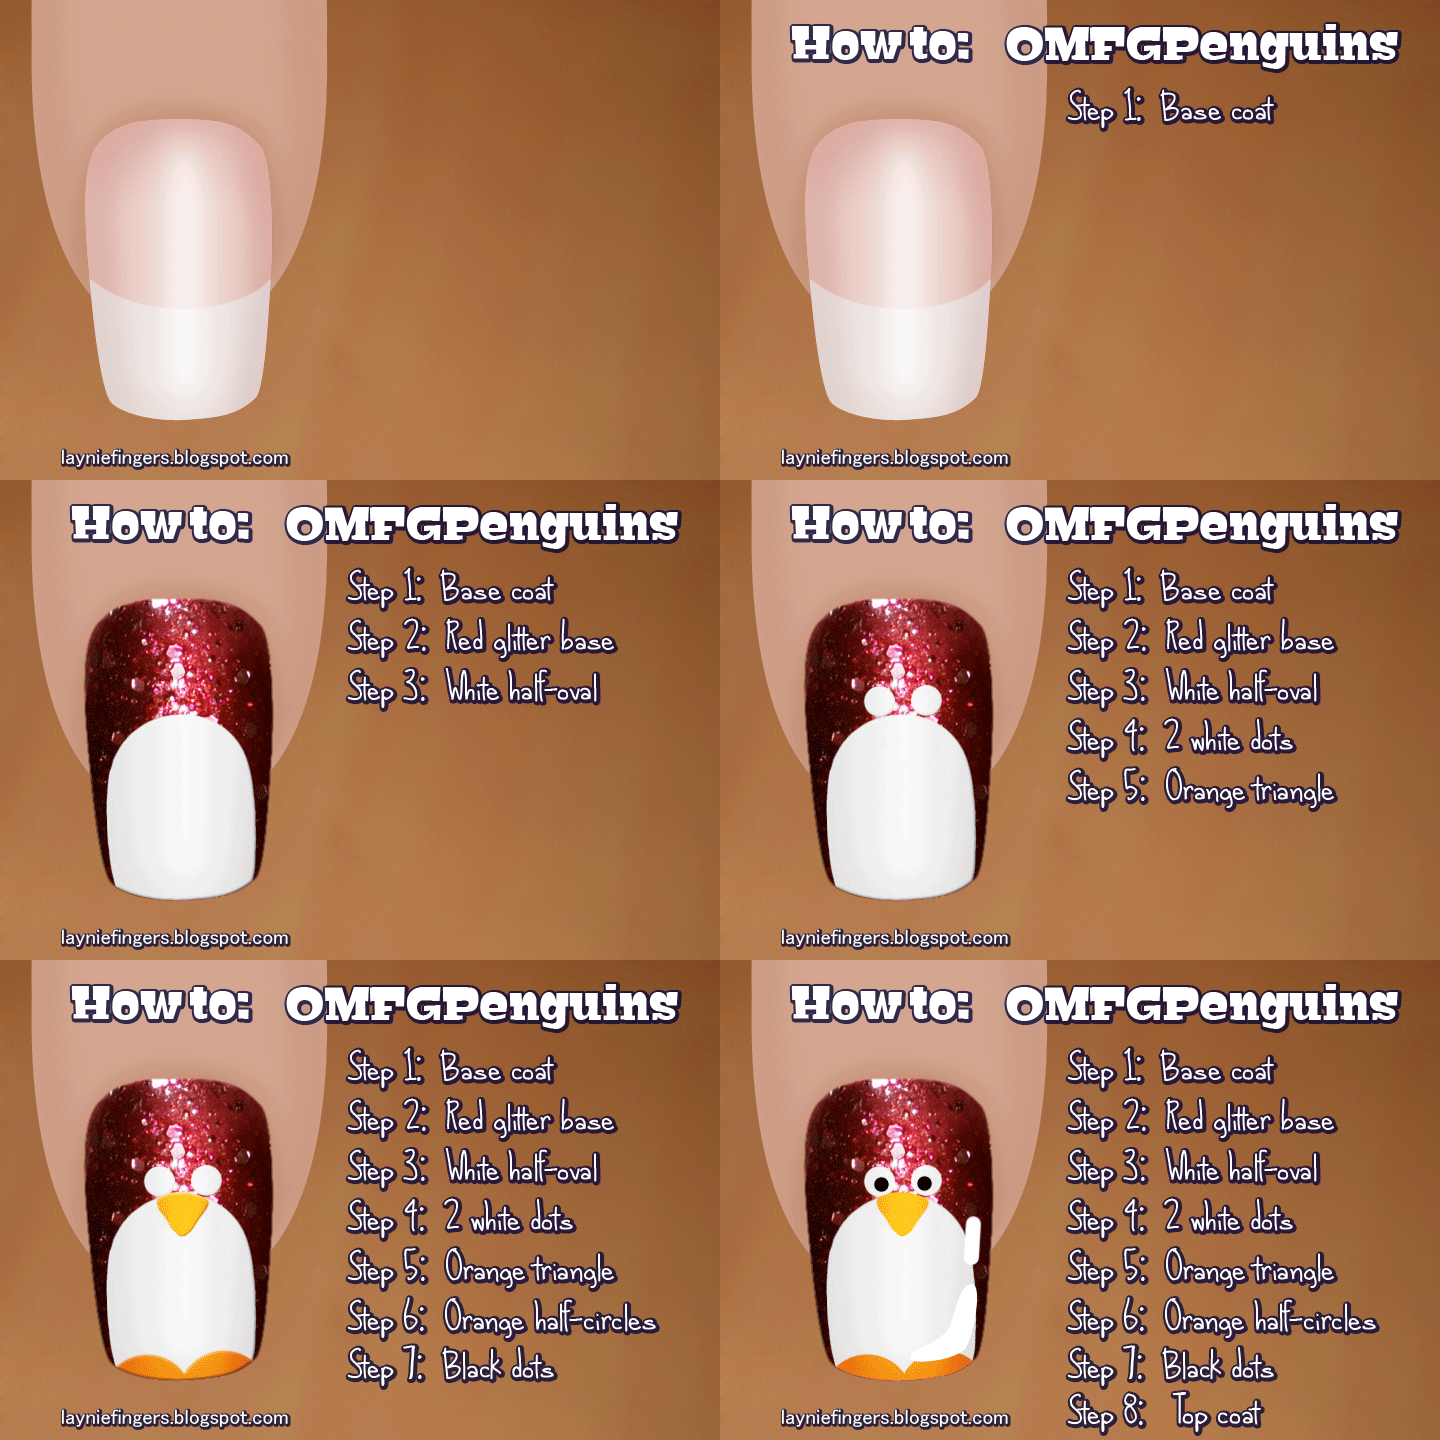
After wearing OMFGPonies for a day, I realized I wanted some nail art. I don't know what prompted me to make red glitter penguins, but I really like them! Turns out they were simple to do, although they were a bit on the fussy side. Still, even my husband loves these!

While it never occurred to me to wear red glitter penguins, I'm glad I did because they make me giggle every time I see them! I'm also really happy with the positions of their eyes, and everyone who has seen them has commented on that as well!

So- how do you make them? I thought you'd never ask!

Items needed to make OMFGPenguins:
  • White nail polish or acrylic paint
    This can be a regular nail polish, a nail art striper polish or even plain white acrylic paint.
    Use whatever you have.
  • Nail art brushes
    These are optional, but a smaller brush can be easier to control when trying to make dots and shapes. Again, use what you have.
  • Dotting tool, bobby pin, toothpick, etc
    I found using a dotting tool was easier for making the eye dots. It's optional. Use whatever you're comfortable with.
  • Black rhinestones, black nail polishI used black rhinestones to create the pupils of the eyes, but you can use whatever you have. Are you sensing a trend here?
 and if you can't follow the how-to because it's upside down, I did a special one just for you!


Keep in mind that you can do lots of expressive things with the eyes. Keep the white parts small and the eyes will be tiny and cute, or make them HUGE and they'll still be adorable! Just look at the different expressions I've given this little guy, just by changing the position and size of the whites and blacks of his eyes!


As always, feel free to show me what you've done if I've inspired you at all. I love sharing with people, and feedback makes me smile for HOURS! :D
Til next time!

EDIT: I cannot believe I forgot to include this image. It's only the first image I edited, and the one I sent to my friends to make them giggle. Yea, I'm forgetful... it's what happens when you get old! Anyway, enjoy!


The penguins have eaten  my brain, it's true!
See my disclosure statement for more information.

Tuesday, July 5, 2011

OMFGPonies- My Little Franken

Holy ponies on a BBQ, I am so, so giddy right now. Last night I was doing my nails with my frankened version of My Private Jet¹ when an idea hit me: I could franken the red-glitter-in-black-jelly polish I've been fantasizing about!

I know, I know. I've mixed my own colors more than once, so why was this such a breakthrough? I have no idea. All I know is the idea hit me like a bolt of lightning, and I immediately tweeted about it!


As you can see, Lisa from Shades of Magic absolutely LOVED my outburst, so I clearly had the name for this franken-to-be, if it turned out at all worth saving.

I knew what I wanted. I've seen several polishes lately that were red glitters in a black jelly base, but each of them had something wrong with them. So rather than keep waiting for the perfect one, I decided to try my hand at mixing what I considered the perfect polish.

See, you may have noticed by now, but I kinda have a thing for glitter. In fact, if you were to look through my box(es) of nail art goodies, you'd find more glitter than you know what to do with. Seriously, I've got over 20 different containers of loose glitter in different sizes and shapes, not counting glitter polishes, and I'm ALWAYS on the lookout for more! It's become an obsession almost, and I simply cannot get enough!

So, thanks to my stockpile of glitter, I was able to pull out three different red glitters, a russet red pigment, and a red glitter polish that I thought would all work together. I also grabbed my TKB glitter suspension base because I knew I wanted a sheer base, and a simple black no-name polish. I used very little black, because black is a very strong color that can easily overpower a polish quickly.

Instead of just jumping in and dumping a lot of stuff into a bottle, I started with one of my mixing cups. I used a dot of black, a dollop of clear suspension base, and a bit of all my glitters. After stirring it up, I was in love, and even though I didn't have the mix right, I knew I wanted a whole bottle of this one.

Onward to the polish. I went in very small quantities at a time, so I could change things if I wasn't happy. It took an hour of tweaking and shaking, testing and tweaking some more to come out with something I was happy with. But once I tested that last mix... omg, I knew this one would live up to its name.

Meet OMFGPonies, the first franken I've made that I am absolutely completely in love with. It's like a deep black cherry base with amazing glitterbits. And keep in mind that these photos really don't capture the depth of it. I need to shoot video in full daylight, but I was sick in bed all day and didn't get to it. Maybe tomorrow...

I absolutely love that as you turn the nail, you capture glints of microglitter peeking up through the sheer black base, russet shimmer catching the light and larger flakes of glitter reflecting a silvery red. My largest red glitter turned silver in the polish, but I knew that was a possibility, and I was ok with the concept if it did.

I love this polish, more than I can say. And the best part? I can make more... :D

You know, if I ever get the bits again.

Til next time...

¹ My version is called My Magic Bus, because it's magically delicious and much cheaper than taking a plane. :D

Some polishes may have been provided by the manufacturer for consideration.
See my disclosure statement for more information.

Monday, July 4, 2011

The Fun of Frankening- Frankencrackle!

This entire entry shows what happens when I get to talking on Twitter. It started out simply enough- I was goofing off, working on photos while I talked to some friends online. Then someone mentioned wondering if she could mix regular shimmery nail polish into crackle polish, and I realized I'd been wondering about that myself. Could you actually franken your own crackle polish colors?

As I talked with my husband, he made a quick joke and I realized that not only would I do some research, I would have to make a mascot. Ladies and gentlemen, allow me to introduce my new frankening mascot- the Mysterious Mr. Frankencrackle!


Cute, isn't he? And yes, in the interest of full disclosure, the above image is a photo illustration based on nail art I did last night. You can see the original nail on my yfrog account. Since he's a mascot I may use again, I wanted  to make him a little cleaner, a little cuter.

So, the experiments. I wondered several things: 
  • Can you thin crackle polish with regular nail polish thinner? 
  • Can you mix colors of crackle polish together? 
  • Can you mix regular nail polish into crackle polish?
  • Can you mix pigments or glitter into crackle polish?
The results were interesting, but to spare you the long, very wordy description, I'll simply let the photos speak for themselves. :D


 So, to sum up:
  • Can you thin crackle polish with regular nail polish thinner? 
    • Yes! Regular nail polish thinner does thin crackle polish, but thinning it too much makes it look a bit odd. It still crackles nicely, though.
  • Can you mix colors of crackle polish together? 
    • Absolutely! It helps to add a drop or two of thinner to give it a bit more open time, before it dries out too much to apply.
  • Can you mix regular nail polish into crackle polish?
    • Absolutely NOT. It turns everything into a goopy, sludgy mess. NOT attractive at all!
  • Can you mix pigments or glitter into crackle polish?
    • Yes, you can! Pigments and glitter do mix nicely into crackle polish. However, you may need some thinner so you don't end up with a total gloppy mess that's too thick to apply!
Check back later today, I'm hoping to finally get my Fourth of July polishes up! I know they don't help much today, but hey, you still have time before tonight, right? :D


Crackle polishes were provided by the manufacturer for consideration.
See my disclosure statement for more information.

Sunday, September 5, 2010

Adding Some Fun To My Mani- Custom-Mixed Pink Dots!

I have such a short attention span. After wearing my grownup manicure for all of 6 hours, I realized I was bored to death with it. I also was dealing with a bit of anxiety from a morning meeting (LONG story), so I decided to do a bit of modification to my manicure. Those of you who follow me on Twitter got a sneak peek of this one. (Hint hint- you can follow me too!)

I thought for a while, and decided that baby pink goes well with cocoa brown. The problem? I have no pink that I felt was appropriate. That's ok, I can mix colors! I pulled out my polishes and started looking. I seem to have mainly one type of pink in my collection- HOT. That wouldn't do.

However, then I realized that if I mixed my pink Kiss Nail Art Nail Paint with my Milani Bare With Me, I'd end up with a pink very close to what I had in mind. Looking back, I'd probably want to warm it up a bit, but I'm pretty happy with it as it is.

I ended up using some recycled plastic cups to mix polish in. My step-grandmother is in a nursing home, and they bring her medications to her in a little plastic cup. Since she gets them 2-3 times a day, that's a lot of cups. She saves them because she thinks they're so cute, and doesn't want to see them thrown away. When she heard I use them for nail art, she wanted my step-mother to bring them to me. That made my day, you know? Just a little peek into my life.

Now, one problem I ran into is that while I mixed enough to do all my nails, it ended up starting to dry out and be unusable by nail 3 or 4. That's easy enough to fix, though. I put a single drop of Orly Nail Lacquer Thinner into the mix, stirred it well with my dotter, and the polish was back to new again. I ended up doing that three times total, and had no problems with getting the dots done.

A quick note about nail polish thinner: it's a must have if you paint your nails often at all. There are lots of brands to choose from, of varying costs. It will totally rescue your thickened, goopy polishes and return them to brand-new consistency without affecting their drying time. Some people will say you can use nail polish remover for this, but don't: it will ruin your polish instead of fixing it. Thinner is inexpensive and fairly easy to find, and it's worth the effort.

Back to the nails, already! So, once I had my pink mixed, I used a homemade dotting tool to put teeny little dots on my nails in a semi-regular pattern. It was simple enough- put a dot in the center of my nail, put one a bit higher up, then a bit higher up. Put a dot under it, then another... all about the same distance apart. It's so much easier to explain with an animated .gif!

Yes, some of the dots went over onto my skin. I did that so that the dot would look like it was continuing off the nail. Once they're dry, it's very easy to clean up the few dots over the edge using a brush and acetone. It makes the whole thing look more consistent, in my opinion.

Once the dots were dry, I applied my topcoat, then used the brush and acetone to clean up all my edges. I am loving using the brush for cleanup, now that I've figured out how to do it. It took a bit of practice to get the hang of it, but I think it's working well now.All I have left to figure out is exactly how much to clean off around the cuticles to get that amazing look I see on so many blogs. But that will come with practice.

And there we go- I went from a very plain, neutral manicure to a fun dotted girlie one! You could even add a pink rhinestone in here and there, or do a pink french tip- that would be adorable if my nails were long enough!
 Polishes were provided by PR for evaluation.

Wednesday, September 1, 2010

What Did I Name My Pinky-Purple Franken? FRANKENBERRY, Of Course!

I know, I know... naming a berry-colored frankened polish FrankenBerry is just begging people to groan. It's so horrible, and I know better. But I was sitting and thinking, and as soon as it hit me I began to giggle, and I just couldn't stop. So now you get to see a frankened polish with the worst name in polish history. Or maybe for this week, I'm not sure.

Anyway, I broke this one down into steps. I was going for a Lippmann-esque glitter in a jelly base. I started out with some polishes I love. I used several clear, inexpensive glitter polishes from Love My Nails along with Sinful Colors Dream On, a vibrant, almost neon purple. I also used a little plastic cup to mix in, as well as a bamboo skewer for mixing. I like those better than toothpicks because I can get a better grip on them.

The thing to remember is start small- you can always add more polish, but removing polish from the mix is impossible. I started out with a small blob of Love My Nails Dazzling. I used this because it's got an absolutely beautiful shimmer to it, almost as if it were filled with diamond dust. I wanted my Franken to have shimmer galore, so this was a perfect start to it!

Then I went for the glitter- a mix of sizes of iridescent glitters in a clear base, Love My Nails Angel Baby. This one would give that mix of glitter sizes I was hoping to have. It also gave the rainbow touch that I seem so fascinated with these days.

Angel Baby has a variety of round glitter in various sizes. It's a great topcoat for layering, but it also works really well for frankening. I really like the way it plays with other colors.

Next I added in the Sinful Colors Dream On. I could have used any color, but I wanted a bright berry-type color. Dream On is a very densely-saturated purple that gives almost complete coverage in one stroke. It also tends to dry to an almost-matte finish, which does play a role in how this looks later. It's an interesting thing to keep in mind.

If I were to make this mix again, I might use a different purple, just to see if it would play better with the mix.

Now I grabbed my bamboo skewer and mixed this thoroughly. It doesn't take long, and soon enough I had a lovely, bright, sheer pinky-purple mix with tons of glitter. I really liked how this looked in the cup. The glitter showed through the polish nicely and the color was still vibrant, but incredibly sheer.

I wonder what it would have come out with had I kept the mix like this...

Time to test! I applied one coat of the mix to my thumb only to find that it was incredibly sheer- much more sheer than I'd intended. However, looking back I wish I'd tried more than one coat of the polish, just to see how well it would build.

Ah well, it's a learning experiment, and I certainly learned a lot while making it! Glitter is good, neons dry funny, and never be afraid to experiment!

I went back for more polish and added a bit more of the purple and mixed well again. This looked much better to me. While I wanted sheer color, I wanted it to be opaque enough to hide the nail line. I wanted it sheer enough to see various glitters peeking through the layers of polish. This looked like it just might do what I wanted...

Also, I really love the size of this plastic cup. It's perfect for mixing a small batch of polish and bit enough to get your brush into. It's also easy to clean, as I'll show soon enough.

One more test and I was satisfied with the color. I went ahead and painted all my nails with the mix. You can see it's still sheer, but deep enough to build to opacity. One coat was much too sheer, but 2 coats built to a lovely, almost-opaque color. I eventually put on 3 coat of polish, and really enjoyed the process. Next up- more colors like this!

Finally I had a lovely finished manicure (except for cleaning up, which I totally forgot to do for these photos). I love the color, and it applied nicely. I was surprised at how matte the polish dried, although it's not a bad thing. I think it dried matte because of the Dream On. It was easy enough to fix by adding a coat of topcoat, and it would have been just fine as a satin as well.

I used a brush from a clear strengthener to apply the polish, then cleaned it on my polish pad before I put it back into the bottle. It worked really well!

Finally, I've got a picture of the bottom of the polish cup, just to show the types of glitter involved in this polish. Isn't it yummy?
I love the combination of colors, and the blue glitter that shows up really is blueish.

I don't know why it took me so long to start mixing colors, but I'll definitely be doing more of it! This was FUN! I'm already looking at polish box, thinking about what colors I could combine for what effects!

So tell me, do you think you'll be likely to experiment with frankening? Are you brave enough to play, or do you prefer to watch other people mix up new colors? If you do mix up a new color, show me, I'd love to see!