 | |
| Yes, this is the same gradient as the tutorial title image! :D |
It's much easier than it sounds! It is time-consuming, though, and it uses up quite a bit of polish. Still, you could do this with any polishes, even going from black to white if you wanted to! You only need a few things...
This one's a LONG post, so I'll be cutting it to save your blog reader!
Supplies Needed:
- Nail polishes
- You need a minimum of two polishes
- I used a combination of four polishes
- Seche Vite (or another topcoat)
- I find the quick-drying topcoats are a lifesaver
- Seche Vite smooths out lumps like nothing I've ever seen
- A paintbrush
- You can use the brush in the polish if your base color is unmixed
- Brush doesn't need to be fancy or expensive
- A sponge tool (Tutorial coming soon!)
- Acetone
- Paper towels for cleaning your brush
- Nail polish thinner or nail polish remover
- A dotting tool or toothpick for mixing your polish
- A surface for mixing colors (I used a notebook)
 You can see that for my polish choices, I used Wet n Wild White, Kiss Nail Art Paint in pearl blue, China Glaze Aquadelic, and Wet n Wild clear polish. What can I say, I am absolutely in love with Aquadelic! Also, while I'd planned to use the pink, I found I liked the colors as they were without it, so I didn't use it after all!
Also, the clear doesn't need to be expensive polish. I just wanted something to make the polishes more sheer.
Tip: It's easier to achieve a gradient
with sheer polish than with opaque polishes!
The first step is obviously painting your nails with whatever color you want to use. I wanted to use Aquadesiac, but I wanted it lighter to make a more pronounced gradient, so I put a couple of drops of it onto my palette, then added some white til I was happy with the color. I wasn't happy with the first mix, so I added more white to make things lighter. I used a dotting tool to mix the polish.
Once I was happy with the mix, I used my paintbrush to paint my nail. I use a simple inexpensive paintbrush that came in a set from a craft store. I think it was $5? I don't remember, it's been years.
Be sure and clean your brush as soon as you're finished. I find removing dried nail polish can be more difficult than cleaning it right away. I swish in acetone, dry with the paper towel, then repeat til the paper towel comes out clean. It took me two or three tries to clean my brush!
As an aside: isn't that a gorgeous color?
Then it was time to start building the gradient. All in all, I mixed four colors to build this gradient. It worked well for the fairly short false nail. If your nails are longer, you may want to use more steps in the gradation.
For the second step in the gradient (the second color overall), I mixed straight Aquadelic with several drops of clear polish. I did this because it's very hard to make a smooth gradient with an opaque polish- instead, you end up with a line of color showing where the new polish starts. I definitely did not want that! So, with the sheer polish I was able to start sponging.
I dipped my sponge into the polish, then tapped it onto the paper a couple of times so it wouldn't be saturated with polish. This, too, can seem strange, but it makes sense- with less polish on the sponge, you end up with less polish applied to the nail, causing it to be more see-through. See-through is great in this situation!
Be sure to leave a bit of the original nail color at the top of the nail unsponged. This is what makes the gradient! I simply applied the polish with a simple tap-tap-tapping, redipping into the pool of mixed polish if I needed more.
Once I applied the second coat, I let the nail dry for a few minutes. In all honesty, your nails should be dry by the time you finish all 10 and ready to go for the next color.
If your pool of mixed polish dries out, add
nail polish thinner. You can do this as often
as needed to to keep your polish workable!
Now I wanted to start going darker on my nail. I put several drops of Aquadelic onto my palette with three drops of clear, then added the tiniest dot of pearl blue. I've mixed colors with this polish before, and I know that it's a very strong color. I figured if I didn't add enough to start with, I could always add more. But lightening things back up when you've added too much can be very difficult and use a lot of polish!
Tip: When mixing colors, always add
a small amount of dark polish to your
light polish. It's easier to get the correct color!
I sponged the third color onto the nail, focusing on the top half. Again, be sure to tap off most of the color on your palette before you apply it to the nail. You can always add more, but taking it away can be tough!
Hey, it's starting to look like a gradient! I know it looks rough and splotchy the farther along we go, but once you add the topcoat it really comes together nicely.
The fourth shade is very similar to the last, only with a tad more blue. That's a few drops of Aquadelic, 3 drops of clear, and two tiny dabs of pearl blue. I realize it's frustrating to not give exact recipes, but polish batches can vary from bottle to bottle, and drops can be big drops or little drops. Just mix til it looks right to your eye.
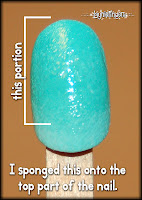
Then I sponged the resulting polish onto the nail, focusing on the top 2/5 of the nail. That's such a strange number to try and explain, but it's really just the top bit as shown in the photo.
And yes, it's looking gloppier and weirder as you go, although the color shift from light to dark is really shaping up! Trust me here, it will look gorgeous once it's done!
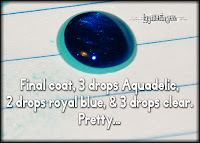
Finally, we're down to our last batch of mixing. While this looks like a great big glob of blue, it's really just a bit more than in the last photo. However, I put the clear on over the blue instead of under it like in the last few photos. It made the blue spread out and look all metallic and gorgeous!!
I have to share something- when I saw this blob of polish, I wondered it if would dry nicely and retain the same glassy look. If so, I'd love to wear it on a pendant or something! I'm so weird...
Once if was mixed, I sponged it onto the very tip of the nail. In this photo, you can see how the shimmer in the pearl blue is showing more and more. The gradient looks really weird right now, especially with the gloppiness toward the end. Even I was worried, and I knew how Seche Vite can pull everything together!
But I knew I was going to be adding my fun homemade nail polish decals to this nail, so I wanted to save on the Seche Vite. Instead I put a coat of the Wet n Wild clear on top, and was pleasantly surprised how nice everything looked afterward!
Now, if you were doing this, I'd recommend placing the nail polish decals while the clear polish is still wet. It makes it easier to shift them a bit if you need to. I know I never get them in the right place at first! Then, add your Seche Vite topcoat to finish things off and seal in the decals and you're done!
That is, unless you're me. See that big empty spot? Yea... I'd used a sheet of clear polish then sprinkled white iridescent glitter over it. I didn't realize that instead of white iridescent glitter, it was clear iridescent glitter. Yea, that didn't work so well, but once my Seche Vite was on, I was kinda stuck...
Or was I...
Quick application of a pink rhinestone from Born Pretty saved the day! Oh, and I would recommend being careful with the Seche Vite... as you can see, the bottom decals started to melt into the Seche Vite, causing them to spread and do strange things. I blame me more than the Seche Vite... my bottle is running out and I've thinned it three or four times, so it's not behaving as nicely as it should.
So... what do you think? Was this a nail success? Do you think you'll try ombre nails? If you do, post a comment and show me, I want to see!
Also, keep your eyes peeled- I've got a tutorial coming soon for the sponge tool I used to create this manicure. It's really cheap and kind of embarrassing, but hey, you use what you've got, right?
Til next time!

Polishes provided by the manufacturer for consideration.
See my disclosure statement for more information.


Thank you for this tutorial! The color is very pretty!
ReplyDeleteI'm glad you like it! I'm tempted to show other gradients as examples of what can be done!
DeleteGreat tutorial! I loved the hearts at the end :D
ReplyDeleteI'm glad you like it! I'm pretty fond of the hearts too... and they're so easy! Makes me want to go get more mini punches!
Deleteso smart and looks amazing! love the tutorial.
ReplyDeleteNah, it's not that I'm smart. I did a few semesters of art school back in the day, so I carry those basic techniques over into nail art. It's amazing how those fundamentals of painting really do apply!
Deletei love this its so cute :)
ReplyDeleteI'm so glad! I had fun doing it... I love gradients, and my last tutorial wasn't nearly as clear or helpful. I've also gotten better at it. :D
DeleteLove it!
ReplyDeleteI got this web page from my buddy who informed me on the topic of this website and now this time I am browsing this website and reading very informative
ReplyDeletecontent at this place.
My web-site :: how to play piano
Hey very interesting blog!
ReplyDeleteMy website - drum tobacco
I love what you guys are up too. This kind of clever work and coverage!
ReplyDeleteKeep up the terrific works guys I've included you guys to my personal blogroll.
Have a look at my webpage amber leaf