Showing posts with label fun. Show all posts

Sunday, August 11, 2013

Shark Week - a Layniefingers animated tutorial

Hi everyone! Since it was Shark Week, I felt the urge to do something whimsical and maybe a bit on the gory side. Enjoy this quick animated tutorial I put together for you!


Sharks scare me. I'd rather swim in a pool...
See my disclosure statement for more information.

Friday, July 26, 2013

New Animated Nail Art Tutorial- Tropical Garden

Oops. I completely forgot to share my latest animated tutorial from YouTube. I'm starting a series of these, since people seem to be enjoying them. They're fast and easy to follow, and fun for times I haven't got something more complex recorded.

So tell me what your feelings are on these animated tutorials: Do you like them? Would you like to see more? Do they need music or a voice-over? Tell me what else you'd like to see!


Some polishes were provided by Jessica Cosmetics. I used them because they're gorgeous!
See my disclosure statement for more information.

Friday, November 2, 2012

More Experimenting With Striping tape

I recently mentioned that I've been experimenting with striping tape. I've got an in-progress design to share with you tonight, and I'm absolutely in love with this one! It's pretty labor-intensive, but it's a really special look and it's not all that difficult.

For this design, I started with a sponged gradient. I chose five pastel polishes that looked soft and pretty together. I created my sponged gradient onto this nail (and another, which you'll see in my next post) and let it dry. It's important to let this totally dry, because if the polish is at all wet, the striping tape will make quite a mess.

Once the nail was dry, I started cutting pieces of striping tape to apply to the nail. I tried to keep the tape fairly evenly spaced to create a diagonal across the nail. This was harder than I expected, but I still think it's something that can be done if you really want to. You could also leave wider spaces between the tape to end up with something like my last design. The tape is going to be a mask for our next layer of polish, so the more open space you leave between the tape, the less of the gradient you'll see once you're finished.

Once all the tape was in place, I applied a fairly thick coat of white polish to make sure it was opaque. Then while the polish was still wet I peeled the striping tape off. You can see toward the middle of the nail where I tried to pull two pieces of tape off at once and actually lifted some of the white polish right off the nail. Oops!

I then let everything dry for a few minutes, then added a coat of Pro FX. Unfortunately, my bottle had gotten a bit thick and I tried thinning it down right before applying it. Talk about a bubble fest! If you need to thin your topcoat, do it a few hours before you need to use it!

That's all there is to creating this look! If you find the written instructions confusing and would like to see a video on how to do this, leave me a comment. I could probably be persuaded to show you how to do this on YouTube. :D

Also, be sure to come back tomorrow to see how I dressed this patterned nail up! I'm super happy with how this came out, and I can't wait to share it with you!

Some polishes were provided by the brand for consideration.
See my disclosure statement for more information.

Friday, October 5, 2012

It's finally here- a tutorial on how to do laser print nail transfers!

Some of you may remember that a while back I posted a pretty photo of colorful nail art, saying I was working on a technique to share with everyone. I finally figured it out, and then the world blew up, so to speak. However, a few people gently reminded me they were still anxiously awaiting this technique, so I finally got off my butt and finished editing the video that's been waiting all this time. I'm so happy to finally share this technique with all of you!

As you may have noticed from the title of today's blog, these nails were done using color laser prints. That's right- no special tools needed, no store-bought decals or fancy papers or anything. The supplies to create these nails are very basic, aside from the laser prints themselves.

You'll need:
  • Color laser prints - inkjet prints will not work for this project.
  • Acetone or nail polish remover
  • A soft paintbrush
  • White or very-light nail polish
  • Base coat and top coat as usual
The process to apply these transfers is simple, but it can be fiddly at times. It took me over two weeks of playing with this daily to achieve what you see in the top image of this post. But if you take your time and make sure your image is actually transferring to your nail before you lift the paper you can come out with a fantastic finished image.

Once your transfers are done, you can finish your nails off any way you like. You can add glitters, stones, stickers or even additional nail polish. The only real limit here is your imagination!

So what are you waiting for? Watch the video!


That's it! You can use your own scanned-in images, things you've drawn or photographed, images from the internet... anything you can print can go on your nails!

Remember, if you do your nails with something inspired by my blog, leave me a comment and a photo. I love seeing what you come up with, and I love knowing I've inspired someone!

Hope you have a fantastic weekend!
Haven't you always wanted a monkey?
See my disclosure statement for more information.

Sunday, April 29, 2012

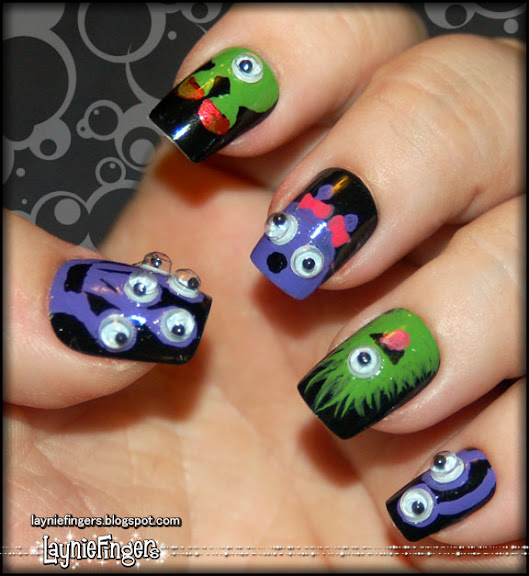
It's a monster flashback!

Here's another flashback, this time one of my favorite manicures of all time! I still get tempted to do another manicure like this, although I get sidetracked with all the other designs I want to do. Sometimes it's frustrating being creative!

Anyway, I hope you enjoy these monsters, because I know I did!

 -*~*-*~*-*~*-*~*-*~*-*~*-*~*-

I have just finished the silliest set of nail tips that I think have ever existed. Rhinestones? Heck no, that's too elegant! Roses? BORING. (Not really, but go with me on this!) I wanted something different, something that really expressed my inner self. I wanted monsters! But not just any monsters. No... I wanted monsters with WIGGLY EYES!

That's right. These nail tips have monsters on them, and those monsters have 3D wiggly eyes that actually move! Some of them look excited, some of them look menacing, but most of them look kind of confused, and I really like that! They're silly, and they're weird, and they're in halloween colors to boot! Purple, green, and orange combine on a stark black background to make these monsters really pop.


Now, I started these ages ago. I got the test one finished way back on August 6, believe it or not! They clearly didn't take that much time to complete. But I got the bases painted and then had a huge moment of fear: could I finish them? Could I make them as cute as I hoped they would be? And those nails sat, and waited, taunting me simply by being unfinished. It was almost depressing!

Then one night I realized that hey, it doesn't matter if they're perfect. They don't have to be perfect because they're monsters! That moment freed me from the fear I was fighting with, and I was able to dive in and get back to work on them. The more I worked, the happier I got, until finally I was giggling as I painted on the goofy details, the pink hair bow, or the goofy teeth on the orange guy with eye stalks. They're not perfect, but they're cute, and that's enough for me. Anyone who wants perfect monsters can paint their own!

By the way, I think you should enlarge the image above, even if you don't click any other images on this blog. It's silly, and you can see all the little guys in their full glory. They're pretty nutty, really, and I love them all! I may have to make my own set of these, especially if someone buys them.

Wait, buy them? That's right, this set of nails is also up on Etsy for $24.95. They'll come nicely and safely packaged so that you don't have to worry about them being squished by the post office, and then you'll get to love the little guys while I miss them.  These guys found their new home ages ago.

It's ok. I can make more. Already, my mind is filled with googly-eyed critters, and I'm wondering what to make next...

So, what do you think? Any other critters you'd like to see?

Wednesday, March 7, 2012

Even MOAR dots!

Ahhh, raise your hand if you knew I was going to add to the dots. I didn't even wait 10 minutes before hitting post before getting my polishes out. Yea, I have no self-control.

Still, I think it turned out pretty cute. I showed my husband the before and after pics, and he likes the dots-in-dots best. He thinks there's more energy to them. Personally, I think they're just more fun this way!

Adding the smaller dots was really easy. I pulled out the three colors I'd used in the gradient along with the mid-sized dotting tool and my palette. I added a drop of lavender, put a few dots here and there, then repeated with the pink and the blue. Once I'd done all three colors, I went back and filled in any leftover dots with whatever color I thought would work best.

It was pretty random, and went really quickly. I'm enjoying the look a lot... every time I see my nails, I grin. The only thing that would make this even better would be some glitter, but even I think that would be a bit much. At least... for now. ;)

I have to admit, though... now that I've figured out an easy way to do gradients I may be doing LOTS of them! I have so many ideas bouncing around in my mind!

So what do you think? Is this a design you'd wear? Leave me a comment and tell me how you'd style this, or how you'd change it!


Why yes, I think I AM losing my mind... how kind of you to notice!
See my disclosure statement for more information.

Friday, February 24, 2012

Finally, an affordable drugstore stamping kit!


Holy WOW, I'm excited about this!! My husband and I went to WalMart to walk, as is our habit, and meandered over to the As Seen On TV section, mainly to have a giggle at the silly products. It's always good for a few minutes of fun, you know?

Imagine my surprise when I found THIS! Holy CRAP, do you see what that is? It's a drugstore nail stamping kit- not just stamping disks, not just a stamper, but a whole kit with everything you'd need (except the polish) to get started stamping your nails!

I may have squealed out loud over this. I may even have hopped up and down a bit while I hugged the kit to my chest, swooning over the awesomeness of it.

My husband's reaction? He chuckled, shaking his head at me. He doesn't understand my love for nail art, but he does like to see me get excited. Once I saw this kit contained awesome image plates, I absolutely had to have it.

That's right... not one plate, not two... but five!! Five plates with adorable images, but I'm getting ahead of myself. Let's look at this bit by bit, shall we?

Just look at what the kit contains- You get the nail design stamper (which is DOUBLE-ENDED, people!!), the scraper, the image plate holder, and FIVE image plates!

And these aren't the usual floral plates... while you get an assortment of really cute florals, you also get cute things like an apple, a palm tree, a seahorse... really cute stuff! The plate with animal print and patterns is what made me hop up and down, though.

What can I say, I'm silly.

Let's look at the plates up close... they're worth it!


Yes, you can click those images to see them larger. How adorable are they? I really like the double heart in the center of plate SE 21, the flower on SE 18, just about everything on SE 19, and the flower on SE 20. And OMG, do I even have to mention SE 22? I LOVE those images!

There's just one issue with SE 22- the images are definitely not full-nail. They might cover my pinky nail, but definitely not any others. Still, these are very usable images.

I can see myself using these as partial-nail stamps, to decorate half the nail, or french tips, or whatever. They're still absolutely adorable! Totally worth the price of the kit!

Oh yea, the price... I haven't mentioned the price. Can you believe this whole kit costs a whopping $10? Me either! Heck, you can barely get a single Konad plate for $10, much less the whole setup. I'm in LOVE!!

I'm also really excited about the double-ended stamper. One of the problems with the traditional stamper that comes with kits is that it's just too big. It can be hard to line images up on smaller nails using the big stamper, and a double-ended stamper can be hard to find, or more than you want to spend.


So, let's look at what it would cost to pick up these items from Konad, since that's the brand that started the stamping craze. If you were to buy them separately, you would end up with:
  • double ended stamper and scraper: $6.90
  • image plate holder: $2.90
  • 5 image plates: $6.50 each, total $32.50
  • Total for whole set: $42.30 before tax and shipping.
Pretty awesome deal, don't you agree? I know I'm over the moon! Of course, you don't get the Konad name, but in all honesty, I've used Konad plates and stampers, and I'm not seeing a huge difference in quality here. This is the best value I've seen yet when it comes to stamping kits.

Now comes the embarrassing part: I am SO out of practice when it comes to stamping. I had my stamping set in a sweet little cloth bag, and I seem to have misplaced it somehow. It's been way too long since I did any stamping, and BOY does it show. But I feel like I need to show the stamping I did, even though I'm WAY out of practice.

I pulled out a selection of polishes I'd been wondering about to see how they'd do on black and white. Sadly, most of them didn't work as well as I expected, although the Heaven polish surprised the heck out of me!

Also? Don't blame the bad stamping on the image plates or the stamper. I'm definitely to blame, as I'm getting used to the whole stamping process again. It definitely takes some getting used to!

So, I know what I'll be fiddling with for the next few weeks. I have so many ideas bouncing around my head! YAY!

Also? This is the fastest I think I've ever reviewed anything. I was so excited to see this, and even more excited that it's everything I was hoping for.

This may have been as As Seen On TV set, but it's definitely nothing to laugh at. This set is worth every penny, and quite a bit more!

As far as I know (after some quick googling) these are for sale at WalMart, CVS, Walgreens, and maybe Rite Aid? You may find them other places as well, I don't know... if you see a section for As Seen On TV items, look around! You just might get rewarded with awesome stamping!

I love this kit! You should go buy one today!
See my disclosure statement for more information.

Monday, February 13, 2012

More Valentine's Nail Designs

Hi again! This is a quick update without much to say, but I wanted to share some more Valentine's Day nail designs with you! These would be good for an accent nail or for all your nails...


So what do you think? I'm really digging the black set at the bottom...

Some polishes were provided by the manufacturers for consideration.
See my disclosure statement for more information.

Sunday, February 12, 2012

Tutorial- How to Create Sponged Gradient Ombre Nails


Yes, this is the same
gradient as the tutorial
title image! :D

Ombre- it's everywhere right now. Ombre hair, ombre clothes, and ombre nails. While I can't help with the clothes or hair, I can show you how easy it is to do your own ombre manicure!

It's much easier than it sounds! It is time-consuming, though, and it uses up quite a bit of polish. Still, you could do this with any polishes, even going from black to white if you wanted to! You only need a few things...

This one's a LONG post, so I'll be cutting it to save your blog reader!