Showing posts with label Fail. Show all posts

Thursday, April 5, 2012

Another Fail...

Once again, I've got a total failed manicure to share with you today. I was experimenting with the Jessica Heavy Petal collection polishes again, this time going for a pink look. Unfortunately, it was a complete disaster.

I'm not sure what I was going for, but this clearly isn't it. I started with a base coat of Dazed Dahlia, which is such a beautiful deep hot pink. It's vibrant, but not too vibrant in my opinion.

I then wanted some texture to the background before I started stamping. I used Rolling Rose on my striping brush and added some slashy, stripey bits. I expected the Rolling Rose to add just a bit of texture and shimmer, but instead the stripes really showed up against the background! Not ideal, but I kept right on, hoping I could salvage something from this.

I pulled out my Salon Express stamping set to add some interest to my nails. I started with CND's Green Scene and stamped a swirly sun-type design on my ring finger. BLEAH! This just did NOT work. The green is too similar in value to Dazed Dahlia, so the colors meld into each other visually. No bueno!!

At this point, I knew I was basically not going to be able to save this one. I just stamped random designs from the Salon Express plates, mainly to see how they worked. I was happy with the stamps, I just with the overall design worked better!

Finally, I'll show you a closeup of my thumb... I think I went over this with the Jessica Holographic topcoat too, but I'm not sure. The sparkles are pretty, but this is just not a good look.

I apologize for not cleaning this one up, but I knew I was taking this off as soon as I got photos of it. Keep in mind, this is not a failure of the polishes. This is purely user error- I'm the failing part of this experiment!

So, help me out here- what do you do when you try a nail design that just doesn't work? Do you keep adding to it, hoping it'll work out? Do you say to heck with it before you're finished and take it off? Do you just shrug and keep it on? Leave me a comment and let me know!

Til next time!

Polishes were provided by the brand for consideration.
See my disclosure statement for more information.

Tuesday, March 13, 2012

Never paint your nails when you're sick...

Wow. You know how sometimes you have a great idea, and yet the execution of it just totally fails? Yea. This was one of those days. I blame the cold medicines and the plague. I didn't bother cleaning these up much because I just wasn't gonna keep them on.

First, I painted my nails with two coats of Love My Nails white, hoping to get the move vibrance out of my rainbows, then taped around my nail like you would for a water marble. I was planning to have gorgeous rainbow gradients, topped with some sort of black pattern.

Best laid plans, I guess. I was feeling lazy, so I just sort of estimated where the color should go on the sponge. I kinda overshot, so I barely had any purple and I had no red/pink at all. Bleah. Worse, when I pulled the tape off I had white edges!!

This isn't awful, I know, but it really isn't at all what I was going for. I said to heck with it and decided to try something different on my right hand...

... except apparently, something different in this case was something hideously ugly. I figured I'd dab the color onto the nail somewhat randomly, then paint over it with black. But... no. This was ugly enough I couldn't wait to remove it.

It makes a fun blog post, though. See, all those times I tell you to have fun with it, because it's only nail polish? I mean it!

At least I like what I did afterwards. But you'll have to wait til tomorrow to see what that is! I know, I'm such a tease...

So come back tomorrow. Today's nails are a total Cinderella story!

Stupid plague...
See my disclosure statement for more information.

Saturday, March 3, 2012

Penguin Skittles Fail

Once again, it was time to see my pain management team. For the first time in months, I felt up to doing a fun manicure for my doctor's visit! Unfortunately, this time it just wouldn't work the way I wanted it to.

I've been itching to try to do something rainbow-inspired since I got the China Glaze Electropop collection. The colors are just so vibrant and fun! I wasn't up for anything too detailed, though, so I decided to do a skittles manicure, then paint penguins on top of it.

Instead of using nail polish for the details, though, I decided I would use acrylic paints instead. I've got some ideas I want to do and I think acrylics would work much better, as well as being easier to correct if I totally make a mess of things. This would be a great way to get used to using acrylics, right?

Clearly, I need lots of practice. From what I can tell, my paint was much too thick, and I was trying to get the details opaque with one coat. Bad idea! Then, I added top coat before the acrylic paint was completely dry which made the paint do weird cracking things and make bubbles. After that, I added another coat of topcoat to try and smooth things out and added even more bubbles!

This was a total mess... but at least I've learned something. Oh, and to add insult to injury, I photographed it last night and figured there was no harm in removing it. Then, when I got the pictures in to crop for the blog post I found that only two shots were usable- the two I combined for the pic in this post.

Oh well... better luck next time!

Painting is HARD!
See my disclosure statement for more information.

Sunday, February 26, 2012

Stamping with the China Glaze Electropop Collection

Sometimes the best intentions just don't work out the way you'd hoped. I received the entire China Glaze Electropop collection from Dolly's 1500-follower giveaway yesterday and absolutely fell in love. This collection is so bright!! It's like they made it specifically for me!

Of course, the first thing I tried with it was stamping. Unfortunately, this look started bad and just kept getting worse. I've done worse manicures, but this one is just not my favorite, by a mile.

Lots of sparkle, and even some out-of-focus-ness
to show that gorgeous holo hex glitter!
I started with a coat of my usual Qtica Natural Nail Growth Stimulator, then did two coats of NYC Oyster. This made my hands look a bit odd, but I knew I was going to stamp on it. I added a coat of NYC Pink Avenue for sparkle, which was nice. I'd like it more over other polish, though. (Both Oyster and Pink Avenue were part of a surprise gift from Melissa at The Daily Nail.) Then, because I wanted still more sparkle, I added a coat of China Glaze Techno!

Finally, I was ready to stamp. Picking colors was hard- I wanted them all on my nails, but I decided to stick with the most vibrant of them. Unfortunately, most of the colors I used were just too pale to really show up. Wicked Style (the bright pink) works nicely, but the rest just disappointed me.

Here you can sort of see Electric Beat (the blue) near the cuticle. The flash of blue at the free edge of my nail is a piece of holographic glitter in Techno. So sad...

I took photos of the rest of the fingers too, though. I only stamped my left hand, because the stamping wasn't looking pretty enough to replicate on my right hand. So, I'll let the other photos speak for themselves.


Oh well... it was worth a try! I still have ideas kicking around in my head, and now I know Oyster just doesn't look good on me. Knowledge is power! ;)

Til next time!
 
I love winning blog giveaways!!
See my disclosure statement for more information.

Wednesday, February 9, 2011

Rainbow Flowers After Showers?

Wow, long time no blog! What can I say, it's been chaotic around here. Lots of weather changes going on, lots of weirdness. Plus, I managed to break every nail on my swatching hand, so I'm down to nubs. Oh yea, that's pretty to photograph! However, I've been experimenting on some false nails, so I have things to show you.

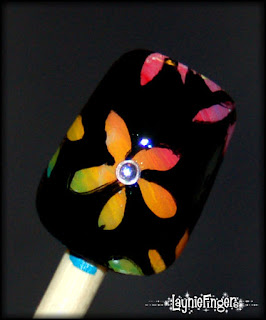
Today's nail art is a revisiting of a nail I'd made earlier. You may remember my acrylic paint rainbow I did a while back. While I love the look, I still wanted to try and experiment with it, see if I could come up with one more look for it.


I think I managed? It's different, at least. I'm not sure if I like it, though. I used a black acrylic paint to block out everything but the flower petals, and then added a single rhinestone in the center from the Fing'rs Flirt Nail & Body Jewels. Once the stone was in  place, I covered the whole thing with a layer or two of my Sally Hansen topcoat, just to secure everything in place and make sure I get that glassy look I love.

So, pros and cons. I love the bright color against the deep black gloss. It's really an interesting look. The stone gives it a nice pop, and I think this look has massive potential. Unfortunately, I think my petals are extremely sloppy and that I put so much black that I've lost the beauty of the rainbow on this nail. It's not awful, but it's certainly not good.

Ah well, I know I'm a perfectionist. One thing I did love is the Fing'rs gems I used. They come in a weird little clamshell container that is absolutely awful- the gems stick to the top and go everywhere if you aren't careful. For example, I was working with these one night and accidentally dumped them in my lap not once, not twice, but three times in a row. And because I'm OCD, I had to sort them back into their little cubbies properly. However, if you can get past that, the gems themselves are absolutely GORGEOUS!!

Seriously, look at these! They're so colorful, and they're small enough to look pretty and dainty on the nail. I also like that there's a range of colors and shapes. Overall, I think this set is totally worth the money, and you'll be seeing a lot more of these in the next few weeks!

So, what do you think? Is this nail a win or a fail?

The nail gems were provided by Fing'rs for consideration.
See my disclosure statement for more information.

Thursday, September 16, 2010

Aiee, Poor Caribbean...


Oh dear. You ever do something pretty, and then just keep on going and destroy it? Yea, that's what I did here. The Caribbean Frost was pretty, but I got bored. Really bored. This is what happens.

See, first I grabbed my stamping kit. I have it all in a cute little bag that Kellie G. sent me. (If it wasn't for her, I'd still be stuck with the same single plate I had.) I dug through all the plates and decided to go with M78. It's a really cute pattern that I've wanted to use more than once, but never got around to using. Since I just got those gorgeous Maybelline Aluminum polishes, I decided to see how they'd stamp on this lovely shade of teal.

It was... pretty. It was fairly sheer, though. I wanted more! I then decided to fill in the cheetah spots with black and white. That was AWFUL!! Thankfully, the Sally Hansen Nail Art pens are water-based, and I could remove them without any damage to the stamp. It was really not something worth saving,unfortunately.

Then I decided to try the silver and gold. They were... better? I don't know. I'm not fond of this look, but I decided to keep it on for whatever reason. A coat of Seche Vite made it durable and shiny, and dried quickly as usual.

Oh, you may be wondering about the naproxen sodium in the photo. I've managed to damage my knee somehow, so I'm taking these around the clock to help with inflammation. I was amused at that bottle being closest to hand. I know, I have a weird sense of humor.

All in all, I don't think this is a horrible look. I just don't have long enough nails to make the best use of the pattern, and it ended up looking sort of disorganized. But it was the first time I used a whole-nail stamp and it turned out nicely. Also, I learned a lot about stamping and design. So overall, it was a great learning experience, right? :D

What would you consider one of your more educational nail polish experiences? Have you done a nail art design that just made you want to take it off and start over? Tell me about it in the comments! And coming up tomorrow, I got a special surprise in the mail that I get to share with you! See you then!

Sally Hansen Nail Art Pens were provided by their PR company for evaluation.

Friday, July 16, 2010

Fail Nails- or why not every experiment is successful...


The problem with being experimental is that sometimes, despite your best efforts, the experiment is going to turn out AWFUL! Experiments can be great, and lead you to great things, or they can end up being a learning experience. Unfortunately, this experiment was a total failure!

See, I'd found an acrylic paint I was in love with. Still am- this stuff is downright magical. I did a test nail with it that turned out amazingly pretty. The problem is that I didn't actually wear the nail. I left it on its cute little stick and admired it for weeks. Finally, I decided to do a full set like it.

This would be where the problem showed up. I used a different application method for this, and unfortunately it just didn't work. Once I'd built the paint up to an opaque level, it was thicker than I realized. Adding two coats of topcoat to smooth out the surface didn't help, either. I left them up on their sticks for three days to dry, and then took them down, sanded their edges, and dropped them into a small ziplock bag for jewelry. I figured I'd photo them when it was time to put them on Etsy, if I ever did that.

When I pulled them out of the bag much later, I was absolutely horrified. What had gone in smooth as glass came out lumpy and gouged to the bare nail in places. The "polish" wasn't sticky. No, it was worse.

It was stretchy.

I couldn't do anything to save this one. My gorgeous turquoise glitter nails ended up being a giant fail.

Sunday, June 27, 2010

Magenta-to-Orange Gradient Nails

OMG, I so love what I did to my nails tonight! I've gone with a gradient again, because gradients are seriously making my day! This time, I went with a gradient from magenta to bright-hot orange. It's so pretty and summery! Pics soon!

Edited to add: OMG, best manicure mess-up ever!! I smudged the heck out of my middle finger on my right hand, so I removed everything on that finger and repainted, and decided to flip the gradient on both middle fingers. SO CUTE!! This totally needs pics!

Edited again: Grr. Managed to destroy the mani without taking decent photos. Gave up, cleaned the mess off, and painted nails with Pure Ice Hot Tamale. I'll try again later. =/

Edited One Last Time: GRRRRR! Bungled the Hot Tamale. Apparently, I am too worn out from my road trip to attempt to polish my nails. I'm taking the whole shebang off and going to bed. Here, enjoy pics from before the blog.


Pretend I did this tonight. It may be a fail, but at least it was a technique fail, rather than a clumsy "omg, I destroyed it" fail. *frown*