Showing posts with label nail gems. Show all posts

Wednesday, February 9, 2011

Rainbow Flowers After Showers?

Wow, long time no blog! What can I say, it's been chaotic around here. Lots of weather changes going on, lots of weirdness. Plus, I managed to break every nail on my swatching hand, so I'm down to nubs. Oh yea, that's pretty to photograph! However, I've been experimenting on some false nails, so I have things to show you.

Today's nail art is a revisiting of a nail I'd made earlier. You may remember my acrylic paint rainbow I did a while back. While I love the look, I still wanted to try and experiment with it, see if I could come up with one more look for it.


I think I managed? It's different, at least. I'm not sure if I like it, though. I used a black acrylic paint to block out everything but the flower petals, and then added a single rhinestone in the center from the Fing'rs Flirt Nail & Body Jewels. Once the stone was in  place, I covered the whole thing with a layer or two of my Sally Hansen topcoat, just to secure everything in place and make sure I get that glassy look I love.

So, pros and cons. I love the bright color against the deep black gloss. It's really an interesting look. The stone gives it a nice pop, and I think this look has massive potential. Unfortunately, I think my petals are extremely sloppy and that I put so much black that I've lost the beauty of the rainbow on this nail. It's not awful, but it's certainly not good.

Ah well, I know I'm a perfectionist. One thing I did love is the Fing'rs gems I used. They come in a weird little clamshell container that is absolutely awful- the gems stick to the top and go everywhere if you aren't careful. For example, I was working with these one night and accidentally dumped them in my lap not once, not twice, but three times in a row. And because I'm OCD, I had to sort them back into their little cubbies properly. However, if you can get past that, the gems themselves are absolutely GORGEOUS!!

Seriously, look at these! They're so colorful, and they're small enough to look pretty and dainty on the nail. I also like that there's a range of colors and shapes. Overall, I think this set is totally worth the money, and you'll be seeing a lot more of these in the next few weeks!

So, what do you think? Is this nail a win or a fail?

The nail gems were provided by Fing'rs for consideration.
See my disclosure statement for more information.

Tuesday, December 21, 2010

Happy Holidaze the Sixteenth- Holy crap, there's a lot of these! I mean, let's trim the tree!

I have a confession to make. Because of circumstances this year, I haven't decorated my home for the holidays at all. I haven't even put up a Christmas tree, which part of me misses but the most of me thinks, "Meh, it's more work using energy I just don't have. Save that energy for something I care about." So this tree is the only one I'm doing this year... good thing it's a cute one!

Woo! A Christmas tree, complete with entirely too many ornaments.
I'm not sure how I feel about this one, but hey... it's a tree, right? :D

I have to share a bit of the process with you as well. This thing was time consuming! I think it'd go faster if I had some appropriate nail stickers, perhaps some sparkly thread to replace the sequins I used to make garlands. But if you're not a fiddly person, this won't be the nail design for you. What's worse, I knew this would be a design I wanted to make an animation for to illustrate the process. But this thing was complex. I sat down and counted (thanks to the counting tool in Photoshop) and there are 82 layers in all, and the animation has even more frames* than that!

So, how do you make this monstrosity of a nail? Well, first you get a chicken...

I kid.

You will need some supplies if you're going to do a nail like this one. Keep in mind, you can substitute all sorts of things, and you don't actually need any of the extra stuff I used. I just used them because I thought they'd be fun. So... what all did I use?

You'll need:
  • base coat
  • a background color (I used a beige and a glitter topcoat)
  • at least three greens (I mixed greens using my base green and other polishes to darken & lighten them)
  • a gold polish for the star
  • a flat star cutout sequin thing
  • flat gold sequins or glitter for the garland
  • nail gems for the ornaments
  • quick-dry topcoat (a must for this sort of design!)
 
Christmas Tree Nail Art Process:
  1. Apply base coat.
  2. Apply your background polish. 2 coats is usually enough, but use your best judgment.
  3. Optional: Apply a layer of glitter topcoat over the background color.
  4. Paint the basic shape of the tree using your medium green polish.
  5. Using your darker green, paint in some shadow lines on the tree shape.
  6. Using the lighter green, paint in some highlights on the tree shape.
    1. These shadows and highlights are just to add some texture to the background tree. They won't be terribly noticeable, but they still add a bit of interest to the background so it isn't so flat.
  7. Using a small detail brush, paint a gold star with your gold polish. You can stop here if you like, or continue on.
  8. Optional: Place a star cutout on top of the gold painted star to add dimension.
  9. Add the garland.
    1. Paint a strip of clear nail polish where the first string of garland will go. Use a dampened manicure stick (or whatever tool you prefer for applying stones and glitter) and apply individual glitter pieces along the garland line. Apply them one by one for the jeweled look I achieved.
    2. You could use a striper polish instead and sprinkle microglitter over the wet stripe of polish for a fuzzier garland look.
  10. Add your rhinestone ornaments.
    1. Dab a spot of clear nail polish where you want the rhinestone to go.
    2. Pick up the rhinestone with your tool of choice, then press it into the clear polish. Press slightly firmly so that the polish slightly indents and rises up around the sides of the stone, so that it will stay in place better.
    3. Repeat with more stones til you've got the look you want.
    4. Optional- you can leave off the rhinestones and simply use a dotting tool to add ornaments to your tree. Glitter polishes (or even sprinkled glitter) would look fantastic!
  11. Seal the embellishments and nail art in with a quick-drying top coat such as Seche Vite or China Glaze Fast Forward.
Seems so simple on paper, doesn't it? Actually, it is simple, as long as you break it down into tiny steps. If you can glue on a rhinestone or paint a stripe, you can probably do this. You may want to leave out the hand-painted star, though... *grin* The rest is just figuring out where to put stuff.

Remember, if you try this, leave me a note, because I'd love to see it! Morgan from Pass the Polish Please did an absolutely adorable version of my Santa nails, and it totally made my day to see it! So definitely link me if you try one of my designs!

Now, I'm off to have a cup of hot cocoa and snuggle with the husband for the evening. Hope y'all have a great night!

*Not that this has any importance at all. I love doing the blog and making animations, and frankly I've had bigger, more complex files than this. I just find it amusing that this particular file took me so much time. Do people really read these footnotes? If you did, that means you're super awesome and I love you to bits! You should respond with a comment saying something silly, like maybe, "Wow, that's cool, but it'd be even more awesome with a squid ornament!" You know, something weird like that!

Nail gems, sequins, and star were provided by Viva la Nails for consideration.
See my disclosure statement for more information.

Wednesday, December 15, 2010

Happy Holidaze the eleventh- All Buttoned Up!

Hiya! Wow, what a day... this has been one of those days that I just can't quite seem to get the hang of.  I've been sleepy all day (go figure), but I managed to accomplish some things, and then went for a drive tonight looking at Christmas lights with my family. That was a lot of fun, except that I don't quite understand some people's holiday decorations.

I mean, take Santa, for example. I understand having lots of decorative deer in your yard, or multiple snowmen. But why would you have seven Santas spread out over a half-acre lot? I just don't get it... it's like there's the Santa by the driveway, and the Santa by the front porch, and the Santa climbing a ladder and the Santa patting a reindeer, and finally the psychotic Santa behind the house chopping up the bad little boys and girls who didn't realize that when they said Santa is watching, they really meant Santa is watching, and he knows if you've been bad!

I know, I digress. But I really do think some people overdo for the holiday. We saw some homes that were so bright it was almost like daylight, with thousands and thousands of lights and animated decorations and just so much STUFF! It seems like overkill, but this is probably just me being a total Scrooge. But seriously- if you have more than one Santa, could you tell me why? What the reasoning is behind it, because I honestly don't get it!


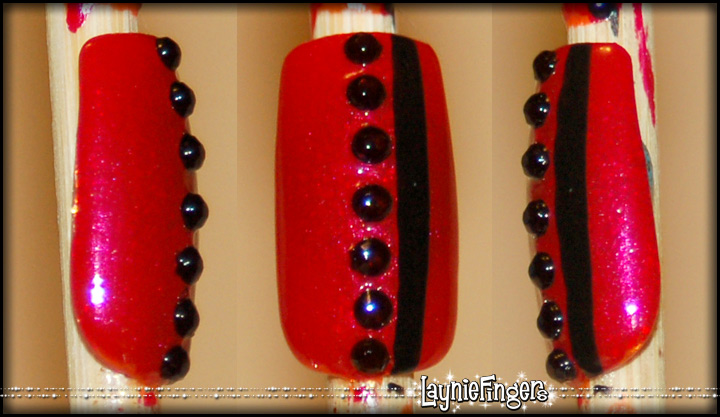
All that babbling aside, here's today's nail art. I'm reminded of a red wool coat with pretty jet buttons up the front! This is (again) a very simple, very bold graphic look that really is easy to do. As you can tell from the graphic, it's a very quick look to put together.
  1. Apply base coat.
  2. Two coats of polish of choice- I chose red.
  3. Apply a black stripe of polish with a thin brush. Let dry.
  4. Apply a line of clear polish down the center of your nail. Then place the black stones in a line alongside the black stripe.
  5. Apply a coat of Seche Vite to secure and protect everything.
So what do you think- is this a look you think you would wear? How would you change it?


The black rhinestones were provided by Viva la Nails for consideration.
See my disclosure statement for more information.