Showing posts with label Love My Nails. Show all posts

Wednesday, April 11, 2012

It's a gradient day at the Zoya beach!

I'm sorry, that title is just puntastic. Anyway, I've been wearing this for a few days and I really like it! Not a whole lot of art to it, but it's sparklelicious and you should know by now how much I like the sparkles!

I started with my base coat, then did one coat of Zoya Arizona from their Beach and Surf collection. I knew I was going to be doing a gradient, so I did a base coat of my lighter color. Then I sponged on a gradient of Arizona and Reagan (also from the Beach and Surf collection).

Arizona and Reagan are both rich, intensely-saturated creme polishes. Arizona is a gorgeous, sunny orange that makes me smile, and Reagan is a deep magenta. The two blended together smoothly, creating a gorgeous transition.

I did make one booboo though... while sponging, I accidentally turned the sponge upside down when I reached my middle finger. I was annoyed, but quickly decided to call it an accent nail. :D

Once my gradient was finished, I thought they needed something else. I decided to go with glitter, adding Love My Nails Angel Baby. It's a fun mix of tiny glitter and larger iridescent rounds. Gorgeous! Also, I added a coat of my super-glitter polish for more blingy goodness to turn this into a rainbow sparkly monster!

... nooo, what do you mean I seem like I need a nap? I feel fine!!! Super! WONDERFUL!!

... Ummm, ok. Maybe I am a touch giddy. Maybe I should go back to the video I'm editing for you. I was hoping to have it up today, but that just didn't happen. I'm not that good yet. But soon.

Ok, you look at the rest of these photos while I go have a bit of a rest work on video. More tomorrow, hopefully.


Polishes were provided by the brand for consideration.
See my disclosure statement for more information.

Thursday, March 15, 2012

A Cinderella Story

Let me tell you, I feel so relieved being able to post a simple, beautiful look after my previous fails. I find it very frustrating when I can't translate what's in my head to what's on  my nails. Thankfully, that wasn't a problem with this look!

Also, I'm still feeling pretty icky, so I didn't do my usual photoshoppery to fix my poor pathetic cuticles. I apologize in advance, but I feel the look is princessy enough to forgive. I hope you agree!

So- this all started with an email I got from KKcenterhk. I almost missed it, because it somehow wound up in my spam folder! Thankfully, I saw it, because they wanted me to try their water decals. I said sure, and after browsing for what seemed like hours, I finally decided on N.NAIL-WDHHC069-Silver- a set of metallic filigree designs.

In all honesty, I wasn't sure what to expect. The water decals I've seen and used prior to this point were very thin, and I couldn't imagine a metallic water decal actually working. But I was optimistic, and eagerly awaited the chance to try them.

Click this one to see the detail on these decals!
Once they came in, I was absolutely floored. They're absolutely gorgeous, shiny metallic silver and so delicate! The only problem I have with them is that they were too darned hard to photograph- I must have taken 20 pictures and this is the best of them!

They are slightly different than other water decals I've worked with, though. Instead of coming loose after seconds, they take a few minutes to really turn loose from the backing paper. I actually used a pair of plastic tweezers to peel them off once they were saturated, but they're very sturdy and held up beautifully.

However, once I had them in hand I couldn't decide what to pair them with! I wanted something simple... no holos or duochrome to take away from the delicacy of the design. I also knew I wanted to put a stone inside the circle of the design. It just seemed made to be accented!

Finally, I decided on a polish I didn't think I'd like at all- Kinetic Candy by China Glaze. It's a pretty enough polish, it was just too pale, too blue, too  Easter for me. I decided to add a coat of Love My Nails Dazzling over the top, and a tiny blue gem from my Fing'rs Nail and Body Jewels.

I don't know if I've mentioned this lately, but this is probably my favorite set of nail gems. They're tiny and so sparkly, plus there's such a fun variety of shapes! This set was provided by the kind folks at Fing'rs ages ago, and I keep finding new uses for it!

You see the end result here... this blue sparkles like Cinderella's ball gown, and I don't want to hear the clock strike 12! I've had this on for days and don't want to take it off. It's so shimmery and delicate, and I am just in love!

Who knew I could be a pale blue, Easter kind of girl? Certainly not me! I also left the Dazzling off my thumb, just to show the decal a bit more clearly without all those sparkles.  I'll let the photos tell the rest of the story.


Water decals were provided by kkcenterhk.com for consideration.
See my disclosure statement for more information.

Sunday, September 4, 2011

Twist and Shout, by Nail Fantasies

You know what? Storms are a pain in the butt. I live in an older mobile home (yay for not paying rent!), so we tend to evacuate when there's a tropical storm or larger coming. That means I'm posting this from my dad's house!

For the record, we're fine. The storm has come and ... well, sort of gone. It's been fairly uneventful, thankfully, and we even had a bit of good luck. Normally we park in the same spot every time we go to my dad's, but this time we parked close to the house. It's a good thing, because when we came out the next morning, there was an ENORMOUS limb right where we normally park our car! It would have been seriously unpleasant, and I'm glad it didn't happen!

We didn't even have to do without power, thanks to my dad's whole-house generator. We lost power sometime in the night last night, but his generator kicked right in and kept us fully-powered. This is where I plan to be for every storm in the future, as well.

But enough of that! I want to show you a lovely polish I got on sale. I've got a few Nail Fantasies brand polishes, and I love them all. This time I'm showing you Twist and Shout, a lovely lime green creme. Unfortunately, I didn't take pictures until after I'd put a coat of glitter polish from Love My Nails on, and I absolutely cannot remember the name of that polish to save my life. I'll update this blog once we're back home again and I can check the name.

Still, you can see the color well in these shots. Twist and Shout is a beautiful creamy lime green that applies nicely. It's one of those colors that really called out to me when I saw it, especially considering it was only $0.50 (if I remember correctly, it might have been less).

As you can see, the glitter polish really does give this green more of a kick. It's an interesting combination of glitters, combining fine translucent opalescent microglitter with large round translucent opalescent glitter, larger translucent opalescent hex glitter and large rhombus holographic glitter. In short, it's absolutely stunning and can look very different from nail to nail.

In fact, the difference nail to nail can be seen either as a positive or a negative characteristic. Personally, I really like the varying looks. However, if you're someone who wants your manicured nails to look consistent overall, then you might find this frustrating. There's really no way to guarantee which shape glitters will show up on your nail that I'm aware of.

I guess you could pour some out into a small dish and try to fish out the bits using a brush or a fine-pointed tool of some sort. Still, that would seem like a waste of polish to me, and too much work. I'm fine with the more whimsical, varying application.

So- overall, I'm extremely happy with both of these polishes. The lime green is perfect both for general application and for nail art, and the glitter is versatile enough to be used as a layering polish or for frankening purposes. This could make some GORGEOUS frankened polish!

As for me? I think it's time for me to find a nap... I think I hear it stalking around in the bedroom. I bet I can totally incapacitate it!

Til next time!


Tropical storms are a pain in the butt.
See my disclosure statement for more information.

Sunday, April 24, 2011

Pink Sparkles make me smile!

Wow. I am utterly exhausted, you guys. I did a photo shoot on Wednesday and ended up taking 2000 pictures of the girl, and even though it was lots of fun, it TOTALLY wore me out. I did get a few shots of my nails, though! ;)


I sat down looking for something in particular. I feel guilty for passing up things in the review box, but sometimes you have to feed your soul first! I wanted deep pink color with super sparkle, and BOY did I get it! I went with layering, using my standby perfect pink topped with a super glass fleck that is absolutely stunning!

I was so happy, because in the sunlight this was absolutely gorgeous. I loved catching the happy pink on my nails every time I glanced down. It absolutely made my day!

Unfortunately it didn't wear terribly well. Two days later I had chips and massive tipwear. I'm unsure whether I should be wearing a base coat over the Qtica Nail Growth Accelerator, but this makes me think I should be. I don't know... anyone have thoughts about this?

Also, if you haven't signed up for my giveaway, what are you waiting for? Go sign up!

I never liked pink. I wonder what changed?
See my disclosure statement for more information.

Thursday, January 20, 2011

Secret Message Nail Art- an understated approach to nail art?

I am a bad, bad blogger. I took this shot several weeks ago and meant to share it, but then I got totally sidetracked. It's a good thing I'm not a doctor or an air traffic controller or something, else people would be dying while I wondered what it was I'd needed to do...

So, today's nail art is sort of backwards, in that you do the nail art first and then cover it up with your base coat. I know, it sounds totally bizarre, but look at the end result!


This was a super easy look, and it will absolutely make people look at your nails. I started with a base coat of solid white, just a cheapie 99 cent white polish from Love My Nails. It works well enough, although it tends to streak a bit on the first coat. Still, for 99 cents I'll deal.

Once that had dried a bit, I used my Art Deco black striper to draw vertical stripes down my nails fairly evenly spaced. This is a cute look on its own, but I had something else in mind. I'd noticed that the Sally Hansen Purple Diamond Nail Prisms dries very translucent, and I wanted to experiment with it.

Once the black and white had dried, I brushed a layer of Purple Diamond over the stripes and sat back to watch it dry. I wish I had video capabilities, because this is an absolutely gorgeous look. It's subtle enough to not look like you're wearing circus tent stripes on your nails, but it's still striped enough to make people wonder how you managed it. I can't wait to wear this one as a full manicure.

So what do you think- do you want to try some hidden nail art? Does it look interesting to you?

Can holographic polishes really be called understated? Who knows?
See my disclosure statement for more information.

Saturday, October 9, 2010

GOSH Black Passion (and a request!)

I love autumn. I get absolutely giddy every year when the weather cools down and I get to start wearing my long-sleeved tops with my kitty shoes. This year has turned cool earlier than usual, and I'm not complaining at all! I am, however, finding myself turning to deep colors for my nails. It's time to pull out my GOSH Black Passion!

This is a deep charcoal polish with silver shimmer. I love it even more than usual because this gift (along with my other GOSH polishes) was sent to me by a lovely friend in the UK. Every time I see those bottles, I'm reminded of how surprised I was to see the package she'd sent me. A little unexpected kindness will turn me into a silly mess of thankfullness every time!

Black Passion is actually less black and more of a graphite color,  complete with silvery shimmer inside. It's absolutely lovely, and a bit easier to wear than straight-up black. I found it kind of hard to apply- it's a very dense, pigmented polish but it tended to have a lot of drag, so I ended up needing two coats just to even everything out. Still, two coats is nothing to complain about, especially when you end up with such a lovely result!

Also, I had a request the other day from Deez Nailz, who was curious to see what Love My Nails Dazzling looks like over black. She was thinking it would look stunning over black, and she was right!


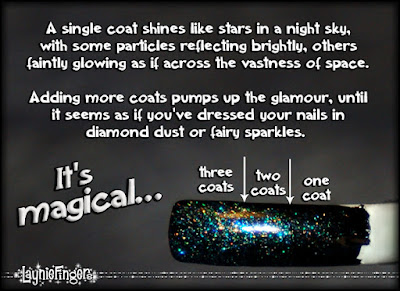
I mean, really... do you see the crazy sparkle on that nail tip? I also tried something simple- I did a gradient with the sparkles, so that it went from pure black at the base to sparkle mania at the top. All I did was paint the glitter on from different parts of the nail for each coat!


I think it's a bit easier to see the lines since I put the arrows on. Also, to cut down on the lumpy look, I did the first coat on just the tip of the nail, the second on half, and the third coat covering three quarters of the nail. Somehow that makes it seem more gradient and less striped. A coat of topcoat and it looks magical!


What can I say, I think everyone should have at least one bottle of this topcoat. It can turn any polish from drab to glam! So tell me, what do you think of this topcoat? What color would you put it over?

Tuesday, October 5, 2010

Tiger Stripes- They're Fun When You Throw In A Gradient!

Let's be honest- animal prints are fun. They're especially fun for nail art, but they can seem a bit flat-looking sometimes. I decided I was going to try to do a tiger print with a bit of depth to it!

I started out with my standard base coat, then two coats of Love My Nails Hot Tamale. This is a gorgeous orange that's absolutely loaded with shimmer. I wanted a bit more, though, so I mixed it with a bit of white polish. Oddly enough, it turned pink! I wish I'd gotten pictures of that stage, but I wasn't thinking. Instead, I added some Sinful Colors Let's Meet (Yellow) to warm that pink up to a pale orange again.

Once I had a pale orange I was happy with, I sponged it lightly over the center high part of my nails. It ended up being a sort-of blended pale stripe down the centers. It still seemed too white/pink for me, so I ended up painting a coat of Let's Meet over my nails to make everything work together. At this point, it was late and I seriously needed sleep, so I added a coat of Seche Vite and let it dry for a bit, then went to sleep.

The next morning, I had to go run some errands, and didn't realize until I was already out of the house that I had odd nails that I hadn't even cleaned up edges on! Thankfully, I don't think anyone noticed. If they did, they probably thought I was insane! My nails looked weird! But that's ok... if they got a giggle, then maybe their day got a little brighter. I'm ok with that!

So, once I got home, I pulled out my Sally Hansen Nail Art pens, choosing the black for the tiger stripes. It was a simple matter to draw on stripes, and my biggest challenge was not drawing too many stripes! I added another coat of Seche Vite, then looked at them. They were pretty, but something was missing...

My basic rule of thumb is this: when in doubt, add glitter! In this case, it worked splendidly! Instead of brushing glitter over the entire nail, though, I wanted to enhance the light parts of the nail. I ended up using a very thin nail art brush to paint the glitter polish onto the appropriate areas.

Sounds fiddly, doesn't it? Oh yea. You could say that. First I painted on a layer of Love My Nails Dazzling (my go-to glitter of choice). It was pretty, but it wasn't enough. So, I pulled out my Sinful Colors Call You Later. This stuff is seriously gorgeous, a mix of gold and copper glitters in multiple sizes that absolutely sings on the nail. It turned out to be the absolute perfect addition, and once I was finished with the glitters I couldn't help but smile.
 
Once I got those applied I added one more coat of Seche Vite. (I hope you aren't counting, but basically, that's a lot.) Believe it or not, it dried fairly quickly and was super smooth even with all the glitter. I did a quick cleanup with my acetone & paintbrush and then I wasn't ashamed to leave the house anymore!

Even my husband seemed amused by this manicure. I showed him my nails and he said, "Awww, you're a kitty!" It made me smile.
Normally he just sort of shrugs and says, "Ew, stinky." To get a positive reaction makes me happy!

So tell me, what do you think about animal prints. Do you like them? Do you love them even more in rainbow colors? Are you a purist who thinks animal prints belong only on the animals who wear them? Tell me all about it in the comments!

Sally Hansen Nail Art Pen was provided by the company for evaluation.

Saturday, October 2, 2010

Milani Bare Necessities With a Dazzling Topcoat

EDIT: Sorry, guys... I have no idea what happened here. The pictures were there when I posted, but suddenly aren't now. I'm blaming the web pixies for stealing my pictures! All should be fixed now, so carry on, carry on! ♥
 Psssst.

Yes, you. C'mere. I've got a secret to tell you.

You have to promise you won't tell anyone. I mean it... not anyone! Can I trust you to keep my secret?

I have an almost unhealthy love for sparkly things.

I know. I hide it so well. People are always so surprised when I squee over something glittery, because it's such a shock! But it's true, and I can't hide it any longer...

Ok, fine. It's not exactly a secret. But it's still the truth. I love glittery, shimmery things so much! It's not that I don't like creme polishes, it's just that they're so... creamy and flat. The idea of being able to add my own layer of shimmer to a creme polish to switch it up is a fantastic one, and it's hardly a new idea. Companies have made glitter polishes for decades!

But I recently found a topcoat that is filled not with glitter but with shimmer- tiny particles that glimmer and sparkle almost like diamond dust. To see that this polish was a grant total of $0.99?

Oh yea. I squealed out loud, standing right there in the middle of WalMart, not caring who saw me, who thought I was insane. I bought a bottle, and am now considering buying a couple of extra bottles for backup. I love it that much! It's called Dazzling, and it's a gorgeous iridescent shimmer in a violet-tinged clear polish. If I could, I would marry it and have lots of tiny little nail polish babies in all colors of the shimmery rainbow!

So, I started out with two coats of Milani's Bare Necessity from this fall's line of limited edition polishes. (For the record? Those polishes are crazy gorgeous for neutrals!!) Two coats gave me a neutral that was just a shade or two deeper than my own skin tone, warm enough to look healthy but still a nice neutral beigey-tan. As a work polish, I think this is ideal, even though you might die of boredom from looking at it too long. (I kid, I kid!!)

Once I'd gotten my base color down, I added a coat of Dazzling. This brought that neutral shade to life, turning it into a glistening neutral that seemed to have sparks inside! I honestly am at a loss about how to describe it... let's just say it was flippin' beautiful, 'k?

After one coat of shimmer gorgeousosity, you'd think I would have stopped there, yea? No. I added another coat, which made it even more magically insane than before!!  It's so crazy that I was abusing caps lock and exclamation points with my friends!! It looked almost alive with delicate rainbow sparkles lighting up my fingertips, causing me to spend entirely too much time staring at my nails and not nearly enough time doing important things, like breathing.  I was in love, y'all!

The best part is that it's absolutely smooth. No bumps, no sandpaper nails. Just a billion sparkles of light, turning your nails into a disco paradise. I added a coat of Seche Vite to make sure this baby wore like iron, and wore this for three days.

THREE DAYS, people!!!

I'm feeling a bit dizzy just remembering it... I think I need a few moments to myself. Feel free to dig around the blog while I go retire to my chambers to stare at my nails a bit more. This way, if I forget to breathe, at least I'll have a soft comfy bed to pass out into! :D

Milani's Bare Necessity was provided by the company's PR for evaluation.

Wednesday, September 1, 2010

What Did I Name My Pinky-Purple Franken? FRANKENBERRY, Of Course!

I know, I know... naming a berry-colored frankened polish FrankenBerry is just begging people to groan. It's so horrible, and I know better. But I was sitting and thinking, and as soon as it hit me I began to giggle, and I just couldn't stop. So now you get to see a frankened polish with the worst name in polish history. Or maybe for this week, I'm not sure.

Anyway, I broke this one down into steps. I was going for a Lippmann-esque glitter in a jelly base. I started out with some polishes I love. I used several clear, inexpensive glitter polishes from Love My Nails along with Sinful Colors Dream On, a vibrant, almost neon purple. I also used a little plastic cup to mix in, as well as a bamboo skewer for mixing. I like those better than toothpicks because I can get a better grip on them.

The thing to remember is start small- you can always add more polish, but removing polish from the mix is impossible. I started out with a small blob of Love My Nails Dazzling. I used this because it's got an absolutely beautiful shimmer to it, almost as if it were filled with diamond dust. I wanted my Franken to have shimmer galore, so this was a perfect start to it!

Then I went for the glitter- a mix of sizes of iridescent glitters in a clear base, Love My Nails Angel Baby. This one would give that mix of glitter sizes I was hoping to have. It also gave the rainbow touch that I seem so fascinated with these days.

Angel Baby has a variety of round glitter in various sizes. It's a great topcoat for layering, but it also works really well for frankening. I really like the way it plays with other colors.

Next I added in the Sinful Colors Dream On. I could have used any color, but I wanted a bright berry-type color. Dream On is a very densely-saturated purple that gives almost complete coverage in one stroke. It also tends to dry to an almost-matte finish, which does play a role in how this looks later. It's an interesting thing to keep in mind.

If I were to make this mix again, I might use a different purple, just to see if it would play better with the mix.

Now I grabbed my bamboo skewer and mixed this thoroughly. It doesn't take long, and soon enough I had a lovely, bright, sheer pinky-purple mix with tons of glitter. I really liked how this looked in the cup. The glitter showed through the polish nicely and the color was still vibrant, but incredibly sheer.

I wonder what it would have come out with had I kept the mix like this...

Time to test! I applied one coat of the mix to my thumb only to find that it was incredibly sheer- much more sheer than I'd intended. However, looking back I wish I'd tried more than one coat of the polish, just to see how well it would build.

Ah well, it's a learning experiment, and I certainly learned a lot while making it! Glitter is good, neons dry funny, and never be afraid to experiment!

I went back for more polish and added a bit more of the purple and mixed well again. This looked much better to me. While I wanted sheer color, I wanted it to be opaque enough to hide the nail line. I wanted it sheer enough to see various glitters peeking through the layers of polish. This looked like it just might do what I wanted...

Also, I really love the size of this plastic cup. It's perfect for mixing a small batch of polish and bit enough to get your brush into. It's also easy to clean, as I'll show soon enough.

One more test and I was satisfied with the color. I went ahead and painted all my nails with the mix. You can see it's still sheer, but deep enough to build to opacity. One coat was much too sheer, but 2 coats built to a lovely, almost-opaque color. I eventually put on 3 coat of polish, and really enjoyed the process. Next up- more colors like this!

Finally I had a lovely finished manicure (except for cleaning up, which I totally forgot to do for these photos). I love the color, and it applied nicely. I was surprised at how matte the polish dried, although it's not a bad thing. I think it dried matte because of the Dream On. It was easy enough to fix by adding a coat of topcoat, and it would have been just fine as a satin as well.

I used a brush from a clear strengthener to apply the polish, then cleaned it on my polish pad before I put it back into the bottle. It worked really well!

Finally, I've got a picture of the bottom of the polish cup, just to show the types of glitter involved in this polish. Isn't it yummy?
I love the combination of colors, and the blue glitter that shows up really is blueish.

I don't know why it took me so long to start mixing colors, but I'll definitely be doing more of it! This was FUN! I'm already looking at polish box, thinking about what colors I could combine for what effects!

So tell me, do you think you'll be likely to experiment with frankening? Are you brave enough to play, or do you prefer to watch other people mix up new colors? If you do mix up a new color, show me, I'd love to see!

Saturday, August 21, 2010

Simple Nail Art Designs Using Konad Stamps as a Base


Have you ever wanted to do a fun nail art design, but had absolutely no idea how to get started? That's how I felt right before I started this look. I was so excited because I'd gotten a couple of KISS Nail Artist Nail Paints, but I had absolutely no idea what to do with them. I just don't paint all that well. Then I had an idea:  I would look through my Konad/Fauxnad plates to see if anything grabbed me.

Before long, I'd settled on image plate m76. I like the flower design I chose for several reasons. It's fun, it's cute, but most of all it has lots of open spaces. I can paint those open spaces with other colors to make it look much more complex than it really is. Plus, I don't have to worry about drawing the design, or if I'm doing it right. It's like doing a paint-by-numbers kit, only I get to choose what colors go where!

Granted, I only had room for the pink KISS striper, but that's ok. I can use the blue some other time. I know I'll use it because it's a gorgeous shimmery royal blue, and I have a thing for shimmery royal blue!

So, next I had to decide on a background color. I made a somewhat strange choice, but I think it worked out well in the end. I put three coats of Maybelline Express Finish in Golden Plum. This pink is absolutely divine, my lovelies. It's bright, but it's also sheer, so that you can get away with it in lots more places. The glass fleck in this polish is so, so pretty. There's something about the depth that I love! I could have left this as is with just a coat of topcoat, but no...

I wanted more.

That's where the Konad stamping comes in. This part was actually pretty easy, if somewhat nitpicky. First, I stamped my chosen image. (Come on, you're still with me, right? I just showed you that picture. Scroll up if you have to!) I decided to use white for the stamp, so that it would look nice against the pink. It looked cute on its own- my husband actually preferred it without filling in the colors. Oh well.

Then it was just a matter of filling in the various bits with color. I think the animated gif I made explains it a bit better than I could with words. Honestly, isn't that usually the case? I used a variety of polishes for the various colors. The petals were KISS Nail Artist Nail Paint Soft Pink, the flower center was a mixture of Sinful Colors Let's Meet and Love My Nails Hot Tamale, the leaves were a mixture of Wet n Wild Wild Shine Carribean Frost and Sinful Colors Happy Ending, and I put Sinful Colors All About You over the various bubbles and things in the design. Sinful Colors All About You is a gorgeous mix of golden and coppery glitters, so it added an interesting punch of color from the right angles.

As I was painting, I wasn't sure if I was going to like it or not. In fact, up until I put the topcoat on, I was half sure I would hate it. But as I put the topcoat on, I realized that the combination of polishes reminded me of cloisonne, a surface treatment in which compartments are filled with enamels or inlays. Something about the way the flower petals were surrounded by the white of the Konad stamp really reminded me of the way the metal barriers contained the enamels in cloisonne beads. I didn't hate it after all!

I also learned something new with this particular manicure. I'd read about repairing broken nails with a tea bag, but had never actually had to do it. Thankfully I had both nail glue and tea bags on hand, because I was walking through my hallway, tripped over my own feet, and managed to split the nail on my left hand ring finger down the center. I was lucky that it didn't go past the white part and didn't hurt or bleed or anything, but I was so upset. That's my swatching hand!! I've got a lot of stuff to show, what do I do?

Well... I mended my nail using a tea bag, my nail glue, and the sweet KISS manicure kit I've been holding on to. Luckily, it had a sanding/buffing block that let me smooth everything after it had dried, as well as emery boards to smooth the end and file off the extra glue-saturated tea bag. I'll talk more about my manicure kit later, but just know that it saved my butt with this! Can you see the repair in the pictures?

So that's my nail adventures for the week! I learned, I experimented, and at the end of the day I was pretty darn happy! What do you think of this faux-cloisonne look?  Do you think you'd try it?


The KISS Nail Art Paint and manicure kit were provided by KISS's PR company for review.
I used them because I like them, not because I'm being compensated to use them.
See my disclosure statement for more information.