Showing posts with label Happy Holidaze. Show all posts

Wednesday, December 22, 2010

Happy Holidaze the seventeenth- they weren't ALL winners...

Hi again! I've shown a lot of fun looks of varying degrees of difficulty in the last few weeks. Some were more successful than others, but I'd like to think that all of them were decent. However, tonight I'm going to share with you the designs I feel weren't quite so successful- the fails.

Everyone does it. No matter what the medium, if you're working at learning a craft you will have projects that turn out badly. There will be cakes that don't rise, woodworking projects that don't fit together correctly, paintings that are unrecognizable. It's part of the learning process, and it's totally ok to fail.

However, most people will shake their heads and say, "Whew, I'm never doing THAT again." They're thankful no one has to see their mistakes, and they carry on happily. I, on the other hand, think it's fun to haul out the horrible projects, the ones that make people say, "Good grief, Laynie, what were you smoking to come up with this?!" These aren't quite that bad (although I've had some that are), but they're still nothing I'd want to wear in public.

First, let's look at the humble snowflake. You saw the one that worked, but you didn't get the see the two prior trials that didn't quite work. See, I had envisioned these tiny snowflakes gently floating down from the sky, stark white against the evening sky. Unfortunately, my first attempt looked more like snowflakezilla, ready to eat the town and the inhabitants before letting out a large, snowy belch.

It wasn't good.

"HELP, the giant mutant snowflake is going to eat us!!"
I'm still not quite sure why it turned out so large, so blobby, so shapeless. I used a tiny brush, the same brush I've painted tiny details with in the past. But this time, it just got bigger and bigger, until it was... well, until it was what you see here. "It's ok," I thought to myself, "I'll try something different..."

I'm not sure what I was thinking here...
Do I have an explanation for this? Umm... no? I didn't even have a dotting tool at that point, so I used something I'd decided would work as a stand in. It didn't, really, as you can see. those are the wonkiest dots ever, and speaking of dots... since when does a snowflake look like dots?

I have no answer. I did, however, realize that this just wasn't working. I knew it needed... I don't know, something. Help is clearly what it needed, but no, I wasn't going in that direction. I decided to do what I always do when I'm not sure something isn't working:  I added glitter.

It didn't help.

Moving on...I also tried to do a plaid look. This one isn't horrible, but my color choices aren't the best, and I think I needed to try it on paper first to make sure I got all my overlaps right. All I know is that this is just not pretty.

Yes... it's definitely sort of plaid... ish...
To be fair, the photo is a touch dark, but I think you can tell that this just didn't turn out nicely at all. The lines are so LARGE! The overlaps are also confusing as heck to me. I'll end up playing with this on paper one day and see if I can come up with a better look once my new nail art brushes come in, but that's a story for another blog post. Don't worry, they should be here soon. :D

I also tried a Christmassy look using both red and green on the nail and trying to put silver scrollwork between the two colors as a divider. The idea isn't horrible, but man, the execution just failed miserably.

Poor, pathetic attempted swirlyblobs. You could have been so beautiful...
Can you see where I was going with these? It's a cute idea, with lots of shimmer and pretty and a touch of silver. But man oh man, it just didn't WORK! I can't even explain why it didn't work, but it definitely didn't, and when I tried to touch it up it kept getting worse and worse. This one I ended up cleaning up before I could snap a picture of it, so you don't get to see the silver bar as wide as the "scrolls" that I ended up removing! I bet you can imagine it just perfectly, though!

But I've saved the *cough cough* best for last. This one... I'd explain it if I could, but I don't even remember what I did to make it so damned ugly. It's black polish with gold glitter and more black polish. Lots of black polish. It's like an uber-goth Christmas. After someone's dog died.

♪ ♫ ♪    It's Christmas and I'll cry if I want to...    ♪ ♫ ♪
So just remember- it's absolutely ok to fail, and it's ok to paint a nail design so ugly that even brain-damaged chimpanzees with a seizure disorder could do a better job. It's only nail polish, and it comes off. Relax and have fun with it!!

Oh, and one more thing... don't try these at home. They're pretty icky. :D


Tuesday, December 21, 2010

Happy Holidaze the Sixteenth- Holy crap, there's a lot of these! I mean, let's trim the tree!

I have a confession to make. Because of circumstances this year, I haven't decorated my home for the holidays at all. I haven't even put up a Christmas tree, which part of me misses but the most of me thinks, "Meh, it's more work using energy I just don't have. Save that energy for something I care about." So this tree is the only one I'm doing this year... good thing it's a cute one!

Woo! A Christmas tree, complete with entirely too many ornaments.
I'm not sure how I feel about this one, but hey... it's a tree, right? :D

I have to share a bit of the process with you as well. This thing was time consuming! I think it'd go faster if I had some appropriate nail stickers, perhaps some sparkly thread to replace the sequins I used to make garlands. But if you're not a fiddly person, this won't be the nail design for you. What's worse, I knew this would be a design I wanted to make an animation for to illustrate the process. But this thing was complex. I sat down and counted (thanks to the counting tool in Photoshop) and there are 82 layers in all, and the animation has even more frames* than that!

So, how do you make this monstrosity of a nail? Well, first you get a chicken...

I kid.

You will need some supplies if you're going to do a nail like this one. Keep in mind, you can substitute all sorts of things, and you don't actually need any of the extra stuff I used. I just used them because I thought they'd be fun. So... what all did I use?

You'll need:
  • base coat
  • a background color (I used a beige and a glitter topcoat)
  • at least three greens (I mixed greens using my base green and other polishes to darken & lighten them)
  • a gold polish for the star
  • a flat star cutout sequin thing
  • flat gold sequins or glitter for the garland
  • nail gems for the ornaments
  • quick-dry topcoat (a must for this sort of design!)
 
Christmas Tree Nail Art Process:
  1. Apply base coat.
  2. Apply your background polish. 2 coats is usually enough, but use your best judgment.
  3. Optional: Apply a layer of glitter topcoat over the background color.
  4. Paint the basic shape of the tree using your medium green polish.
  5. Using your darker green, paint in some shadow lines on the tree shape.
  6. Using the lighter green, paint in some highlights on the tree shape.
    1. These shadows and highlights are just to add some texture to the background tree. They won't be terribly noticeable, but they still add a bit of interest to the background so it isn't so flat.
  7. Using a small detail brush, paint a gold star with your gold polish. You can stop here if you like, or continue on.
  8. Optional: Place a star cutout on top of the gold painted star to add dimension.
  9. Add the garland.
    1. Paint a strip of clear nail polish where the first string of garland will go. Use a dampened manicure stick (or whatever tool you prefer for applying stones and glitter) and apply individual glitter pieces along the garland line. Apply them one by one for the jeweled look I achieved.
    2. You could use a striper polish instead and sprinkle microglitter over the wet stripe of polish for a fuzzier garland look.
  10. Add your rhinestone ornaments.
    1. Dab a spot of clear nail polish where you want the rhinestone to go.
    2. Pick up the rhinestone with your tool of choice, then press it into the clear polish. Press slightly firmly so that the polish slightly indents and rises up around the sides of the stone, so that it will stay in place better.
    3. Repeat with more stones til you've got the look you want.
    4. Optional- you can leave off the rhinestones and simply use a dotting tool to add ornaments to your tree. Glitter polishes (or even sprinkled glitter) would look fantastic!
  11. Seal the embellishments and nail art in with a quick-drying top coat such as Seche Vite or China Glaze Fast Forward.
Seems so simple on paper, doesn't it? Actually, it is simple, as long as you break it down into tiny steps. If you can glue on a rhinestone or paint a stripe, you can probably do this. You may want to leave out the hand-painted star, though... *grin* The rest is just figuring out where to put stuff.

Remember, if you try this, leave me a note, because I'd love to see it! Morgan from Pass the Polish Please did an absolutely adorable version of my Santa nails, and it totally made my day to see it! So definitely link me if you try one of my designs!

Now, I'm off to have a cup of hot cocoa and snuggle with the husband for the evening. Hope y'all have a great night!

*Not that this has any importance at all. I love doing the blog and making animations, and frankly I've had bigger, more complex files than this. I just find it amusing that this particular file took me so much time. Do people really read these footnotes? If you did, that means you're super awesome and I love you to bits! You should respond with a comment saying something silly, like maybe, "Wow, that's cool, but it'd be even more awesome with a squid ornament!" You know, something weird like that!

Nail gems, sequins, and star were provided by Viva la Nails for consideration.
See my disclosure statement for more information.

Monday, December 20, 2010

Happy Holidaze the fifteenth- it's all stripey!


Today's look is simple again. I find that some of the most fun looks are simple.This green look could be worn just about anywhere, and is still simple enough to do at home.

I started with a base coat as always, then did two coats of my green polish. I added a layer of multi-sized glitter, then painted on stripes of silver polish. I let everything dry for 5-10 minutes, then applied a coat of topcoat.

Easy as can be. You could also jazz this look up with some rhinestones or striping tape if you liked. It's a fun look that takes almost no time to put together!

Sunday, December 19, 2010

Happy Holidaze the Fourteenth- It's a Kwanza day!

*koff*sniffle* Oh boy, it's still one of those days. Let's make things short and sweet today. When I asked people what holidays I should include art for, several of my friends suggested Kwanzaa. And since I'm not terribly familiar with it, I turned to the web to learn more about it.

The Official Kwanzaa Web Site has a lot of information about the holiday, and has a lot of interesting reading about it. For my art today, though, I stayed with a very simple look using the colors of Kwanzaa- black, red, and green.


This simple design is elegant and festive, and the sparkle in the polishes fit the festive nature of the season. I would have no problem wearing this design any day of the year!


Friday, December 17, 2010

Happy Holidaze the Twelfth- It's a Fat Man's Red Suit!

You know, today's design is one of my favorite designs I did for the holidays. It's just so cute, so festive, so FUN! Sometimes you need to head back to the classics, and so I did. I was inspired by Beauty Judy's Santa Nails, only I needed to do them my way. Santa needed some serious sparkle!


That's right- instead of using creme colors like Judy did, I went for super-sparkle. I used my Heaven polish in Ruby for the red because it is absolutely the most gorgeously intense red glitter polish I've ever seen. Everything else was Art Deco stripers in black, white, and silver. The glitter on the white is from the glorious (and messy) glitter samples I wrote about the other day. It looks pretty fab on, doesn't it?

How to make Santa suit nails:
  1. Apply your base coat.
  2. Apply (at least) 2 coats of red polish.
  3. Apply a white strip down the center of the nail.
  4. Apply a white french tip the width of the center white strip.
  5. Paint a thin black band across the center of the nail. This will be Santa's belt.
  6. Make a small silver rectangle across the black band. This will be the buckle on Santa's belt.
  7. Paint a thin silver line starting from the center of the silver rectangle. This will be the bar/latch of the belt buckle.
  8. Let everything dry. Then paint clear polish over the white sections and
    sprinkle with white or clear glitter, just to add sparkle.
  9. Apply top coat to seal and protect.
That's it... it looks sort of complex, but when you break it down step-by-step, it's really very simple. Lots of designs are, once you break them down! I'd wear this on my own nails right now if they were long enough, but they end about where Santa's belt ends right now. My nubs are SAD!

Remember- if you try a version of one of my designs, leave me a note and a picture! I'd love to see what you do! I know y'all can totally improve on my stuff! :D

Wednesday, December 15, 2010

Happy Holidaze the eleventh- All Buttoned Up!

Hiya! Wow, what a day... this has been one of those days that I just can't quite seem to get the hang of.  I've been sleepy all day (go figure), but I managed to accomplish some things, and then went for a drive tonight looking at Christmas lights with my family. That was a lot of fun, except that I don't quite understand some people's holiday decorations.

I mean, take Santa, for example. I understand having lots of decorative deer in your yard, or multiple snowmen. But why would you have seven Santas spread out over a half-acre lot? I just don't get it... it's like there's the Santa by the driveway, and the Santa by the front porch, and the Santa climbing a ladder and the Santa patting a reindeer, and finally the psychotic Santa behind the house chopping up the bad little boys and girls who didn't realize that when they said Santa is watching, they really meant Santa is watching, and he knows if you've been bad!

I know, I digress. But I really do think some people overdo for the holiday. We saw some homes that were so bright it was almost like daylight, with thousands and thousands of lights and animated decorations and just so much STUFF! It seems like overkill, but this is probably just me being a total Scrooge. But seriously- if you have more than one Santa, could you tell me why? What the reasoning is behind it, because I honestly don't get it!


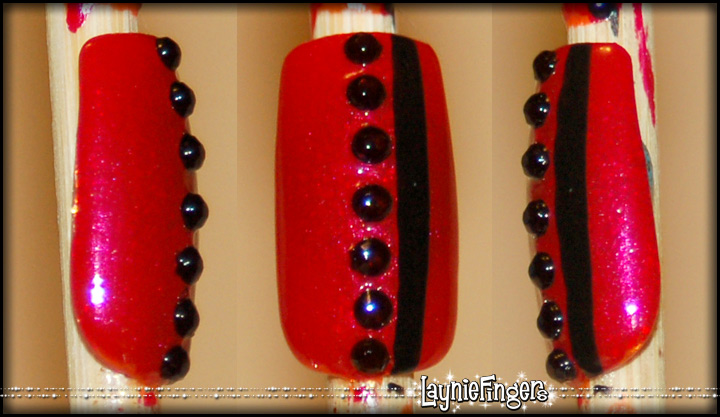
All that babbling aside, here's today's nail art. I'm reminded of a red wool coat with pretty jet buttons up the front! This is (again) a very simple, very bold graphic look that really is easy to do. As you can tell from the graphic, it's a very quick look to put together.
  1. Apply base coat.
  2. Two coats of polish of choice- I chose red.
  3. Apply a black stripe of polish with a thin brush. Let dry.
  4. Apply a line of clear polish down the center of your nail. Then place the black stones in a line alongside the black stripe.
  5. Apply a coat of Seche Vite to secure and protect everything.
So what do you think- is this a look you think you would wear? How would you change it?


The black rhinestones were provided by Viva la Nails for consideration.
See my disclosure statement for more information.

Tuesday, December 14, 2010

Happy Holidaze the tenth- Checks, Please!

Whew, today has been one of those days that seems like it's 48 hours long, and I only got a few hours of sleep. I even ended up falling asleep in the waiting room at my son's doctor appointment! Talk about embarrassing...

So, this will be a short-n-sweet blog for short-n-sweet nails! (Or long nails, whatever, I'm not picky!) Today's nails are checked, using blue, green, and silver. It's very simple to do... paint your base color, then do diagonal stripes one way in one color, then the other in another color.


The process is really simple.

  1. Apply base coat. Always, base coat.
  2. Apply background polish color. This generally means 2 coats, minimum.
  3. Paint evenly-spaced silver stripes diagonally across the nail.
  4. Paint evenly-spaced green stripes diagonally in the opposite direction across the nail.
  5. Apply top coat after stripes have had a few minutes to dry.


See? I like it, I think it's cute, but I'm not sure it looks finished, exactly. Maybe it needs something else on top- a few flowers, or something. Maybe a fleur de lis, since I'm in New Orleans Saints country? What do you think- would you leave it like this or add something to it? What would you add?

Monday, December 13, 2010

Happy Holidaze the ninth- A-stamping we will go!

Hiya, folks... today's art is a quick one because for some reason I am absolutely wiped out today! Maybe it has something to do with the fact I only slept 1 hour last night... ;)


This is a very simple project, yet beautiful and appropriate for just about anything! A deep blue background is set off by silver stamping. This is further accented by placing a swarovski crystal in the center of the ruffled-looking section. That's it, and it could be changed up easily by choosing any deep jewel-toned polish as a background.

See you tomorrow!!

Sunday, December 12, 2010

Happy Holidaze the eighth- Dollar Tree striping tape?

It's been a crazy time full of alternative sources for nail embellishments here at Layniefingers! I've been absolutely bombarded with ideas lately, and I find myself pulling my notebook out at the strangest times when I have an idea. If I didn't carry my sketchbook with me everywhere, I swear I would get nothing done!

Take today's nail art. I've been interested in experimenting with striping tape for quite some time now, but I'm too frugal to invest in any. Imagine my surprise when I was wandering through my local Dollar Tree and I happened to look over at their Christmas decorations and see the packet of silver holographic tinsel! Gee, self, I thought to myself, that looks surprisingly like striping tape!

Remember, you can click this picture for a larger version!
I picked up a packet and now have enough striping tape to last me the rest of my life! Seriously, this stuff goes a long way! It was very simple to use, too! I did two layers of blue polish (can't remember which blue, unfortunately, but feel free to use whatever color you like), then let those dry. Next I added the sections of tinsel on top of a layer of topcoat, trimming them just past the nail's edge. Once that layer dried, I topped with another layer of topcoat to seal in the tinsel. I also added some rhinestones from the Kiss rhinestones packet I have, using a larger one in the center, then two smaller ones on each side to accent it. Once everything was dried, I used an emery board to file the edges of tinsel off.

EDIT: I made an animated gif to show the process of making this nail, and will describe it step by step as I have for other looks. Remember, all you have to do is ask if I haven't made one!


To create this look:
  1. Use a good base coat. That's always step 1!
  2. Use two coats of your background color. I used Sally Hansen Ultra HD Laser. Let those dry.
  3. Brush on a thin layer of clear polish or topcoat, then add the strips of tinsel as shown in the gif.
  4. Add the rhinestones. Add more clear polish if it dries out too quickly.
  5. Top with a coat of Seche Vite or the topcoat of your choice.


Overall, this was fairly quick and easy, and yet has a fun elegance to it. This is lots of fun for a holiday party, and it would be fun in any color combination! I think this could be especially nice with a deep black or violet. What do you think of this... do you think you'll try some tinsel as striping tape?

Kiss rhinestone pack was provided by the manufacturer for consideration.
See my disclosure statement for more information.

Friday, December 10, 2010

Happy Holidaze the eigth- punch out your nail art!

We're taking another break from my marathon session of decorating nail tips today so I can show you something I worked out over the last few days. I apologize- I don't have pretty nails to show you, because due to splitting and chipping I had to file my nails back to nubs. I consider it a fresh start, and I'm hoping that with the new nail strengthener I'm using I'll see some good growth soon.

All that blahblah aside, I have something fun to share, now that I've figured out the various bits. I've had it in the back of my mind for a while now that those tiny scrapbooking punches could make some adorable nail decals, if only I could figure out how. Well, as you can see in the photo to the right, I've figured it out and now I'm sharing it with you!

This is a scrapbooking punch.
Make sure yours is small enough to fit on a nail!
The first thing we need are some scrapbooking punches. These things used to be expensive, but now you can pick them up for next to nothing! The three I've grabbed this week were a dollar each- two were at Big Lots and one was found in a bin of sale punches at Michaels. Can't beat that, especially if you're a frugal person like me! I picked up a heart, a star, and a cute little swirly design, but I also saw a dog, a cat, a dragonfly, a hand, a sun... there really are a lot of designs you can find!

Then I had to figure out how to use a craft punch on liquid nail polish. Kind of a tough idea, yea? I tried painting it onto thin paper and punching that, but it was hard to get it to apply nicely to the nail afterward. Same thing happened with thin plastic. And yet... I remembered that nail polish pulls away from zipper sandwich bags nicely once it's dried thoroughly. So... if I were to paint it in a sheet...

That's just what I did. I painted a strip a bit wider than a nail onto some plastic I cut up for the occasion, then let it dry for a couple of days. I know, I smudged the heck out of it because I am incredibly klutzy. It's a miracle I manage to get my nails dried ever.

I also tried punching directly from the plastic, but that only worked partially, and it resulted in me patiently fiddling with tiny stars and hearts, removing the plastic backing from them so they would work on the nail more effectively. Oh, the things I do for nail art...

Once the strip had dried, I very carefully bent the edge of the plastic down away from the polished edge. I sort of pulled/rolled it down, so that it pulled away from the polish. Once I had enough polish free of the plastic, I was able to gently pull the strip free, and I was left with a sweet strip of pure polish.

I'm once again reminded that I haven't quite got the hang of photoing processes for the blog, because I have no pictures of me actually removing the strip of polish. All I have are photos of the dried strip on the plastic, and then pictures of the strip off the plastic.

This is because I am a minor fail. I am, however, decent with words, so I can at least partially describe the process for you. Hopefully it's enough. I will say that it really is important to let the strip dry for at least 24 hours, preferably 48. Otherwise, it hasn't had time to do its polishy-drying thing, and the chemical reactions involved with drying haven't finished. Once it's thoroughly dried, it's much easier to work with.

Once the polish is dried and peeled, you're left with... a very dodgy strip of nail polish. Well now, this is useful... right?

Actually it is. Even if you don't have punches, you could cut this into strips with your regular scissors, punch holes in it with your office hole punch, or cut shapes with your scissors or an xacto knife to apply to your nails.

We're going to use this strip in our punch. Remember, it's fragile, so be careful with it as you slide it into the punch slot. Practice with a sheet of paper to make your first few punches so you can get the feel of the device. Once you're comfortable with paper, you can move on to the polish strip.

I prefer to work with the punch upside down, so that I can see through the opening that I'm getting a solid shape without having pre-cut areas poke in. If you work with it right-side up, you may have problems getting the strip positioned correctly.

Once you've pressed the button and punched out a shape, this is what things look like. You've got a sweet pure-polish decal and a strip of polish with a heart cut out of it. It didn't occur to me until I was writing this that you could place your punch in the center of the strip then cut the strip of polish so that you've got a contrasting stripe in the punch color with the heart shape punched out.

You could then apply this strip onto a different nail as an accent nail, letting the heart stand out in your base polish. It's an idea I'll have to play with once I've got some more time. It would also work really well with nail tips.

And that's all there is to it! To use these, I painted my nails, topped them with a coat of Seche Vite, then let that dry for 5-10 minutes. It was dry to the touch then, so I positioned the heard where I wanted it, then pressed it down with my thumb and forefinger of my opposite hand. The polish in the decal stuck to the polish on my finger! Then I added another coat of Seche Vite to keep things in place, and there ya go- sweet nail art with super-crisp edges that's all polish! Removing this will be super-easy because there are no plastic bits to resist the polish remover!

I got five decals from this sheet, and I wasn't being terribly careful.
Imagine the possibilities!

I don't know if you can tell, but I'm super-excited about this. Imagine the possibilities- using a tiny hole punch to make polka dots! Making your own holographic nail accents! Paint marbled swirls for accents, or even strips with stripes and dots! I'm seriously giddy here.

So what do you think of these? Is this something you'd be interested in doing yourself? Would you be interested in buying decals like these, especially if you could choose the polish color yourself?


Hard Candy Beetle was provided by the manufacturer for consideration.
See my disclosure statement for more information.

Thursday, December 9, 2010

Happy Holidaze the seventh- Sweet nothings!

Ahhh, the holiday season, when people hang all sorts of candies from a tree, so that you can casually nab a snack as you wander by! Oddly enough, I've never been a fan of mint but I think the patterns on mint candies can be adorable. Candy canes, starlight mints... the crisp white really sets off the red & green stripes. That's the inspiration behind today's nail art.

I just want to lick these!!
This is the simplest nail art ever. Two coats of white polish, then use a striping polish in red and/or green. I used the lush red glitter striper from Kiss's limited edition holiday set, along with a green Art Deco striper from the Dollar Tree. While a deeper green would seem more Christmassy, I think the lighter green really does give this a candy feel.

As always, a coat of Seche Vite tops everything off to make this smooth and glossy. Other top coats aren't bad, really, but Seche Vite is thick, dries exceptionally quickly, and self-levels so that any lumps and bumps get covered up. It's SWEET!

Kiss Nail Art Nail Paint was provided by the manufacturer for consideration.
See my disclosure statement for more information.

Happy Holidaze the sixth- Laynie loses her mind with glitter!

I'm taking a break from the batch of nail tips I decorated, but don't worry. You're still getting the holiday nail art, but today it's more of a cautionary tale, although I'm not quite sure what I'm cautioning you against. I think it's a simple Don't do this, because it isn't pretty!

But first, let me show you yesterday's adventures! I finally sold the monster nails, so I treated myself to a sample pack of glitter! Unfortunately, it came packaged in cute little baggies, which doesn't work for me. I debated for quite a while in Michaels, trying to figure how I was going to store this stuff so that I could use it!

Then it hit me. I saw a set of paint pots for $2.75 hanging in the section with palettes and containers and things for painting. Have I mentioned I'm frugal? Yea, I don't want to spend $10 on something to store my $4 glitter, so this was just right for me! The only issue would be transferring the glitter from the packets to the pots, but I could be careful, right?

Right. The thing I forgot to take into consideration was that this is microglitter. It's so incredibly fine that it can waft into the air like a dust cloud, gently drifting and lazily gliding on air currents in the room. How do I know this, you ask yourself? Lemme tell you...

Because I'm so frugal, I wanted to get every last speck of the glitter out of the packages. I spent good money on that stuff, and I don't want to waste it! I cut the edge of the first bag off (emerald green, ine you were wondering, and haven't seen me since the incident!), gently tap-tap-tapped it into the pot, being careful not to spill any. Then, I lifted the bag up with the cut end pointing up, intending to tap it on my finger to pull down the glitter stuck to the edges of the bag. It worked perfectly while the bag was closed!

Unfortunately, I didn't think this through carefully enough. When I tapped the bag on my finger, instead of this causing gravity and inertia to pull the glitter on the edges of the bag down to the bottom it turned the bag into a very small bellows, sending a tiny mushroom cloud of green glitter directly into my face.  It felt like it was in slow motion, this tiny cloud expanding toward my face, enveloping my head in its sparkly green goodness. Except it wasn't quite goodness that enveloped my head. It was glitter, and glitter never goes away.

I won't waste your time with the tales of how I finally got all the bits of glitter picked up and shaken out of my hair. Let's just say it included lots of masking tape, lots of cursing, and lots of my family pointing and laughing at me. I deserved it, clearly, but really... how was I supposed to know this was going to happen?

I finally got the glitter packed away and most of the random glitter fallout picked up. What am I saying... I know I'm going to be finding glitter in random places for the next 15 years. Glitter is like herpes- once you get it on you, it never goes away.

And on to the nail art, since I've shared my secret shame. Unfortunately, this isn't much less embarrassing. I had visions of a cute, sassy Konad look that would be fun to wear. What I ended up with was more like the 80s threw up all over my nails. It's not horrible, granted, and it's better than I could do when I first got the Konad stuff. But still?

This isn't good. Not by a long shot. And the more I did to it, the worse it got.

It all started with the package I won from Scandalously Polished over twitter. I had no idea what to expect, so I was absolutely BLOWN AWAY when I saw it was 10 polishes and 4 nail foils! CRAZY! She is super awesome, and if you haven't seen her blog, then scoot over right after you read this and say hi!

In that package was a polish from H&M called Bella's Choice. I'm going to assume this has something to do with that vampire thing going around... Dusk or Nightfall or Twilight or something, yea? Whatever... it's an absolutely gorgeous turquoise creme that I couldn't wait to put on. I was hoping it would look wonderful on me!

In truth, not so much. It made me look somewhat ill. My husband looked at it and called it "that puke polish you're wearing." I wore it grocery shopping and the cashier caught sight of my nails, did a double take, then quickly looked away with a strange look on her face. I think she didn't want to ask if I was feeling ok, but you could tell she didn't think it looked good. I like the color, though, so I figured maybe if I stamped over it, I'd be able to wear it.

Enter the second color she sent- H&M Goddess on Stage. This polish is magnificent, y'all. I really don't even have the words to describe how amazing this is. Creamy, gorgeous, just luscious. I thought it would play nicely with Bella's Choice and make something wearable for me. But it actually stamped sort of sheerly, and in my stamping ineptitude I ended up missing spots and stuff.

No big deal, I thought to myself, I can just fix those spots with a brush. Sure, except that I couldn't copy the consistent thinness of the stamped image, leaving me with heavy purple spots on the edges of the print. Oh yea, that looks GREAT.

Maybe I can add some color to the spots, to draw the eye away from the dark edges, I continued thinking to myself. I pulled out my pink and white creme polishes and added some to the dots, but that wasn't enough, in my opinion. My husband did think it made everything look better, even better than the stamp alone. "It covers the puke nicely!"

Thanks hon. I feel much better now.

As a finishing touch, I added lime green and yellow creme dots to the remaining spots and covered it all in Seche Vite. And you know what?

It wasn't horrible, but I don't think I'll be wearing this one again. There are just too many things here that just didn't work well together, and I'm just... no. No. Never again!

Do you have any horrible stories about manicures that just didn't work as well as you hoped? I'd love to hear them to make me feel better about this one!


Wednesday, December 8, 2010

Happy Holidaze the fifth- Five Golden Rings!!

Boy oh boy, am I glad I did a bunch of nail art in advance. I had to cut my nails back tonight, and I'm back to nubbins, unfortunately... they're so short they aren't even close to the tips of my fingers. *sighs* Stupid breaks and splits. Hopefully they'll be healthier because of it, though...

So, I don't know about you, but sometimes when I go to a holiday party, I have no desire to paint my nails in red and green. Sure, it's a Christmas party, but the red and green can stay on the tree! Instead, I'm going to show you an easy Konad design that I absolutely love!

Ok, it's dots instead of rings, and there are more than five. But they ARE gold!
First, I painted my nails with a basic black creme polish. Pick one, any of them will do. Two coats, then once they dried I pulled out my  Maybelline Express Finish in Matte Gold for stamping. Doesn't it do a great job? Unfortunately, I don't remember quite which Konad plate this image is from, but really you can pick one you like.  I chose this one because of the blank space at the top and the bottom.

First I used a tiny paint brush and a dot of the Matte Gold to take the lines all the way to the edge of the nail at the top and the bottom. It's not quite perfect, but that's ok- nobody is going to be looking that closely at your nails. I'm just too obsessive to leave them unconnected.

Once the edges were tidied up, I then pulled out my Sinful Colors All About You, which is an absolutely delicious gold-toned glitter that has multiple sizes and multiple tones of gold. I absolutely adore this glitter, because it's sparkly enough to add a kick, but still small enough to stay sort of subtle, at least as far as glitter goes. :D

I added All About You to the top and bottom sections of the nail, adding to the look and sort of making things look finished. I feel like it really did take a design that was pretty and make it pretty awesome! Then I finished things off with a coat of Seche Vite to protect everything and I called it DONE! Easy as can be.

Now, if only I had somewhere to wear it to! Ah well, soon.

Sunday, December 5, 2010

Happy Holidaze the fourth- it's all about the glitter, baby!

Wheee! My contest ended this afternoon- I hope you got your entries in before it closed! I'll have the winner announced very soon. I can't wait to see who wins!

Until then, it's time for more holidaze fun! Today's look is a very simple one that's just tons of fun to do, and super easy! I painted my nails with 2 coats of a base color (red in one case, gold in the other) and then took glitter in shades of red, green, and silver and basically blinged them to heck and back! Look how sparkly they are!


One thing that's kind of hard to tell in these pics is that the glitter isn't just spread on in a mix. Instead, I would paint a small section of the nail then press on a single color of glitter. Then I would paint another small section and press on a different color. This gave me sections with mostly red, mostly green, and mostly silver. It really does look gorgeous when the lights are sort of low and the glitter sparkles.

This isn't one of my favorite looks, but I think it could be fun to play with some more. I would like to find a more efficient way of applying the glitter so that it can be both neat, smooth, and yet filling in most of the spaces.

Ah well, one day, yes? Now I'm off to verify more entries in the giveaway. But I'll post more about that when I announce the winner! Have a great day/night/afternoon/whatever it is where you are! :D

Blah blah was provided by the manufacturer for consideration.
See my disclosure statement for more information.

Happy Holidaze the third! A simple snowflake design...

EEEP! The night got away from me, and I totally missed posting the blog tonight. I feel so guilty, but I had a lot of fun going out with my husband and my son, so I guess it was worth it.

It's a simple design today, one inspired by the weather up north. Living in Louisiana, we don't often get snow. Instead, we have weather that bounces back and forth, often seeing 85° one day followed by 35° the next. That actually happened last week, and let me tell you it's NO FUN! How can you get in the holiday spirit when you're in shorts and a tee shirt, sweating your tushie off?

I decided I wanted something pretty to remind me of the first snow we saw while living a bit north of here. We'd gone out in the night to watch it fall- enormous fat, fluffy flakes lazily drifting down to dust the grass. It was a slow fall at first, with huge flakes scattered in the night, standing out starkly against the dark sky. Later that night, the snow fell hard and covered the world with a soft blanket of white, the night absolutely silent as the snow muffled the sound. It was magical, and waking up that morning was so memorable. We walked outside and just looked around, feeling as if we'd been transported to a magical winter wonderland in the night.


This gives you a hint of where my mind was when I did this design, yes? I started with two coats of Sally Hansen Ultra HD Laser, then let that dry. I then pulled out my stencils that came with the limited edition Kiss Nail Art Nail Paint three pack. It's got such adorable stencils for the holidays- a candy cane, a christmas tree, snowflakes and gingerbread men... lots of holiday-themed cuteness! I chose this snowflake, and as you can see they're reusable! I then added a small rhinestone in the center of each snowflake from a pack of adhesive stones by Kiss, then topped with a coat of Seche Vite to smooth everything out and protect the art.

The stencils are super-easy to use. Make sure your polish is dry, then pull the stencil of your choice off the plastic sheet it comes on. Place it carefully on your nail, making sure to press it down thoroughly. If you don't, there's a chance the polish could seep under the edges, ruining your stencil. Apply your polish, then while it's wet lift off the stencil. (I haven't tried letting the polish dry before lifting the stencil off- I'll try that tonight!) Let the stenciled area dry completely, then add a layer of topcoat to protect it.

Once I pulled the stencil off, I'd place it back onto the plastic it came on, then clean off the wet polish with a cotton ball soaked in polish remover. Then I'd place it onto the next area again and start again! The stencils really are lots of fun to use!

Now... let's see if I can get some sleep before tomorrow. I hope your Saturday night was as much fun as mine... what did you do for the evening?


The Kiss Nail Art Nail Paint set with stencils was provided by the manufacturer for consideration.
See my disclosure statement for more information.