Tuesday, September 21, 2010

BPAL has NAILPOLISH now!! Really!

For years, I've watched my friends geek out over BPAL. They get to into it, and it's almost like they've joined a cult with its own language, its own practices. They organize everything into spreadsheets, imps and wish lists, things to keep and things to trade, and elaborate discussions of dry down and top notes and things that I just don't understand. It's smelly stuff, how could it be that awesome?

I stayed away from the mania contently, without feeling the pull. It was easy, because I knew I didn't have the money to get involved, so I'd just watch amusedly from afar, never getting too close lest I be sucked in. That is, I stayed away easily until last week.

Last week, BPAL reached out and grabbed my heart in a sudden, unexpected gesture, and my life will never be the same again. After seeing Magic Maid's post all about the new BPAL Claw Polish, I found myself drawn in against my control. They looked so lush, so beautiful. I found myself at the Black Phoenix Trading Post looking at each polish and its description, swooning. I sent an email to them, congratulating them on their new line, expressing my pleasure at seeing them have such a lovely, expressive line of colors for their first nail polishes, and a request to be aded to their PR list for future information.

I was surprised to hear back from an absolutely wonderful person named Puddin. We had a fun email exchange, but most of all he told me to expect a little package from them. I was ecstatic! But when it got here, I was absolutely dumbfounded! That lovely man had sent me 9 polishes from the line that seemed absolutely perfectly chosen for me. I'm not sure how he did it, just that he did, and I couldn't wait to swatch them all... I interrupted the post I was making just to swatch and photo. Finally, I'm ready to post the results!

First I painted them onto my nails in a sort of blood-related skittles mani. It actually worked well, showing the relation of the colors and how they're subtly different from each other. Photographing these was almost impossible, because flash severely altered the colors, but shooting manual made the colors have an incredibly orange cast to them. However, with a bit of photoshop I was able to rescue the manual shots into something that's almost accurate.

These polishes are decadent. I mean that... they go on silky smooth, creamy as ... the creamiest thing imaginable. I struggle for words. The colors are divinely pigmented, ranging from the deep dark blood-colored Blood Countess, to the dried-blood shade of Lady Macbeth, and ending with the color of fresh arterial spray in Mme Moriarty. These shots aren't 100% accurate- Mme Moriarty truly is the color of fresh blood, deep red and thick and absolutely beautiful on the skin. Sed Non Satiata is a more pink shade, described by BPAL as being "Lust captured: pulsating deep burgundy." They're all absolutely gorgeous creme polishes that I am thrilled to have.

Moving on, there is the other four, which are less blood oriented: Maiden is a very sheer, pale pink that would probably be good for french manicures or for people who want a touch a color, but not a lot. Opium poppy is a vivid  pink for those who love color, a bright hot pink that commands attention. Bordello is my favorite- a silver shimmer in this deep pink that is simply stunning on the nail. One coat of this is sufficient, but I chose to do two coats for every polish. The last polish on this hand is Midnight on the Midway, a plum frost that is my least favorite of the bunch. It's not bad, by any stretch of the imagination, it simply appears slightly dated compared to the other shades. However, it's still lush and beautiful, covering generously with one coat.

The final polish in the bunch is Embalming Fluid, a gorgeous lime green in the bottle that applies sheer and glittery over any polish you put it over. Unfortunately, I seem to have neglected to get any photos of it!! I'll hopefully remedy that soon, and do an update on it.

Of course, by this point, there was only one thing to do:  I had to test the stampability of these polishes! I used my new method of stamping onto a white sticker that I then apply onto the bottle, so that I know just how well it stamps without having to jump into my spreadsheet to check it! My husband and I came up with the perfect word for these- STAMPLES! As you can see, they're all extremely good for stamping except for Maiden and Embalming Fluid, which left the page basically blank and are simply too sheer to stamp with.

I highly recommend enlarging this one to see the stample details!

And so we reach the conclusion of my epic swatchathon. These polishes are available at the BPAL Trading Post for $9 each, are big 3 free, and in my opinion are at least equal in quality with my Deborah Lippman polishes. Add in the amazing customer service and you cannot go wrong with any of these polishes. I think they are absolutely amazing, and I ended up wearing Bordello as my nail of the day for a full week! It stayed on until I took a very leisurely hour-long bath, which soaked the polish off several of my nails. But any polish would have done the same, so I'm not complaining about that at all!

So- if you're at all interested in these shades (and I do so hope that you are), when you head over to the Trading Post, be sure to tell Puddin you read about them here!

Monday, September 20, 2010

Would You "Marry Me?" Giveaway at Tuli's Nails!

Sorry for the cheesy title, but I couldn't resist. Tuli (over at Tuli's Nails) is hosting a giveaway to celebrate being chosen part of the 50 top nail blogs! She's giving away a bottle of Lanvin Marry Me Eau De Parfum! This scent has such an interesting description:

The composition is based on luminous tonic mixed of bitter Tunisian orange and sensual essences of Sambac jasmine. This surprising combination is wrapped in sweet zest of peach and sophisticated jasmine tea aromas. A sensual heart is painted with jasmine enhanced with magnolia blossom and romantic, non-chalant rose petals. Union of white flowers and fruit zest melts in juiciness and warmth of powerful hot amber and musky trail.
-Lanvin press release

If you're the lucky winner, you will receive your very own bottle of this scent! Even if it's not a scent you'd particularly like to wear, the bottle would look absolutely lovely on your vanity. I like the clean lines of the bottle, and the pink ribbon gives it a cute kick! So what do you have to do to win this?


It's easy as can be: simply head over to Tuli's and fill out her entry form- that's it! The winner will be chosen at random on  September 24, so you don't have a lot of time. What are you waiting for- scoot on over and sign up! Tell her Laynie sent you! ;)

Image court of Tuli's Nails and Lanvin Press Release

Sunday, September 19, 2010

New Discoveries- Candy Foil Nails

I have a problem, I think- I'm always looking at things and thinking, "I could use this for something." I have several boxes of craft goodies that I'm holding on to, knowing that I'll use them for something one of these days. Sure, some people call it hoarding- I call it recycling! ;)

Seriously, though, I've had three Reese's Peanut Butter Cup Minis wrappers in my nail art box for several months now. At the time I saved them, my family thought I had totally lost my mind! I wasn't sure what I would use them for, I just knew that I would use them. Then a couple of weeks ago I got an invitation to be part of the BzzCampaign for Elmer's CraftBond adhesives and X-ACTO cutting tools.

I cannot even begin to tell you how quickly I hopped over to sign up. I was giddy, and couldn't wait to see what they would send. Well, I wound up receiving my package yesterday, and boy, was it fun! Included were two pairs of decorative edged scissors, a corner rounder, and various adhesives. But the scissors are what excited me. As I opened the package, I was hit by a moment of inspiration. Suddenly, I knew what I would be doing with those candy wrappers... they were going to become foil strips for my nails!

The first thing I did was smooth out the foil wrapper as smooth as I could. That worked nicely, and I was left with a slightly-crinkled foil that was really pretty. Then I tried to cut the wrapper with the scissors- it didn't do well. It sort of shredded the foil into things that wouldn't be very useful. However...

I remembered that in sewing, sometimes you have to reinforce a delicate fabric with a sturdy paper backing to stitch on it. I figured why not try it for cutting? I got a piece of plain typing paper, cut it slightly larger than the piece of  wrapper I was working with, and tried again to cut. SUCCESS! I had perfect cuts, making small slivers of foil I could then apply to my nails! I was excited and cut a lot of strips from half of a wrapper.

I also cut a few wider ones with one straight edge and one wavy edge. I applied one to a false nail with a thin thin coat of base coat, then used a small piece of plastic bag to smooth it down. This way I didn't get polish on my fingertips! The foil tended to slip a lot, so it might be better to wait for the base coat to get tacky.

Once it was tacked down nicely, I used an emery board to remove the edges of the foil by gently filing downward, cutting through the foil and leaving a smooth edge. I don't know how you could achieve the same look on natural nails, unfortunately.

Finally, I put a single coat of Seche Vite over it, and within 10 minutes or so I had a beautifully smooth nail with a gold foil applique. If you attempt this, be sure to wrap the tips, so that your foil won't try and peel up. I didn't have that problem, but better safe than sorry, right?

So there you have it- Candy Nails! I love the look, and will be putting some foil strips on my own nails soon enough. Currently, the strips are stored in small ziplock bags, with scraps in a separate bag. I think it could be fun to patch together tiny pieces of foil to make a fully-foil-covered nail! Besides, how many nail art techniques let you eat chocolate as part of it? Remember, if you try this, send me a picture, I wanna see it!

     ♥ Laynie

Elmer's CraftBond adhesives and X-ACTO cutting tools image provided by BzzAgent.com.

Saturday, September 18, 2010

YAY! I Received a Sunshine Award!

Have you ever noticed that sometimes you'll find a spot of brightness just when you need it most? I've been having a very difficult week, thanks to a knee that's out of whack, a house that's frustratingly messy, and a pile-up of RL suckitude. Then, as I was going through comments today, I saw that Anita at A Splash of Serendipity has sent me a Sunshine Award!

I can't even explain how happy it made me! So hopefully I can pass that happy on a bit, and let it grow. Did you know happiness is one of the odd things that actually gives you more when you give it away? :D

Rules:
1. Save the image above and post it on your blog.
2. Pass the award on to any fellow bloggers needing a bit of sunshine in their day.
3. Link the nominees.
4. Let the nominees know they have won this award by commenting on their blog.
5. Share the love and link to the person you received this award from!

You know, I think I'd send this to every blogger I know right now, but I'm gonna focus on just a couple. So... this is me passing it on!

Magic Maid, you cheer me up so much, and you make me giggle. I hope this makes you smile as much as it did me!

Daily Nail, you inspire me, you make me smile, you give me so much creative energy. You totally deserve some sunshine!

Have a great day, everyone! I've got some fun stuff coming up!

Friday, September 17, 2010

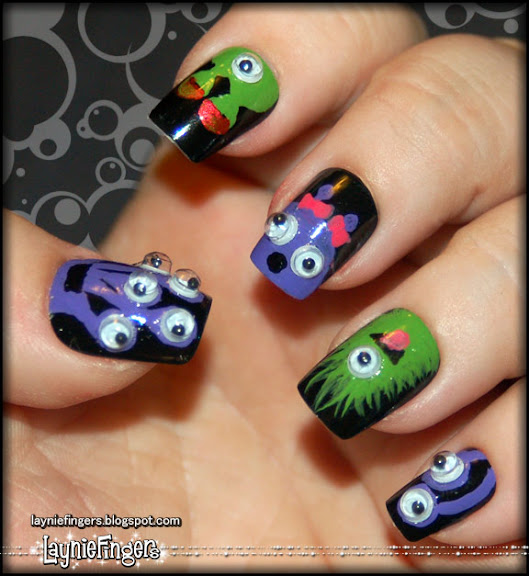
With Monsters On Her Fingers, Why Should She Be Afraid?

I have just finished the silliest set of nail tips that I think have ever existed. Rhinestones? Heck no, that's too elegant! Roses? BORING. (Not really, but go with me on this!) I wanted something different, something that really expressed my inner self. I wanted monsters! But not just any monsters. No... I wanted monsters with WIGGLY EYES!

That's right. These nail tips have monsters on them, and those monsters have 3D wiggly eyes that actually move! Some of them look excited, some of them look menacing, but most of them look kind of confused, and I really like that! They're silly, and they're weird, and they're in halloween colors to boot! Purple, green, and orange combine on a stark black background to make these monsters really pop.


Now, I started these ages ago. I got the test one finished way back on August 6, believe it or not! They clearly didn't take that much time to complete. But I got the bases painted and then had a huge moment of fear: could I finish them? Could I make them as cute as I hoped they would be? And those nails sat, and waited, taunting me simply by being unfinished. It was almost depressing!

Then one night I realized that hey, it doesn't matter if they're perfect. They don't have to be perfect because they're monsters! That moment freed me from the fear I was fighting with, and I was able to dive in and get back to work on them. The more I worked, the happier I got, until finally I was giggling as I painted on the goofy details, the pink hair bow, or the goofy teeth on the orange guy with eye stalks. They're not perfect, but they're cute, and that's enough for me. Anyone who wants perfect monsters can paint their own!

By the way, I think you should enlarge the image above, even if you don't click any other images on this blog. It's silly, and you can see all the little guys in their full glory. They're pretty nutty, really, and I love them all! I may have to make my own set of these, especially if someone buys them.

Wait, buy them? That's right, this set of nails is also up on Etsy for $24.95. They'll come nicely and safely packaged so that you don't have to worry about them being squished by the post office, and then you'll get to love the little guys while I miss them.

It's ok. I can make more. Already, my mind is filled with googly-eyed critters, and I'm wondering what to make next...

So, what do you think? Any other critters you'd like to see?

Thursday, September 16, 2010

Aiee, Poor Caribbean...


Oh dear. You ever do something pretty, and then just keep on going and destroy it? Yea, that's what I did here. The Caribbean Frost was pretty, but I got bored. Really bored. This is what happens.

See, first I grabbed my stamping kit. I have it all in a cute little bag that Kellie G. sent me. (If it wasn't for her, I'd still be stuck with the same single plate I had.) I dug through all the plates and decided to go with M78. It's a really cute pattern that I've wanted to use more than once, but never got around to using. Since I just got those gorgeous Maybelline Aluminum polishes, I decided to see how they'd stamp on this lovely shade of teal.

It was... pretty. It was fairly sheer, though. I wanted more! I then decided to fill in the cheetah spots with black and white. That was AWFUL!! Thankfully, the Sally Hansen Nail Art pens are water-based, and I could remove them without any damage to the stamp. It was really not something worth saving,unfortunately.

Then I decided to try the silver and gold. They were... better? I don't know. I'm not fond of this look, but I decided to keep it on for whatever reason. A coat of Seche Vite made it durable and shiny, and dried quickly as usual.

Oh, you may be wondering about the naproxen sodium in the photo. I've managed to damage my knee somehow, so I'm taking these around the clock to help with inflammation. I was amused at that bottle being closest to hand. I know, I have a weird sense of humor.

All in all, I don't think this is a horrible look. I just don't have long enough nails to make the best use of the pattern, and it ended up looking sort of disorganized. But it was the first time I used a whole-nail stamp and it turned out nicely. Also, I learned a lot about stamping and design. So overall, it was a great learning experience, right? :D

What would you consider one of your more educational nail polish experiences? Have you done a nail art design that just made you want to take it off and start over? Tell me about it in the comments! And coming up tomorrow, I got a special surprise in the mail that I get to share with you! See you then!

Sally Hansen Nail Art Pens were provided by their PR company for evaluation.

Wednesday, September 15, 2010

I always wanted to go to the Caribbean...

I have a problem. It's a great one, but it's a problem, regardless. I'm indecisive, and now I have a box full of untried polishes that is just almost impossible to choose from. Seriously, I'm sitting here looking and just totally overwhelmed. For this mani, I decided to ask a friend to choose my color.

"Pick a color. Any color, I'm bound to be able to come close to it..."

She laughed at me, then said, "Well, I'm wearing this sort of teal-blue-green color on my toes... how about that?"

And that's how I decided on today's color, Wet n Wild's Caribbean Frost.  I like it, I think, but I don't think it likes me. I can't quite decide if I like it on me or not...it's so green! But it's an absolutely lovely color, with just enough shimmer to make me smile.

Unfortunately, I had the same problem with this one as I did with Wet n Wild Eggplant Frost. I'm going to have to try it over a bare nail, maybe it's my base coat causing the problems? Whatever, these two polishes were horrible to work with. The polish didn't want to go where I wanted it! I'll try it without a base coat first, and then maybe try thinning it out a bit with my polish thinner. It's frustrating, because these are absolutely beautiful polishes!!

I finally managed to get the polish mostly where I wanted it, though, with only a few curse words. (I have a bit of a potty mouth when I'm frustrated... or, well, when I'm breathing. :D) A coat of Seche Vite made things look even nicer, and I managed to get this cleaned up better than ever before, I think. I'm finally getting the hang of using acetone and a brush to clean up. It only took me what... 3 months?

One good thing about how Caribbean Frost is how well it stamps. I've gotten a bit OCD lately, so whenever I get a new polish, I put it into my spreadsheet, then I do a sample stamp with it onto a small sticker. That way, I have a reference of how well it stamps without having to remember details on all of my polishes! I've managed to go back and do sample stickers on about 1/3 of my polishes... the ones I think would stamp well. It's so much easier than having to dig through the spreadsheet!

Clearly, this one stamps like a dream. I want to see what it looks like over black. Ooooh, that's an interesting idea for the future! *rushes over to make a note in her spreadsheet* Sure, that might be geeky, but it helps me remember what I wanna do!

So yea, this is what I've worn for the past day or two. I have to admit, it's growing on me. I think I'm going to have to stamp on it to see what it looks like then...

Then again, knowing me, I'll destroy it totally. I'm good at that! Oh well... stay tuned for tomorrow's exciting conclusion to Wet n Wild Caribbean Frost! Will it be stamped on? Will it be a masterpiece, or will it be ugly! Wait and see!!