Showing posts with label Etsy. Show all posts

Saturday, October 23, 2010

Test Nail- Crystals and Mermaids and Dragons Oh My!

I'm absolutely exhausted tonight so I'll let the photos do most of the talking. I've had several sleepless nights in a row now, and I'm managing maybe an hour or two at a time before I'm awake and miserable again, so my brain is sort of melty at the moment. But the photos rock.


I was kicking around ideas in my head, and this is simply one of the ideas I've been toying with. I think I'm happy with it...


Taking photos inside didn't work that well. The color really didn't show, although you do get an idea of how it looks in low light.


So I took things outside and fastened the nail to my poor dirty car with poster putty. It was late afternoon and there was no direct sunlight, but you can still see the color much better.


So now I think I'll make a full set to put on Etsy. I love the way they catch the light. They make me think of shattered crystal shards, of mermaids, of dragons. The cool thing is that I can make them in multiple colors... I can see these in red, green, black...


So that's my post for today/tonight. Hardly my usual, but I hope the photos make up for it. Now I get to sleep, and hopefully to stay asleep for more than an hour. Leave me a comment and tell me what you think: should I make a full set of these for Etsy? Should I make them in different colors? What color would you like to see?


Thursday, October 7, 2010

Cleaning Up My Manicure- A Look At My Nail Brushes

A few posts back (or maybe more than a few, I'm not so good with time) someone asked in the comments what sort of brushes I use to clean up my manicure. In a totally separate conversation, a friend of mine mentioned that she thought I was just super-talented at painting my nails and managed not to make a total mess at it. That's so not true... so much so that I had to laugh!

See, I've had a tremor since I was in my teens. I could never be a neurosurgeon, else my patients would end up blinded, paralyzed, or missing chunks of their anatomy! As it is, I've managed to cut off part of my finger using a craft knife. (Don't worry, it was a tiny part and I barely miss it. But if you ever look closely at my left hand index finger, you'll notice it's got a slanted edge on one side. That's because I lost that part in a nasty art school incident. But I digress...)

So how do I end up with nails that look neat and skillfully-painted? Easy. I cheat. I use a technique that I first read about on Lacquerized: I use a paint brush and pure acetone to remove the polish from everywhere that should be polish-free! For the actual how-to, I really suggest you go read her description of the process. I simply cannot explain the process any better than she does, or even add anything new or fun to it. But finish reading my entry before you go, if you don't mind. :D

The question is, what sort of brush do I use? I still haven't completely decided what sort of brush to use. Mostly, I flip-flop between two main brushes. Thankfully, since I'm a painter I have an absolute ton of paintbrushes on hand. Let's look at what I've been using...


I started out using this tiny little brush. It came from a multi-pack of brushes from WalMart's craft department. (I think it was $3 or $4 for a pack of five brushes, maybe?) Although this was a very inexpensive brush, it works really well. It would also be a good brush to use for cream or gel eyeliners. What I love about this brush is that it's got such a sharp, chiseled edge. This means I can get right into the crevices on the sides of my nails where polish tends to pool, or I can turn the brush sideways to sweep off larger blobs of polish from other parts of my finger.

 The synthetic bristles hold their shape well and so far haven't seemed to be degrading from the acetone. The biggest drawback of this brush is that it simply doesn't hold much acetone, so I end up dipping back into the liquid over and over and over and over again. It gets tedious. So for preliminary cleanup (or when I'm feeling particularly lazy) I switch over to my larger cleanup brush.


You can see that this brush is much larger than the first one. I can sweep off much more polish with this one before needing to redip it. Unfortunately, since it holds more acetone it also tends to flood my nail with it if I'm not careful. (It's always something, isn't it? Sheesh, my diamond shoes are too tight and all this money in my purse makes my bag too heavy!) To avoid the acetone flooding into my nail creases, I simply tap the tip of the brush onto my towel before I touch it to my finger. Problem solved!

One thing to be careful with: acetone is a really potent solvent. It removes nail polish, right? Well, it will also remove the paint from your paintbrushes, so be very careful not to dip your brush too far into your acetone. If you aren't careful, you'll end up with paintbrush paint all over your fingers. It's not a pretty look, trust me!

I have one more brush that I use for nail art, and it's one I customized myself. I may have mentioned this before, but I am VERY frugal. (Frugal sounds so much nicer than cheap or poor.) I wanted to have a fine brush that was long enough to make straight lines easier to paint and fine enough to make those lines thin. I had several liner brushes, but they were all entirely too large. So, one day I pulled out my scissors and gave my brush a haircut.


Now the brush does exactly what I wanted it to do, even if it is ugly as can be. One day I may end up with actual nail art brushes, but until then these do the job nicely. I'm even getting faster with cleaning up my polish... when I first started this technique, I'd spend a good hour going over the various parts of my nails and still not have a very good result. Now I get a pretty nice result after around half an hour (unless I'm wearing red- red is EVIL to clean up!), and I know people who manage to do their cleanup in around 10 minutes!

So, do you think you'll try this method? I honestly cannot say enough good things about it. How do you currently clean up your edges?

Friday, September 17, 2010

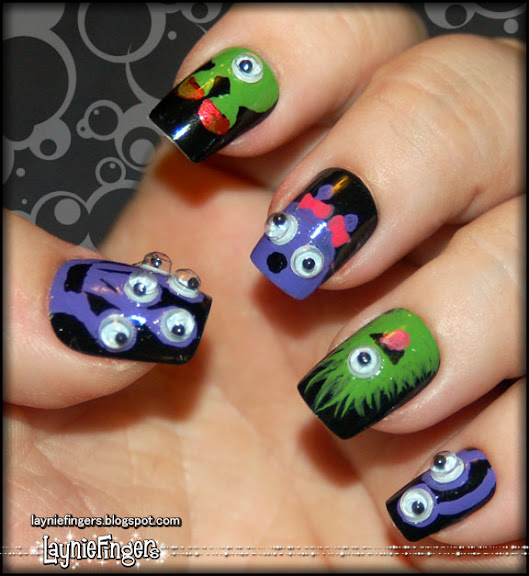
With Monsters On Her Fingers, Why Should She Be Afraid?

I have just finished the silliest set of nail tips that I think have ever existed. Rhinestones? Heck no, that's too elegant! Roses? BORING. (Not really, but go with me on this!) I wanted something different, something that really expressed my inner self. I wanted monsters! But not just any monsters. No... I wanted monsters with WIGGLY EYES!

That's right. These nail tips have monsters on them, and those monsters have 3D wiggly eyes that actually move! Some of them look excited, some of them look menacing, but most of them look kind of confused, and I really like that! They're silly, and they're weird, and they're in halloween colors to boot! Purple, green, and orange combine on a stark black background to make these monsters really pop.


Now, I started these ages ago. I got the test one finished way back on August 6, believe it or not! They clearly didn't take that much time to complete. But I got the bases painted and then had a huge moment of fear: could I finish them? Could I make them as cute as I hoped they would be? And those nails sat, and waited, taunting me simply by being unfinished. It was almost depressing!

Then one night I realized that hey, it doesn't matter if they're perfect. They don't have to be perfect because they're monsters! That moment freed me from the fear I was fighting with, and I was able to dive in and get back to work on them. The more I worked, the happier I got, until finally I was giggling as I painted on the goofy details, the pink hair bow, or the goofy teeth on the orange guy with eye stalks. They're not perfect, but they're cute, and that's enough for me. Anyone who wants perfect monsters can paint their own!

By the way, I think you should enlarge the image above, even if you don't click any other images on this blog. It's silly, and you can see all the little guys in their full glory. They're pretty nutty, really, and I love them all! I may have to make my own set of these, especially if someone buys them.

Wait, buy them? That's right, this set of nails is also up on Etsy for $24.95. They'll come nicely and safely packaged so that you don't have to worry about them being squished by the post office, and then you'll get to love the little guys while I miss them.

It's ok. I can make more. Already, my mind is filled with googly-eyed critters, and I'm wondering what to make next...

So, what do you think? Any other critters you'd like to see?

Thursday, September 9, 2010

Lace Nail Art- A Preview...

I've been working very, very hard on a set of lace nails for my Etsy shop. Wait, what's that? You didn't know I had an Etsy shop? Turns out you're not alone. I'm doing another quick promo for the nail sets in my shop, plus a teaser for the set I've been working myself silly on.

I mean that quite seriously, by the way. As an example of what I've been doing, look at this emery board. It was new when I started. Now it's garbage. Those white patches aren't stuff in the file, that's bare board where the abrasive bits that have been rubbed off. This poor board is shot!


But it's so worth it. I love these nails more than I thought possible... so, briefly, here's a sneak peek of an upcoming post (and addition to the Etsy shop):


Sweet, isn't it? That's real lace, by the way. You'll hear more as soon as they're finished, and I can stop working on them. :D

Also in the shop are some really fun nails. I've got a set of nails that are pure holographic glitter, gorgeous and sparkly with all the colors of the rainbow flashing. I've got rainbow nails with a holographic topcoat- like rainbows topped with rainbows! There are rainbows nails with black zebra stripes on top- I call them the Pride of the Wild. I've also got a set of gorgeous, more understated gradient nails that shift from pink to red topped with a holographic topcoat. And finally, my favorites, I've got vibrant paint splatters on a black background.

I love these nails, and I'm hoping you will too! So go check them out, and if you see something you just have to have, well... you know what to do. :D

          ♥ Laynie

Monday, July 26, 2010

Paint splatters can be FUN!

You know, I admit it. I am totally a child of the 80s. I love neon, I love wild prints, and I love paint splats. This set of nails reminds me of a sweatshirt I had in grade school, only the shirt was white instead of black. But what better color than black to make colors pop?


You can see how vivid the colors are. I can't lie, I want to keep these all for myself! So much fun, but at least I can redo them if I decide to!

This set of nails is made with a custom-mixed rainbow of acrylic paints, so that they have the same level of intensity. I love the black base, and the topcoat makes the colors so intense and glassy!

I won't lie, I can see doing this design with shimmers, metallics, glitters... monochromatic colors, analogous colors... I think it'd be fun no matter HOW I mixed it up! It's just downright FUN! Oooh, imagine white splats on a black background, with the occasional splat of red! There are so many ways to do this, and I don't know if any are better than the others. You'll definitely see this pattern again, if only on Etsy! Speaking of Etsy, these will be going up as soon as I finish this post.

I'm so excited to add that I've got some surprises coming up soon! I'm planning some videos, both of some of those dramatic, color-shifting polishes in the sun as well as some technique videos. If you have anything you'd like to see, feel free to leave requests in the comments!

And oy, I've just looked at the clock to see that once again, I'm catching 7:30am from the wrong side. I think I need to go to sleep. Man... one of these days I'll get my internal clock set right again.

...maybe. :D