Showing posts with label acrylic paints. Show all posts

Friday, April 6, 2012

Rainbow Zebra- how to do the zebra print

Whew, I finally got this one edited and uploaded! Here's the second half of the rainbow zebra tutorial... Hopefully it makes sense!


I love the metallic sparkle of the left nail. It's sponged over silver, as opposed to the right which is over white.

I love zebras. They're cute!
See my disclosure statement for more information.

Friday, March 2, 2012

Custom Nail Decals Redux

Do you remember that post I wrote a while back about making your own custom nail decals with nail polish and scrapbooking punches? Then I wrote another post with a photo, implying I had something fun to show you if it worked out?

I've still been fiddling with them, trying to see just how much I can do with them. The verdict is in... they're lots of fun! Turns out they're even more versatile than I thought, which means lots of fun for everyone!

So, what would be a fun way to embellish punched nail decals? Since I had an adorable cupcake punch, I decided to play around with those. It was a perfect chance to fiddle with multicolor polish strips. Once I punched out my cupcakes, I wasn't happy with them, though. But then I realized they needed something else- the proverbial cherry on top, if you will.

I pulled out my plastic bags again, along with some clear nail polish and the adorable Fingr's Flirt nail and body jewels kit I'd been sent ages ago to evaluate. Those are the cutest little gems, tiny and perfect for nail art! I put a tiny dot of clear polish onto the bag for each cupcake, then pressed it gently into place so that it wouldn't be moving around. Then I added a tiny dab of clear polish onto the top of each cupcake and pressed a stone onto each one to represent a sparkling cherry (or other cupcake decoration). Once that had dried, I added a coat of topcoat to seal everything together and held my breath.

As you can see, they worked out wonderfully! I wanted to make sure there wasn't a lot of excess clear polish around each decal, so I used my cleanup brush with some acetone to remove any extra that had gathered around the edges of the decals. I also added different embellishments to some hearts and butterflies. Some got gems, some got glitter.  All got a coat of topcoat and cleanup afterwards.

I found out you can really play with the dimensionality of the decals once they're set up like this. For the tiny heart I mixed some Isis brand glitter in the color Coral Beach from Nail de Royale with clear polish into a thick paste, then mounded it onto the tiny heart. To my surprise, it stayed mounded once it was dry! So cute... I may have to make some more of those...

This pic should give you an idea of how large these decals are... that's my index finger it's sitting on! So teeny and cute... I love it!

I also experimented with another substance for decals. I didn't like how the nail polish decals can crack, or melt and smear with topcoat. I started thinking, and realized I've had success peeling acrylic paint off of my palette once it's dried. It was time to experiment some more!

As you can see, they turned out nicely! I had some old cheapie acrylic paints that came with a kids' art project years ago. They were super-thick with age, so I smeared them onto my plastic bag with a craft stick and let them dry.

Some of them turned out pretty thick, but it was still proof that the idea works. These decals end up
sticking well to the plastic bag, so I didn't have any problem with them getting stuck together or cracking or anything. And with a dab of clear polish, I was able to combine decals for bold color, or to add rhinestones or glitter to them. I am SO in love with these!

So there you have it- even more options for creating your own nail decals! I've had much too much fun making these, and now that I know I can use my acrylic paints? I may need more storage just for the mini punches I plan to acquire!

I know, I know, it's a sickness... but at least it's a productive one!

Various items were provided by the manufacturers for consideration. Links are in the post.
See my disclosure statement for more information.

Monday, December 27, 2010

After the Rain...

If you've been reading Layniefingers for long, you won't be surprised when I say I love rainbows. It's almost obsession, really. I'm fascinated by the color gradients, watching one color shift into another. It's mesmerizing, and I adore it.

Today's design was created using three colors of acrylic paint. I blended them on the nail, using generous blobs of paint and a very quick back-and-forth motion with a thin liner brush. If I had a video camera I'd show you the process, but... well, to steal a quote from my mother, "If a frog had wings, he wouldn't bump his butt when he jumped." A coat of Seche Vite made the drab finish of the acrylic paints come to life and sealed them together under its glassy shine.


I  love this one. It makes me think of candy, or carnivals and fun carnival foods. What does it make you think about?


Friday, September 17, 2010

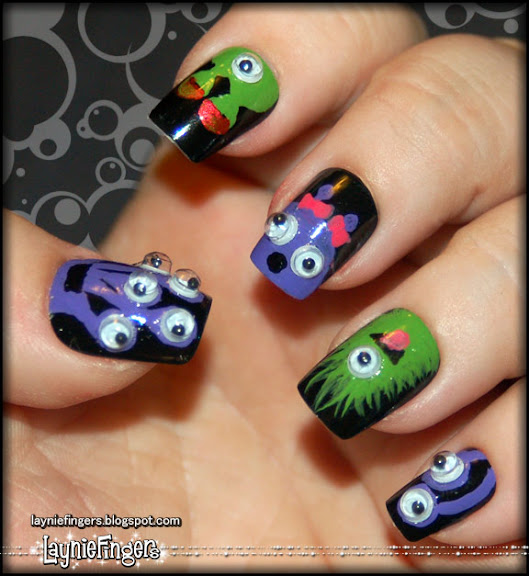
With Monsters On Her Fingers, Why Should She Be Afraid?

I have just finished the silliest set of nail tips that I think have ever existed. Rhinestones? Heck no, that's too elegant! Roses? BORING. (Not really, but go with me on this!) I wanted something different, something that really expressed my inner self. I wanted monsters! But not just any monsters. No... I wanted monsters with WIGGLY EYES!

That's right. These nail tips have monsters on them, and those monsters have 3D wiggly eyes that actually move! Some of them look excited, some of them look menacing, but most of them look kind of confused, and I really like that! They're silly, and they're weird, and they're in halloween colors to boot! Purple, green, and orange combine on a stark black background to make these monsters really pop.


Now, I started these ages ago. I got the test one finished way back on August 6, believe it or not! They clearly didn't take that much time to complete. But I got the bases painted and then had a huge moment of fear: could I finish them? Could I make them as cute as I hoped they would be? And those nails sat, and waited, taunting me simply by being unfinished. It was almost depressing!

Then one night I realized that hey, it doesn't matter if they're perfect. They don't have to be perfect because they're monsters! That moment freed me from the fear I was fighting with, and I was able to dive in and get back to work on them. The more I worked, the happier I got, until finally I was giggling as I painted on the goofy details, the pink hair bow, or the goofy teeth on the orange guy with eye stalks. They're not perfect, but they're cute, and that's enough for me. Anyone who wants perfect monsters can paint their own!

By the way, I think you should enlarge the image above, even if you don't click any other images on this blog. It's silly, and you can see all the little guys in their full glory. They're pretty nutty, really, and I love them all! I may have to make my own set of these, especially if someone buys them.

Wait, buy them? That's right, this set of nails is also up on Etsy for $24.95. They'll come nicely and safely packaged so that you don't have to worry about them being squished by the post office, and then you'll get to love the little guys while I miss them.

It's ok. I can make more. Already, my mind is filled with googly-eyed critters, and I'm wondering what to make next...

So, what do you think? Any other critters you'd like to see?

Friday, August 6, 2010

No H8- my inspired reaction to the overturning of Proposition 8.

I'm not even sure what to say about this, really. When I heard yesterday that Proposition 8 had been overturned, I was so overwhelmed. I sat and smiled, feeling history being made, and wondered what had taken so long to get to this point. I told my husband, my son. My online friends and I talked and laughed, happy for some good news for a change.

Then last night before I was heading to bed, I found this post- the Daily Nail's post about her No H8 manicure. I love rainbows as you may have noticed in my past blogs, but even more so I love the idea of the No H8 campaign. I also absolutely agree with every word she said in her blog. So when I saw her manicure, I knew I wanted to do my own spin on the idea. But be aware that this one came directly from the Daily Nail.

I immediately pulled out all my stuff and got down to business. Sally Hansen Hard as Nails base coat, then I mixed custom colors for the rainbow in acrylic paints*. For some reason, I like my rainbows with brighter colors, rather than the traditional red, so I used Medium Magenta, Brilliant Blue, and Cadmium Yellow Deep Hue straight from the tube and mixed the purple, green, and orange from these. For my left thumb, I used 2 coats of Fantasy Makers** white, then used a dotter with Fantasy Makers black and Sally Hansen Teflon Tuff in Red Forever Creme to do the lettering.

I took the picture to the right before I'd even finished cleaning up. My fingers are so messy... don't judge me, please! At that point, it was something like 2:30 am and I was absolutely crashing. I shoved everything back into my polish box and tried to sleep some. Once I got up, I realized that I didn't like the way the colors looked, so I decided to top the rainbow fingers off with a holographic top coat. I grabbed my Milani HD and did a thin coat over all the rainbow nails, leaving the NO H8 thumb alone.

I did another round of cleanup and scrubbed my hands nicely and wound up with this, and I think I'm pretty happy with it. Unfortunately, no one has noticed my nails yet. But it's ok. I know what they mean... they sum up my belief that love doesn't discriminate between color or gender, and that our laws shouldn't either. I have no problem with churches refusing to marry couples of the same sex, because that is their right. But there is a difference between marriage in the church and a legal marriage, and the church, in my opinion, has no right to step into legal matters.

Be happy, be safe, and be kind to each other. Those are the best suggestions I have for this life...

*I use Liquitex Professional Acrylic Artist Color in Heavy Body for my acrylic paints.
**Fantasy Makers polishes are distributed by Markwins Beauty Products Inc.

Monday, July 26, 2010

Paint splatters can be FUN!

You know, I admit it. I am totally a child of the 80s. I love neon, I love wild prints, and I love paint splats. This set of nails reminds me of a sweatshirt I had in grade school, only the shirt was white instead of black. But what better color than black to make colors pop?


You can see how vivid the colors are. I can't lie, I want to keep these all for myself! So much fun, but at least I can redo them if I decide to!

This set of nails is made with a custom-mixed rainbow of acrylic paints, so that they have the same level of intensity. I love the black base, and the topcoat makes the colors so intense and glassy!

I won't lie, I can see doing this design with shimmers, metallics, glitters... monochromatic colors, analogous colors... I think it'd be fun no matter HOW I mixed it up! It's just downright FUN! Oooh, imagine white splats on a black background, with the occasional splat of red! There are so many ways to do this, and I don't know if any are better than the others. You'll definitely see this pattern again, if only on Etsy! Speaking of Etsy, these will be going up as soon as I finish this post.

I'm so excited to add that I've got some surprises coming up soon! I'm planning some videos, both of some of those dramatic, color-shifting polishes in the sun as well as some technique videos. If you have anything you'd like to see, feel free to leave requests in the comments!

And oy, I've just looked at the clock to see that once again, I'm catching 7:30am from the wrong side. I think I need to go to sleep. Man... one of these days I'll get my internal clock set right again.

...maybe. :D