Sunday, July 31, 2011

Seeing Spots- some nail doodling to tide us over...

Hi y'all! I'm still coughing my fool head off and feeling gross, so I dipped into my photo archives to share something I did not too long ago while I was doodling. Sometimes I enjoy just putting various polishes together to see what I can come up with.

I'd love to tell you what polishes I used for this design, but I can't. Most of those colors I mixed myself from various polishes in my collection, and I honestly don't remember how I achieved them. However, this is a very simple look to achieve.

First, I imagined a V going down the center of my nail. I painted the three base colors, one in each triangle. After that dried, I began adding dots with whatever color I thought would mesh well with the backgrounds. I started with the large silver center dots on the turquoise bit, then added smaller pink dots on top of the silver ones. Finally I filled in the blank spaces with the sparkly blue dots. The side triangles are more simple. Finally I added black stripes to better separate the three sections. A quick coat of topcoat finished things off!

Hopefully I'll be feeling enough better to get a post up soon. If not, I'll dig into the archives again! Til next time!


The robots are coming to take me away!! :D
See my disclosure statement for more information.

Thursday, July 28, 2011

Hospitals Suck.

I apologize for interrupting the fun, colorful nail art and other cosmetic goodness posts, but I'm afraid this has to be said. Hospitals suck, and not in the happy fun way. Let's see if I can sum this up briefly...

Some of you may know I've been sick for three and a half weeks now. Coughing, feeling horribly achy and weak, body aches, etc... it's not been a pleasant month here. For a week, I felt too bad to go to the doctor, which is sort of scary, but there ya go.

Last night, I ended up having a hard enough time breathing that I said enough was enough and finally went to the emergency room. I'm pretty fond of breathing, and when I feel like I can't I get rather grumpy. I'd have gone to the doctor sooner, but I have pretty severe medical anxiety, so it takes a LOT to get me into a doctor's office.

While sitting in the waiting room, I had lots of time to think about just why I dislike going to the emergency room. Forget being surrounded by sick people...it's just not very fun.  Even though I was there for my chest they made me strip naked and sit waiting in a tiny hospital gown that was totally open down the back. Then they wanted me to walk to radiology!

Yes, I put my pants back on before the trip to radiology. Some things I just won't do. :D

One bit amused me, though. The doctor seemed convinced that I smoke for some reason. He asked me at least three different times during the exam if I smoked, as if he'd somehow sneak up on me and get me to change my story. I'm actually pretty boring- I don't drink, I don't smoke, I don't do drugs, I don't do much of anything except craft!

Ahh well, it's ok. Even though the doctor seemed convinced I had pneumonia, I don't. I have pretty bad bronchitis, and that's what's been making me feel dizzy and pass out too. That breathing thing really IS important!

Also, don't be like me. If you end up with something you can't kick after 3-4 days, go to your doctor. As the doctor told me, you don't want to end up like Jim Henson- he died of an easily treatable pneumonia, and had he seen the doctor even one day earlier, he'd have survived. I got lucky this time, but you might not.

Til next time, hopefully with better breathing!


My lungs hate me.
See my disclosure statement for more information.

Monday, July 25, 2011

Franken Fun- My Magic Bus

I had the strangest night. I finally seem to be getting over the cold I've had for the past three weeks, so my family and I went out to the bookstore to get out of the house for a bit. We got home around 9pm and I immediately hopped onto my computer to update the blog.

But as I was opening images to crop, I saw the art doll I've been working on lately. I realized she needed more trimming and shaping, so I pulled out my supplies and got going on that. Once she was a little more to my liking, I took photos of her so I could keep track of things. But then I realized I had more things to photo for the blog, and figured I might as well shoot them at the same time since I had the camera out.

Fast forward to 7am, when I realize I've revamped the art doll twice, started not only a head for her but a new doll as well, started two paper mache candlesticks, redone a necklace to better suit my tastes, cleaned out my purse, photo'd lots of nail art, shot two or three videos for the blog, reorganized my nail art brush box and my paper mache supplies box, torn new paper strips for the new paper mache goodies, transferred my new bottle of acetone into the bottle I prefer, cut down that bottle into more storage for tall thin things...

... and I looked at the clock and shouted, "Holy CRAP, when did it become 7am??"

My husband, ever the smartass, replied, "About 2 minutes ago." He's so helpful. :D

And so here it is, almost 11am and I'm just now getting to the blog update I started 14 hours ago. I haven't slept, I've barely eaten, but oh how satisfied I feel right now!

However, since I didn't do anything new I'll show you a franken I made several weeks back. I've been admiring OPI's My Private Jet for quite some time, but I am much too frugal to consider buying it. Even if I had the spare cash to spend on it, I'd much prefer to throw that toward something else. So, enter a splash of black, a lot of clear, and some Gosh Holographic.

I love the photo of the bottle. The color is a touch off, for some odd reason, but the sparkles are GORGEOUS! Then again, I do have quite a thing for rainbows. Just in case you don't want to zoom in on it, let me show you a bit of that gorgeous holo sparkle...

Is that delicious or what? The best part? These photos were taken after midnight in my poor bedroom... I can't wait to put this on and take it for a ride outside. This baby is going to sing in the sunlight, I think!

If you're interested in mixing up your own version of this stunner, it's fairly simple as long as you have the right base. You'll need a very holographic polish- something like China Glaze OMG or Gosh Holographic works beautifully. I wish I could tell you a ratio, but it really depends what polishes you're using. My suggestion would be to put about half a bottle of clear, a healthy dollop of holo polish, and then add your black one drop at a time. It really doesn't take much black to completely mask the holographic glitter/shimmer, so it's easier to add it bit by bit than to end up wasting your holo polish in plain old black!

So, if you're anything like me, you're wondering what this looks like on. In a word? YUMMY! It's hard to see the pretty rainbow in this unless you click the picture to enlarge it. Good thing I'm nice enough to do a zoomed-in shot of it! Just look...

Keep in mind, that pic on the right there? Yep... shot after midnight with ambient room lighting. Can you imagine what this would do in the sun? I'm almost hyperventilating thinking about it!! Don't worry, eventually I'll get a shot or three of this in bright daylight, full sunlight so we can all appreciate just how gorgeous a charcoal holo can be. :D

But for now? I'm looking at the clock and it's almost 11:30 and I am finally starting to get a bit sleepy. YAY SLEEPS!!

... who am I kidding, I'll be up before 2. Still, even naps are better than nothing! Keep your chins up, kids, and I'll catch ya on the flip side!

Til next time!
It may not be a private jet, but I'm not complaining...
See my disclosure statement for more information.

Thursday, July 21, 2011

Dr.'s Remedy Hot Hot Hot Summer 2011 Collection- ON ME!

You know, I wrote about the Dr.'s Remedy Summer 2011 collection a few days back, but the press release photos just did NOT do these beauties justice! Once I got these in my hands, I couldn't wait to put them on immediately!

Unfortunately, the metallic colors didn't fare so well over the deep color I had on already, so I had to take it all off and start over. Awww, shucks, such a shame... more time playing with my polish! *wink* Don't worry, I ended up with lovely shots of all the colors, and I'll share them all with you after the jump!

Tuesday, July 19, 2011

Recycling Fun- Making a Set of Funnels for Frankening

Ok, once again I've gotten crafty and creative with some of my recycling. I got super excited after I was done because the finished product worked so well, and after a bubbly tweet, I realized other people might be interested too! (Ok, it was the requests for photos that suggested other people might be interested, but hey... at least I figured it out, right?) So let me share with you the story of how I made two tiny funnels from an empty eye drop bottle!

It all started with frankening, of course. I've mixed colors for as long as I've played with paint in any form. In fact, I made a glitter paint several years ago to use on a pair of red canvas sneakers! Unfortunately, it gets really hard to put glitter into nail polish bottles. Up til now I'd been rolling up paper to make a temporary funnel, but that got messy and annoying. What to do, what to do...

Yes, I know there are mini funnels you can buy, but as you may have noticed? I'm frugal. Exceptionally so, and if I don't absolutely have to buy something, I generally won't. Plus I really do love finding ways to make whatever I want/need. It's sort of the best of both worlds!

So, today I was working on a paper mache art project (more to come on that later!) when I realized that hey, I had an empty eye drops bottle, and hey, that bottle was perfect size to go into a nail polish bottle, and HEY, what if... 

Some of my best projects start with "what if..." So, if you would like to make some tiny funnels, here's what you need!
  • An empty eye drops bottle.
    Mine was a generic brand, but as far as I'm aware they're all pretty much the same- flexible sturdy plastic with a tiny tip.
  • A coarse file or some sandpaper.I used my 8-step buffing block that came from the Dollar Tree. I've used this thing on SO many projects, and most of them weren't nail-related. Hmm...
  • Scissors.This one's fairly self-explanatory. We'll get there in a few minutes.
  • An X-acto knife.This may or may not be important. I don't know if it's totally necessary or not, but it's good to have on hand.
  • A dotting tool, bamboo skewer, or something else long and thin.Again, I'll explain what this is for farther in.
  • Plenty of elbow grease.This could be done using a dremel tool, but I didn't feel like digging it out and plugging it in and having to deal with all that. I used what I had on hand, and so can you!
First, I decided to turn the cap of the bottle into a funnel. I felt fairly sure there wasn't all that much plastic to remove to get things open, so I held the bottle upside down with the cap on and started rubbing it back and forth on the buffing block.

I know it seems like it would take forever, but it really didn't. After maybe two minutes the top of the cap was gone and I had a funnel. Unfortunately, there were little bits of leftover plastic inside the opening, which would be a disaster to try and use.

Top right- outside of funnel
Bottom right- inside of funnel
Click for larger image.
This is where the long skinny utensil comes in handy. I used the large dotting tool to push the shreds out from the inside and fold them over. Then I removed the dotting tool and sanded them away with a few more strokes on the buffing block. This took 4 or 5 different repeats of poke out the shreds, then sand them away. However, once they were gone I was left with a lovely tiny funnel, just perfect for glitter, micas, pigments, or even other polishes!

After finishing the small funnel, I looked at the bottle and wondered if I could make it into a funnel too! I sanded a bit on the bottom of the bottle, but it wasn't responding nearly as well to the buffing block as the cap did.

That's when I pulled out my scissors. I squished¹ the bottle flat and grabbed my scissors. I was expecting to have trouble cutting the plastic (like when I cut a soda bottle to use as a large funnel or a container for organizing stuff), but my scissors cut right through it, taking the very end off in one clean cut. YAY! (Although now I'm looking at the bottle end and thinking how perfect it would be as the base for a hat for one of my paper mache critters... I know, I need help, but this really does keep me sane! Imagine how bad it'd be if I didn't make stuff!!)

Then came the hard part- removing the part of the bottle tip that keeps the eye drops from squirting out in a stream. I had no idea how to do this, but since when has that ever stopped me? I grabbed my dotting tool again and put it through the open end of the bottle and pressed down, forcing the droppy-tip out nicely! What a surprise!

Once the very tip was out, I could see the dropper mechanism inside. Unfortunately, it was part of the tip so I couldn't just pop it out. I grabbed my X-acto knife to try cutting it out without realizing that I could just cut the very end of the dropper off. That would have worked much better than what I did, and it's what I suggest you do if you decide to make some funnels.


Once I got the dropper part out, I was finished with an awesome result: two adorable funnels that only cost me a few minutes of time. They're even easily stored- the cap still screws on to the bottle! I can't wait to use them next time I'm frankening!

Til next time!

¹ Squish: very technical term. Only the best for my readers
When does the hurting stop?
See my disclosure statement for more information.

Sunday, July 17, 2011

Cracked Up Flowers- a fun floral manicure using crackle polish

I'm an experimenter, and sometimes my experiments turn out a little scary or just downright sad.Today, however, I've got an experiment that I actually like the end result! The best part is that it's super simple!

I do wish I'd used a different base color for this, but overall I still think it turned out really cute. This would be perfect for an accent nail, since placing all the stones does take a bit of time. Still, it's definitely something people can accomplish without a lot of stressful painting!


It's easy enough to create. While I'm going to mention brands, keep in mind you can use any color or brands you like better. I just happened to use what I have and what I like. Use what you have, and what works well for you.

First, I used a base coat. I can't repeat this enough: a good base coat and top coat are the most important part of your manicure. They protect your nails from staining (some, at least) and protect the polish on your nails. If you're going to splurge on something, splurge on top coat! Even the 98 cent Wet n Wild polishes can wear like iron if you use a good base coat and top coat!

... woops, I seem to have landed on a soapbox! How did that happen? Getting back to the manicure, it's simple. It goes like this:

  1. Base coat.
  2. Background color. Use 2-3 coats, whatever it takes to have a nice, solid background. I used a somewhat dusty metallic pink.
  3. Once this is totally dry, I painted China Glaze Broken Hearted (pink) crackle polish in a rough triangle on the top half of my nail. I then used Sally Hansen Vintage Violet (purple) crackle polish on the bottom half trangle. 
  4. After the crackle polishes have dried, I used my white Art Deco striper to paint a somewhat thick line separating the two crackles.
  5. After everything had dried for a few minutes more, I placed the various rhinestones into place, using my clear topcoat as a glue to keep them in place. These rhinestones came from the Fingrs Flirt package, which I absolutely LOVE!
  6. Finally, I added a coat of top coat to seal everything into place and protect everything, and we were done!
Let me know what you think of this one. I think it'd be fun to have pink crackle on my thumb and first two fingers, the accent nail, and then purple crackle on my pinky. Weird, but fun!

Ah well... til next time!
Some polishes were provided by the manufacturers for consideration.
See my disclosure statement for more information.

Friday, July 15, 2011

Nail Art Inspired by Katy Perry's "Last Friday Night" Video

Celebrities often wear the latest trends, and Katy Perry not only follows the nail art trends, she sets them! In her latest video "About Last Night," Katy wears a vibrant, colorful look that's very reminiscent of the 80's. (I can remember wearing colors like those back in the 1980s, and my hair was almost as high as hers!)


Tuesday, July 12, 2011

Dr's Remedy Nails- Summer 2011

I'm having a horrible time with my email lately. I don't know why, but suddenly lots of emails are ending up in my spam folder that shouldn't be. I'm so glad I started looking through it every few days, although I really don't want to think how many mails I missed that I would have wanted to see...

Thankfully, I found the email from Dr's Remedy Nail Polishes telling me about their new summer collection! These colors are LUSH! The orange is calling my name, and I cannot WAIT to see the blue on my nails. I also have a feeling that I might actually be able to wear the nude pink... we shall see!

The descriptions for the polishes really make me want to try these. Just look for yourself!

* Lovely Lavender: a pale purple with matte depth and charm
* Glee Gold: a shimmer-infused coin of perfection
* Tranquil Tangerine: a bold, but wonderfully wearable, slice of juicy delight
* Bold Baby Blue: an aqua-meets-turquoise take on every boy's favorite color
* Nurture Nude Pink: a delicate, damsel-in-distress barely-there beautiful

Aren't these fab? That lavender looks like it might be one of those almost grey, almost lavender, neutral and lovely colors that's so popular at the moment, and really, do I need to say anything about those shimmers? I'm absolutely bouncing at the idea of getting to try these!!

Dr.’s REMEDY Enriched Nail Polish is DBP, Toluene & Formaldehyde free and is exclusively available for $17 online at www.remedynails.com, or call 877-323-6756.
Images and information were provided by the company for consideration.
See my disclosure statement for more information.

Coming Soon From China Glaze- the Metro Collection!


I'm sure you've heard about the upcoming China Glaze Metro collection. Still, I have to say that I am really looking forward to it!I love the way the colors look all together in the above image! The colors are so rich and yummy! Let's see what's in there!

First off, there's the Downtown collection, a 6 piece box set which includes Skyscraper, Concrete Catwalk, Westside Warrior, Trendsetter, Loft-y Ambitions and Midtown Magic. The polish descriptions sound so interesting!
* Skyscraper: A sparkling, glitter blue reminiscent of the sky over the city.
* Concrete Catwalk: Steel grey crème is amazing for a chic mani.
* Westside Warrior: For the trendsetting woman this camo green crème is to die for.
* Trendsetter: Mustard yellow shimmer translates beautifully from hot dogs to nails.
* Loft-y Ambitions: Burgundy shimmer and cocktail hour – nothing better.
* Midtown Magic: Burgundy base with flecks of gold shimmer captures the latest fashion trend.
Click image for a larger view of the polishes.

Then there's the Uptown collection, a 6 piece box set which includes CG in the City, Urban-Night, Traffic Jam, City Siren, Street Chic and Brownstone. The descriptions make me want to wear these!
* CG in the City: Glittering dusty purple, bronze and silver multi-tonal glitter, perfect for a pop of edge from West side to East side.
* Urban-Night: Exactly what you need for a night on the town – rich purple crème.
* Traffic Jam: Stop traffic with a breathtaking, raspberry pink crème.
* City Siren: The perfect deep, red crème to match any outfit.

* Street Chic: This gorgeous beige crème is the perfect go to shade letting your clothes do the talking.
* Brownstone: Burnt terracotta crème mirrors the quaint townhouses of the city.
Click image for a larger view of the polishes.
This collection looks yummy to me. I'm obviously drawn to the two glitter polishes (Hello, my name is Laynie and I am a glitter addict!), but that olive green is calling my name! The yellow looks interesting for nail art, and I'm just itching to get my hands on  the four middle Uptown polishes! Yea, I think I need to start saving my pennies!

The Metro polishes will be available as box sets of 6 and as individual polishes. China Glaze nail lacquers are free of DBP, toluene, and added formaldehyde, and are available through salons and professional beauty supply stores nationwide. For more information, visit: www.chinaglaze.com or follow China Glaze on Twitter: http://twitter.com/ChinaGlaze.

Til next time!
Images and information were provided by the manufacturer.
See my disclosure statement for more information.

Monday, July 11, 2011

OMFGPonies and Pengins, does it get any better than this?


I have to be honest here. I intended to post this earlier- maybe Saturday morning? I've lost track of time, thanks to the chest cold of doom that's descended upon our home. I've spent too much time hacking and coughing, wondering if I have the energy to cough again. And all this while, the penguin photos have been waiting for me.

It all started with me deciding I had to wear OMFGPonies and see what it looked like on my nails. It was a bit thick to start out with, so I thinned it with a few (maybe 10?) drops of polish thinner, and then it was absolutely dreamy!

Also, I apologize because I'm going to be sharing a few more photos than usual with this one. I'm sort of in love with it!! Also, I gave up on getting video of it, mainly because it would involve spending half an hour outside in weather that feels like it's 115 degrees so that my camera can adjust to the ambient temperature. Otherwise, the lens just fogs up and makes it impossible to take pictures.

One thing I didn't expect with OMFGPonies is the ending finish: it turned out to have a matte texture that really surprised me! It was easily remedied with a coat of Seche Vite, but I would have preferred a glossier finish. Ah well, not a huge deal.

One thing I didn't think about but was obvious in retrospect was the difficulty that occurred during cleanup. Big glitter = messy cleanup. Overall it wasn't too hard to clean up, but I definitely ended up with some glitter spots that made my cuticles look a bit messy.

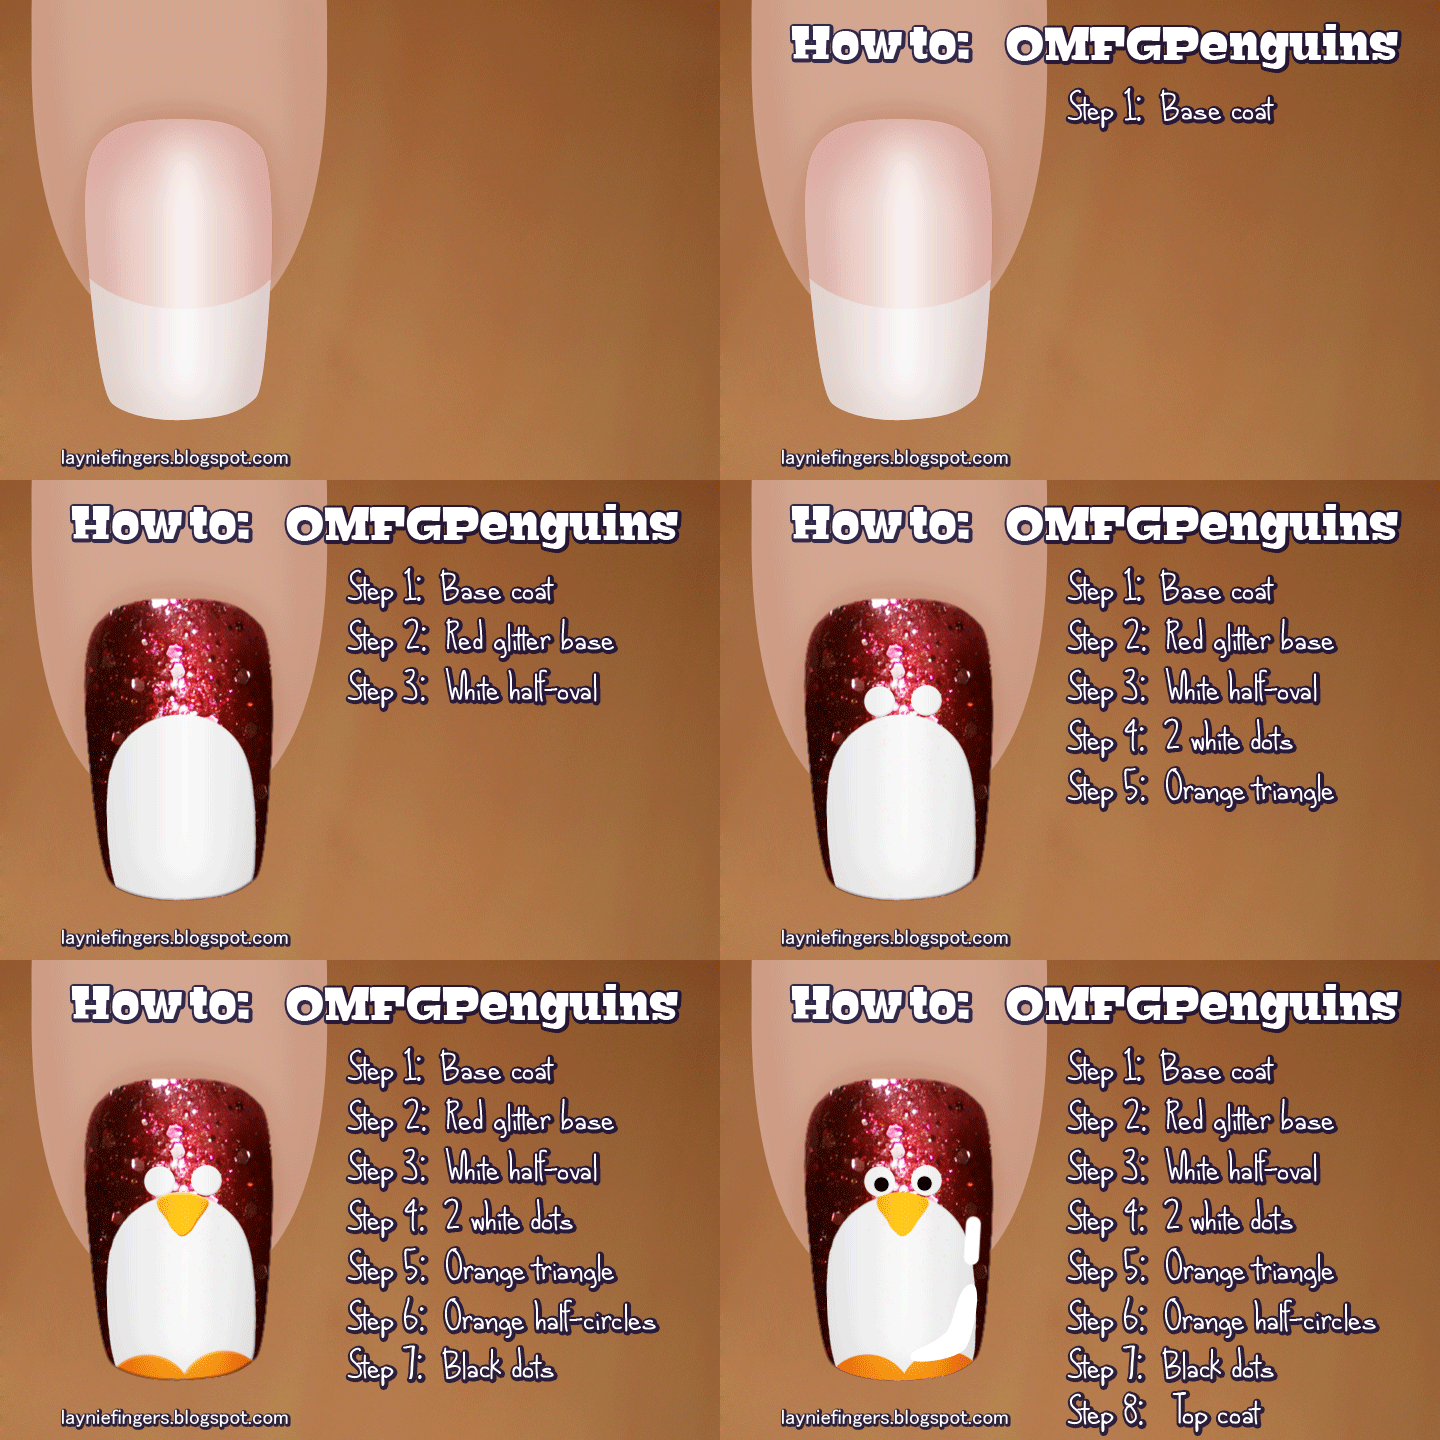
After wearing OMFGPonies for a day, I realized I wanted some nail art. I don't know what prompted me to make red glitter penguins, but I really like them! Turns out they were simple to do, although they were a bit on the fussy side. Still, even my husband loves these!

While it never occurred to me to wear red glitter penguins, I'm glad I did because they make me giggle every time I see them! I'm also really happy with the positions of their eyes, and everyone who has seen them has commented on that as well!

So- how do you make them? I thought you'd never ask!

Items needed to make OMFGPenguins:
  • White nail polish or acrylic paint
    This can be a regular nail polish, a nail art striper polish or even plain white acrylic paint.
    Use whatever you have.
  • Nail art brushes
    These are optional, but a smaller brush can be easier to control when trying to make dots and shapes. Again, use what you have.
  • Dotting tool, bobby pin, toothpick, etc
    I found using a dotting tool was easier for making the eye dots. It's optional. Use whatever you're comfortable with.
  • Black rhinestones, black nail polishI used black rhinestones to create the pupils of the eyes, but you can use whatever you have. Are you sensing a trend here?
 and if you can't follow the how-to because it's upside down, I did a special one just for you!


Keep in mind that you can do lots of expressive things with the eyes. Keep the white parts small and the eyes will be tiny and cute, or make them HUGE and they'll still be adorable! Just look at the different expressions I've given this little guy, just by changing the position and size of the whites and blacks of his eyes!


As always, feel free to show me what you've done if I've inspired you at all. I love sharing with people, and feedback makes me smile for HOURS! :D
Til next time!

EDIT: I cannot believe I forgot to include this image. It's only the first image I edited, and the one I sent to my friends to make them giggle. Yea, I'm forgetful... it's what happens when you get old! Anyway, enjoy!


The penguins have eaten  my brain, it's true!
See my disclosure statement for more information.

Friday, July 8, 2011

Green and Gold Animal Print- is it Tiger? is it Zebra? Who knows?

Hi hi!! I have to share this, even though I should be asleep. I had a weird night and should have been spending the day with my mom taking her to the doctor, but I seem to have a tummy bug. So I figured I'd give you something fun to look at while I'm feeling icky!

This is the last installment for this version of Animal Print week (which actually lasted two weeks, or... is it three? I can't count!) Still, it's cute as a button and can be done in the colors of your choice!

It's super simple too. Apply your base coat and then 2-3 layers of your background color. (This one is Manbug by BB Couture.) Once that's dry, add stripes of the metallic polish of your choice (I've forgotten which one I used here! EEP!) and follow up with thin black stripes under each metallic stripe as an accent. If your background color is darker, you can use silver and white as accent colors and it would really pop!


So, try it, and if you do, show me! I love seeing people trying what I've shown! Til next time!

The tiger zebra is actually a very rare animal. Green is considered the ultimate beauty for their coat.
See my disclosure statement for more information.

Tuesday, July 5, 2011

OMFGPonies- My Little Franken

Holy ponies on a BBQ, I am so, so giddy right now. Last night I was doing my nails with my frankened version of My Private Jet¹ when an idea hit me: I could franken the red-glitter-in-black-jelly polish I've been fantasizing about!

I know, I know. I've mixed my own colors more than once, so why was this such a breakthrough? I have no idea. All I know is the idea hit me like a bolt of lightning, and I immediately tweeted about it!


As you can see, Lisa from Shades of Magic absolutely LOVED my outburst, so I clearly had the name for this franken-to-be, if it turned out at all worth saving.

I knew what I wanted. I've seen several polishes lately that were red glitters in a black jelly base, but each of them had something wrong with them. So rather than keep waiting for the perfect one, I decided to try my hand at mixing what I considered the perfect polish.

See, you may have noticed by now, but I kinda have a thing for glitter. In fact, if you were to look through my box(es) of nail art goodies, you'd find more glitter than you know what to do with. Seriously, I've got over 20 different containers of loose glitter in different sizes and shapes, not counting glitter polishes, and I'm ALWAYS on the lookout for more! It's become an obsession almost, and I simply cannot get enough!

So, thanks to my stockpile of glitter, I was able to pull out three different red glitters, a russet red pigment, and a red glitter polish that I thought would all work together. I also grabbed my TKB glitter suspension base because I knew I wanted a sheer base, and a simple black no-name polish. I used very little black, because black is a very strong color that can easily overpower a polish quickly.

Instead of just jumping in and dumping a lot of stuff into a bottle, I started with one of my mixing cups. I used a dot of black, a dollop of clear suspension base, and a bit of all my glitters. After stirring it up, I was in love, and even though I didn't have the mix right, I knew I wanted a whole bottle of this one.

Onward to the polish. I went in very small quantities at a time, so I could change things if I wasn't happy. It took an hour of tweaking and shaking, testing and tweaking some more to come out with something I was happy with. But once I tested that last mix... omg, I knew this one would live up to its name.

Meet OMFGPonies, the first franken I've made that I am absolutely completely in love with. It's like a deep black cherry base with amazing glitterbits. And keep in mind that these photos really don't capture the depth of it. I need to shoot video in full daylight, but I was sick in bed all day and didn't get to it. Maybe tomorrow...

I absolutely love that as you turn the nail, you capture glints of microglitter peeking up through the sheer black base, russet shimmer catching the light and larger flakes of glitter reflecting a silvery red. My largest red glitter turned silver in the polish, but I knew that was a possibility, and I was ok with the concept if it did.

I love this polish, more than I can say. And the best part? I can make more... :D

You know, if I ever get the bits again.

Til next time...

¹ My version is called My Magic Bus, because it's magically delicious and much cheaper than taking a plane. :D

Some polishes may have been provided by the manufacturer for consideration.
See my disclosure statement for more information.

Monday, July 4, 2011

Happy Independence Day! Let's Have Some Nail Art!

I have to laugh... I was talking twitter last night (I know, I said that already, but I've been up all night. Give me a break!) and someone asked me how long I've been blogging. I went to check my history, thinking my one year blogaversary was coming up this month. Instead, I had a surprise...

My one year blogaversary was actually on June 23! I've been blogging over a year, and didn't even know it! So, let me just say from the bottom of my heart, thank you for being here! There's no way I'd have managed to keep this going without all of you reading and commenting. You make it worthwhile, and that's why you're getting two bits of bloggy goodness today!

So, let's look at some fourth of July nail art, shall we? I didn't do anything overly spectacular, but I did do designs I'd be happy to wear. I started out with something fun, something glittery...

Glitter Glory is a simple design using only three polishes. I chose a white base so that my colors would pop, and I wouldn't have to worry about painting a stripe later. Once my base color was dry, I put in diagonal sections of red glitter and blue glitter. A top coat of Seche Vite and we were done!

 Spangles and Stripes is a simple, almost nautical theme. Again, I started with a white base. This time, I painted a thick red horizontal stripe at the top of the nail and a thick blue stripe toward the base of the nail. In between I added a stripe of silver glitter, just because I really love glitter. Add top coat and it's done! This could be cute alternating the top color, as well!


Finally, I did a design inspired by all the fireworks that will be seen tonight. Normally I would have used a black base for this, but instead I chose to use a very deep blue shimmer polish for the background. It still feels like night without being utterly black. I then chose a central point on the nail and began pulling thin stripes of polish out in a star pattern. I alternated blue, reg, and silver glitter for this, hoping to mimic fireworks. I think I overworked it a bit too much, though. Ah well, they can't all be winners, right? 

To re-find my center point, I added a single white rhinestone in the center of the burst to signify the explosion at the center of a firework. It's not what I was hoping for, but it's still wearable, I think. What do you think?

And now that I've posted both my crackle experiences and my July 4th manicures, I think I'm going to curl up in my bed, try to get some sleep, and hope I can avoid the hottest part of the day. Currently it's 11:50am with a temperature of 90 and a heat index of 111. NO BUENO, people!!! NO BUENO!

Til next time, my lovelies!


Some polishes may have been provided by the manufacturer for consideration.
See my disclosure statement for more information.