Tuesday, December 21, 2010

Happy Holidaze the Sixteenth- Holy crap, there's a lot of these! I mean, let's trim the tree!

I have a confession to make. Because of circumstances this year, I haven't decorated my home for the holidays at all. I haven't even put up a Christmas tree, which part of me misses but the most of me thinks, "Meh, it's more work using energy I just don't have. Save that energy for something I care about." So this tree is the only one I'm doing this year... good thing it's a cute one!

Woo! A Christmas tree, complete with entirely too many ornaments.
I'm not sure how I feel about this one, but hey... it's a tree, right? :D

I have to share a bit of the process with you as well. This thing was time consuming! I think it'd go faster if I had some appropriate nail stickers, perhaps some sparkly thread to replace the sequins I used to make garlands. But if you're not a fiddly person, this won't be the nail design for you. What's worse, I knew this would be a design I wanted to make an animation for to illustrate the process. But this thing was complex. I sat down and counted (thanks to the counting tool in Photoshop) and there are 82 layers in all, and the animation has even more frames* than that!

So, how do you make this monstrosity of a nail? Well, first you get a chicken...

I kid.

You will need some supplies if you're going to do a nail like this one. Keep in mind, you can substitute all sorts of things, and you don't actually need any of the extra stuff I used. I just used them because I thought they'd be fun. So... what all did I use?

You'll need:
  • base coat
  • a background color (I used a beige and a glitter topcoat)
  • at least three greens (I mixed greens using my base green and other polishes to darken & lighten them)
  • a gold polish for the star
  • a flat star cutout sequin thing
  • flat gold sequins or glitter for the garland
  • nail gems for the ornaments
  • quick-dry topcoat (a must for this sort of design!)
 
Christmas Tree Nail Art Process:
  1. Apply base coat.
  2. Apply your background polish. 2 coats is usually enough, but use your best judgment.
  3. Optional: Apply a layer of glitter topcoat over the background color.
  4. Paint the basic shape of the tree using your medium green polish.
  5. Using your darker green, paint in some shadow lines on the tree shape.
  6. Using the lighter green, paint in some highlights on the tree shape.
    1. These shadows and highlights are just to add some texture to the background tree. They won't be terribly noticeable, but they still add a bit of interest to the background so it isn't so flat.
  7. Using a small detail brush, paint a gold star with your gold polish. You can stop here if you like, or continue on.
  8. Optional: Place a star cutout on top of the gold painted star to add dimension.
  9. Add the garland.
    1. Paint a strip of clear nail polish where the first string of garland will go. Use a dampened manicure stick (or whatever tool you prefer for applying stones and glitter) and apply individual glitter pieces along the garland line. Apply them one by one for the jeweled look I achieved.
    2. You could use a striper polish instead and sprinkle microglitter over the wet stripe of polish for a fuzzier garland look.
  10. Add your rhinestone ornaments.
    1. Dab a spot of clear nail polish where you want the rhinestone to go.
    2. Pick up the rhinestone with your tool of choice, then press it into the clear polish. Press slightly firmly so that the polish slightly indents and rises up around the sides of the stone, so that it will stay in place better.
    3. Repeat with more stones til you've got the look you want.
    4. Optional- you can leave off the rhinestones and simply use a dotting tool to add ornaments to your tree. Glitter polishes (or even sprinkled glitter) would look fantastic!
  11. Seal the embellishments and nail art in with a quick-drying top coat such as Seche Vite or China Glaze Fast Forward.
Seems so simple on paper, doesn't it? Actually, it is simple, as long as you break it down into tiny steps. If you can glue on a rhinestone or paint a stripe, you can probably do this. You may want to leave out the hand-painted star, though... *grin* The rest is just figuring out where to put stuff.

Remember, if you try this, leave me a note, because I'd love to see it! Morgan from Pass the Polish Please did an absolutely adorable version of my Santa nails, and it totally made my day to see it! So definitely link me if you try one of my designs!

Now, I'm off to have a cup of hot cocoa and snuggle with the husband for the evening. Hope y'all have a great night!

*Not that this has any importance at all. I love doing the blog and making animations, and frankly I've had bigger, more complex files than this. I just find it amusing that this particular file took me so much time. Do people really read these footnotes? If you did, that means you're super awesome and I love you to bits! You should respond with a comment saying something silly, like maybe, "Wow, that's cool, but it'd be even more awesome with a squid ornament!" You know, something weird like that!

Nail gems, sequins, and star were provided by Viva la Nails for consideration.
See my disclosure statement for more information.

Monday, December 20, 2010

Happy Holidaze the fifteenth- it's all stripey!


Today's look is simple again. I find that some of the most fun looks are simple.This green look could be worn just about anywhere, and is still simple enough to do at home.

I started with a base coat as always, then did two coats of my green polish. I added a layer of multi-sized glitter, then painted on stripes of silver polish. I let everything dry for 5-10 minutes, then applied a coat of topcoat.

Easy as can be. You could also jazz this look up with some rhinestones or striping tape if you liked. It's a fun look that takes almost no time to put together!

Sunday, December 19, 2010

Happy Holidaze the Fourteenth- It's a Kwanza day!

*koff*sniffle* Oh boy, it's still one of those days. Let's make things short and sweet today. When I asked people what holidays I should include art for, several of my friends suggested Kwanzaa. And since I'm not terribly familiar with it, I turned to the web to learn more about it.

The Official Kwanzaa Web Site has a lot of information about the holiday, and has a lot of interesting reading about it. For my art today, though, I stayed with a very simple look using the colors of Kwanzaa- black, red, and green.


This simple design is elegant and festive, and the sparkle in the polishes fit the festive nature of the season. I would have no problem wearing this design any day of the year!


Happy Holidaze the Thirteenth- *koffkoff* *sniffle* I hab a code. Nail art today will be simple. :*D

Hey y'all, sorry for the pause in posting but I seem to have contracted the holiday funk. I've been all achy and sniffly and sleeping copious amounts. Writing simply wasn't on the list, and while I seem to be feeling a touch better, I'm still not 100%, so let's look at something a bit more simple today.

I know I've been writing about fairly complex nail art looks, ones that are fun and funky and eye-catching. But let's not forget that sometimes a simple look can be just as much fun as a more elaborate one. A simple glitter topcoat can change a manicure from simple and nice to simply gorgeous! For example...


The glitter topcoat on both of these polishes add a touch of sparkle, and can be a lot of fun for people who don't necessarily like drawing pictures on their nails. Or, you can try something a bit different, but just as elegant. Try adding a thin line of glitter at the very tip of the nail, while using a nice neutral warm-toned polish.


It's subtle, yet it still sparkles. I think even people who don't wear nail art often could wear any of these looks for an evening out and feel both normal and a bit sexy. There's nothing like a bit of sparkle to brighten your day (or evening)!

With that, I'm back off to bed. I've got a date with my pillow, and we're going to share a wonderful vintage of cold medicine together. Ahh, romance...


Friday, December 17, 2010

Happy Holidaze the Twelfth- It's a Fat Man's Red Suit!

You know, today's design is one of my favorite designs I did for the holidays. It's just so cute, so festive, so FUN! Sometimes you need to head back to the classics, and so I did. I was inspired by Beauty Judy's Santa Nails, only I needed to do them my way. Santa needed some serious sparkle!


That's right- instead of using creme colors like Judy did, I went for super-sparkle. I used my Heaven polish in Ruby for the red because it is absolutely the most gorgeously intense red glitter polish I've ever seen. Everything else was Art Deco stripers in black, white, and silver. The glitter on the white is from the glorious (and messy) glitter samples I wrote about the other day. It looks pretty fab on, doesn't it?

How to make Santa suit nails:
  1. Apply your base coat.
  2. Apply (at least) 2 coats of red polish.
  3. Apply a white strip down the center of the nail.
  4. Apply a white french tip the width of the center white strip.
  5. Paint a thin black band across the center of the nail. This will be Santa's belt.
  6. Make a small silver rectangle across the black band. This will be the buckle on Santa's belt.
  7. Paint a thin silver line starting from the center of the silver rectangle. This will be the bar/latch of the belt buckle.
  8. Let everything dry. Then paint clear polish over the white sections and
    sprinkle with white or clear glitter, just to add sparkle.
  9. Apply top coat to seal and protect.
That's it... it looks sort of complex, but when you break it down step-by-step, it's really very simple. Lots of designs are, once you break them down! I'd wear this on my own nails right now if they were long enough, but they end about where Santa's belt ends right now. My nubs are SAD!

Remember- if you try a version of one of my designs, leave me a note and a picture! I'd love to see what you do! I know y'all can totally improve on my stuff! :D

Wednesday, December 15, 2010

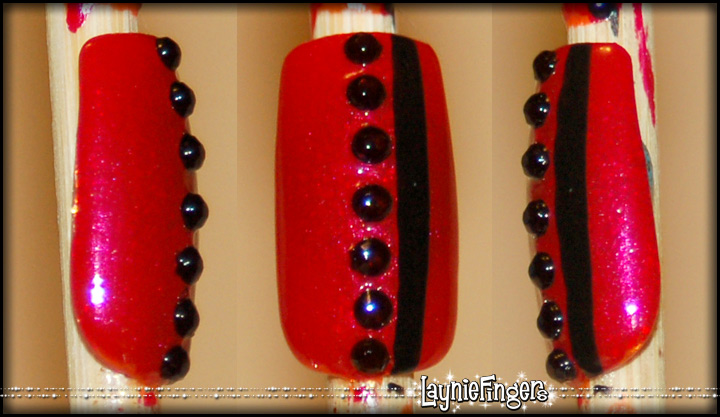
Happy Holidaze the eleventh- All Buttoned Up!

Hiya! Wow, what a day... this has been one of those days that I just can't quite seem to get the hang of.  I've been sleepy all day (go figure), but I managed to accomplish some things, and then went for a drive tonight looking at Christmas lights with my family. That was a lot of fun, except that I don't quite understand some people's holiday decorations.

I mean, take Santa, for example. I understand having lots of decorative deer in your yard, or multiple snowmen. But why would you have seven Santas spread out over a half-acre lot? I just don't get it... it's like there's the Santa by the driveway, and the Santa by the front porch, and the Santa climbing a ladder and the Santa patting a reindeer, and finally the psychotic Santa behind the house chopping up the bad little boys and girls who didn't realize that when they said Santa is watching, they really meant Santa is watching, and he knows if you've been bad!

I know, I digress. But I really do think some people overdo for the holiday. We saw some homes that were so bright it was almost like daylight, with thousands and thousands of lights and animated decorations and just so much STUFF! It seems like overkill, but this is probably just me being a total Scrooge. But seriously- if you have more than one Santa, could you tell me why? What the reasoning is behind it, because I honestly don't get it!


All that babbling aside, here's today's nail art. I'm reminded of a red wool coat with pretty jet buttons up the front! This is (again) a very simple, very bold graphic look that really is easy to do. As you can tell from the graphic, it's a very quick look to put together.
  1. Apply base coat.
  2. Two coats of polish of choice- I chose red.
  3. Apply a black stripe of polish with a thin brush. Let dry.
  4. Apply a line of clear polish down the center of your nail. Then place the black stones in a line alongside the black stripe.
  5. Apply a coat of Seche Vite to secure and protect everything.
So what do you think- is this a look you think you would wear? How would you change it?


The black rhinestones were provided by Viva la Nails for consideration.
See my disclosure statement for more information.

Tuesday, December 14, 2010

Happy Holidaze the tenth- Checks, Please!

Whew, today has been one of those days that seems like it's 48 hours long, and I only got a few hours of sleep. I even ended up falling asleep in the waiting room at my son's doctor appointment! Talk about embarrassing...

So, this will be a short-n-sweet blog for short-n-sweet nails! (Or long nails, whatever, I'm not picky!) Today's nails are checked, using blue, green, and silver. It's very simple to do... paint your base color, then do diagonal stripes one way in one color, then the other in another color.


The process is really simple.

  1. Apply base coat. Always, base coat.
  2. Apply background polish color. This generally means 2 coats, minimum.
  3. Paint evenly-spaced silver stripes diagonally across the nail.
  4. Paint evenly-spaced green stripes diagonally in the opposite direction across the nail.
  5. Apply top coat after stripes have had a few minutes to dry.


See? I like it, I think it's cute, but I'm not sure it looks finished, exactly. Maybe it needs something else on top- a few flowers, or something. Maybe a fleur de lis, since I'm in New Orleans Saints country? What do you think- would you leave it like this or add something to it? What would you add?