Friday, December 17, 2010

Happy Holidaze the Twelfth- It's a Fat Man's Red Suit!

You know, today's design is one of my favorite designs I did for the holidays. It's just so cute, so festive, so FUN! Sometimes you need to head back to the classics, and so I did. I was inspired by Beauty Judy's Santa Nails, only I needed to do them my way. Santa needed some serious sparkle!


That's right- instead of using creme colors like Judy did, I went for super-sparkle. I used my Heaven polish in Ruby for the red because it is absolutely the most gorgeously intense red glitter polish I've ever seen. Everything else was Art Deco stripers in black, white, and silver. The glitter on the white is from the glorious (and messy) glitter samples I wrote about the other day. It looks pretty fab on, doesn't it?

How to make Santa suit nails:
  1. Apply your base coat.
  2. Apply (at least) 2 coats of red polish.
  3. Apply a white strip down the center of the nail.
  4. Apply a white french tip the width of the center white strip.
  5. Paint a thin black band across the center of the nail. This will be Santa's belt.
  6. Make a small silver rectangle across the black band. This will be the buckle on Santa's belt.
  7. Paint a thin silver line starting from the center of the silver rectangle. This will be the bar/latch of the belt buckle.
  8. Let everything dry. Then paint clear polish over the white sections and
    sprinkle with white or clear glitter, just to add sparkle.
  9. Apply top coat to seal and protect.
That's it... it looks sort of complex, but when you break it down step-by-step, it's really very simple. Lots of designs are, once you break them down! I'd wear this on my own nails right now if they were long enough, but they end about where Santa's belt ends right now. My nubs are SAD!

Remember- if you try a version of one of my designs, leave me a note and a picture! I'd love to see what you do! I know y'all can totally improve on my stuff! :D

Wednesday, December 15, 2010

Happy Holidaze the eleventh- All Buttoned Up!

Hiya! Wow, what a day... this has been one of those days that I just can't quite seem to get the hang of.  I've been sleepy all day (go figure), but I managed to accomplish some things, and then went for a drive tonight looking at Christmas lights with my family. That was a lot of fun, except that I don't quite understand some people's holiday decorations.

I mean, take Santa, for example. I understand having lots of decorative deer in your yard, or multiple snowmen. But why would you have seven Santas spread out over a half-acre lot? I just don't get it... it's like there's the Santa by the driveway, and the Santa by the front porch, and the Santa climbing a ladder and the Santa patting a reindeer, and finally the psychotic Santa behind the house chopping up the bad little boys and girls who didn't realize that when they said Santa is watching, they really meant Santa is watching, and he knows if you've been bad!

I know, I digress. But I really do think some people overdo for the holiday. We saw some homes that were so bright it was almost like daylight, with thousands and thousands of lights and animated decorations and just so much STUFF! It seems like overkill, but this is probably just me being a total Scrooge. But seriously- if you have more than one Santa, could you tell me why? What the reasoning is behind it, because I honestly don't get it!


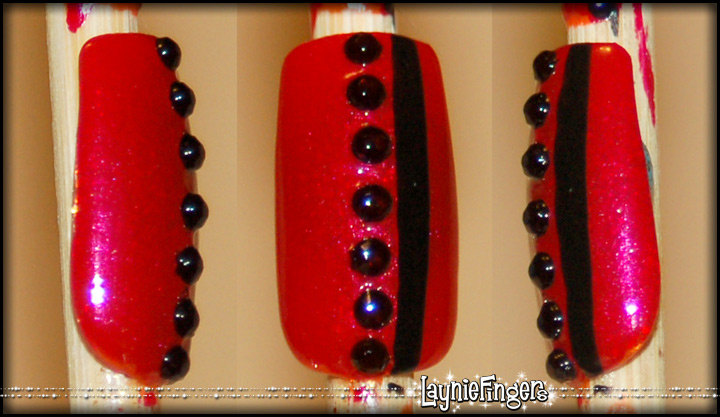
All that babbling aside, here's today's nail art. I'm reminded of a red wool coat with pretty jet buttons up the front! This is (again) a very simple, very bold graphic look that really is easy to do. As you can tell from the graphic, it's a very quick look to put together.
  1. Apply base coat.
  2. Two coats of polish of choice- I chose red.
  3. Apply a black stripe of polish with a thin brush. Let dry.
  4. Apply a line of clear polish down the center of your nail. Then place the black stones in a line alongside the black stripe.
  5. Apply a coat of Seche Vite to secure and protect everything.
So what do you think- is this a look you think you would wear? How would you change it?


The black rhinestones were provided by Viva la Nails for consideration.
See my disclosure statement for more information.

Tuesday, December 14, 2010

Happy Holidaze the tenth- Checks, Please!

Whew, today has been one of those days that seems like it's 48 hours long, and I only got a few hours of sleep. I even ended up falling asleep in the waiting room at my son's doctor appointment! Talk about embarrassing...

So, this will be a short-n-sweet blog for short-n-sweet nails! (Or long nails, whatever, I'm not picky!) Today's nails are checked, using blue, green, and silver. It's very simple to do... paint your base color, then do diagonal stripes one way in one color, then the other in another color.


The process is really simple.

  1. Apply base coat. Always, base coat.
  2. Apply background polish color. This generally means 2 coats, minimum.
  3. Paint evenly-spaced silver stripes diagonally across the nail.
  4. Paint evenly-spaced green stripes diagonally in the opposite direction across the nail.
  5. Apply top coat after stripes have had a few minutes to dry.


See? I like it, I think it's cute, but I'm not sure it looks finished, exactly. Maybe it needs something else on top- a few flowers, or something. Maybe a fleur de lis, since I'm in New Orleans Saints country? What do you think- would you leave it like this or add something to it? What would you add?

Tutorial for The Tinsel Striping Tape Added

Hello, my lovelies. Just wanted to let you know I've added a tutorial process and animated gif to the Happy Holidaze the eighth post about using tinsel as striping tape. So, if you were interested in how I made that work, hop on over and watch the animation. It's a cute little thing, if I do say so myself!

Monday, December 13, 2010

Happy Holidaze the ninth- A-stamping we will go!

Hiya, folks... today's art is a quick one because for some reason I am absolutely wiped out today! Maybe it has something to do with the fact I only slept 1 hour last night... ;)


This is a very simple project, yet beautiful and appropriate for just about anything! A deep blue background is set off by silver stamping. This is further accented by placing a swarovski crystal in the center of the ruffled-looking section. That's it, and it could be changed up easily by choosing any deep jewel-toned polish as a background.

See you tomorrow!!

Sunday, December 12, 2010

Christmas Shopping With Layniefingers!

I can't believe how close we are to Christmas. This year has absolutely FLOWN by! Every year my dad asks me for a list of things I want, and so I've been browsing on the web. I've seen some cute things, both big and small. I figured I'd share some of the cute finds with you!

First off, I am absolutely NUTS about penguins!! Since I don't do so well with cold weather, I've been really digging the fleecy pajama pants. Target to the rescue! Look at this adorable set of Nick and Nora penguin pajamas! OMG, I could die happy in those. Or perhaps you're more into the footed pjs, in which case this set from Pajama City has you covered... totally covered! (ha ha, I crack myself up... totally covered!!)

Ok, maybe you aren't a pajamas kind of person. Maybe you like shiny things, in which case Dreams of Glass should be right your style. They make handmade lamp-worked jewelry that is absolutely stunning. I really, really like this pendant- the blues and purples sparkle in such an eye-catching way. It's pretty, but not over-the-top... it's totally me! Plus, it comes on a totally sweet 1.5mm Sterling Silver Box chain, so you don't have to worry about what to put it on.

Finally, there's the top of the list, the thing I want most but wouldn't really expect anyone to buy for me. Well, except maybe Bill Gates or some other uber-rich celebrity who wants to donate to the poor. *grin* I have had my heart set on a new Nikon DSLR for ages. Don't get me wrong, I would be totally happy with a D5000, which is still pretty expensive but OMG it shoots HD MOVIES!! But if I'm dreaming, why not dream big? Look at the D3X- it is a photographer's wet dream, $8000 worth of it. But omg, it would be so sweet...

So Bill, if you're watching, I've been a very good girl this year! If you wanna play Santa, you know where I am!


Happy Holidaze the eighth- Dollar Tree striping tape?

It's been a crazy time full of alternative sources for nail embellishments here at Layniefingers! I've been absolutely bombarded with ideas lately, and I find myself pulling my notebook out at the strangest times when I have an idea. If I didn't carry my sketchbook with me everywhere, I swear I would get nothing done!

Take today's nail art. I've been interested in experimenting with striping tape for quite some time now, but I'm too frugal to invest in any. Imagine my surprise when I was wandering through my local Dollar Tree and I happened to look over at their Christmas decorations and see the packet of silver holographic tinsel! Gee, self, I thought to myself, that looks surprisingly like striping tape!

Remember, you can click this picture for a larger version!
I picked up a packet and now have enough striping tape to last me the rest of my life! Seriously, this stuff goes a long way! It was very simple to use, too! I did two layers of blue polish (can't remember which blue, unfortunately, but feel free to use whatever color you like), then let those dry. Next I added the sections of tinsel on top of a layer of topcoat, trimming them just past the nail's edge. Once that layer dried, I topped with another layer of topcoat to seal in the tinsel. I also added some rhinestones from the Kiss rhinestones packet I have, using a larger one in the center, then two smaller ones on each side to accent it. Once everything was dried, I used an emery board to file the edges of tinsel off.

EDIT: I made an animated gif to show the process of making this nail, and will describe it step by step as I have for other looks. Remember, all you have to do is ask if I haven't made one!


To create this look:
  1. Use a good base coat. That's always step 1!
  2. Use two coats of your background color. I used Sally Hansen Ultra HD Laser. Let those dry.
  3. Brush on a thin layer of clear polish or topcoat, then add the strips of tinsel as shown in the gif.
  4. Add the rhinestones. Add more clear polish if it dries out too quickly.
  5. Top with a coat of Seche Vite or the topcoat of your choice.


Overall, this was fairly quick and easy, and yet has a fun elegance to it. This is lots of fun for a holiday party, and it would be fun in any color combination! I think this could be especially nice with a deep black or violet. What do you think of this... do you think you'll try some tinsel as striping tape?

Kiss rhinestone pack was provided by the manufacturer for consideration.
See my disclosure statement for more information.